
Olive Oil Pumpkin Cupcakes with Rosemary Buttercream
These lightly spiced olive oil pumpkin cupcakes with rosemary buttercream are a refreshing fall treat. Different and delicious, these cupcakes are easy to make with a few simple steps that are filled with flavor.

Top view of a single cupcake unwrapped.
Pumpkin is a fall staple. You have the pumpkin spice anything, everywhere. So why not take it and make it a little different this year? Like these olive oil pumpkin cupcakes with rosemary buttercream! It's different but still oh so good, and anyone with hankering of a savory sweet dessert will love these!
What You'll Need
Olive oil - To make a cake olive oil based, you only need to replace the vegetable oil with good quality olive oil. The olive oil adds in flavor while adding moisture to the cake.
Pumpkin puree - A very important ingredient for these cupcakes, I just bought a can of Libby's pumpkin puree from my local grocery store.
Rosemary - When making the rosemary buttercream, make sure you get fresh rosemary from the produce section of the grocery store. DO NOT use the dried rosemary in your spice cupboard!!!

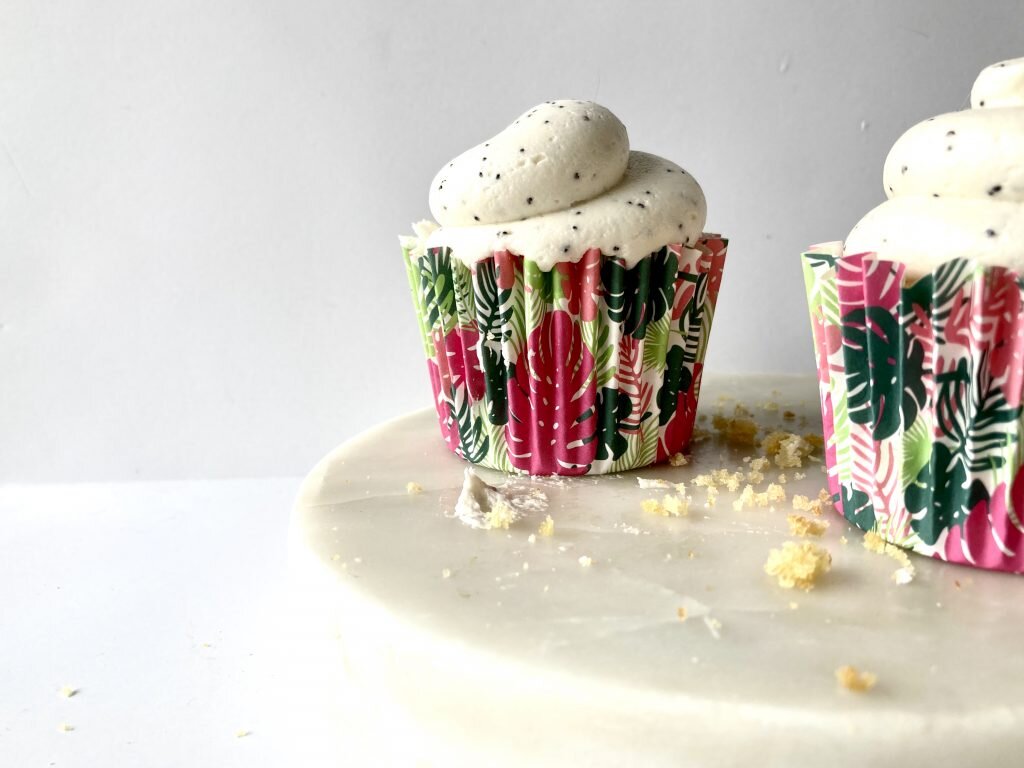
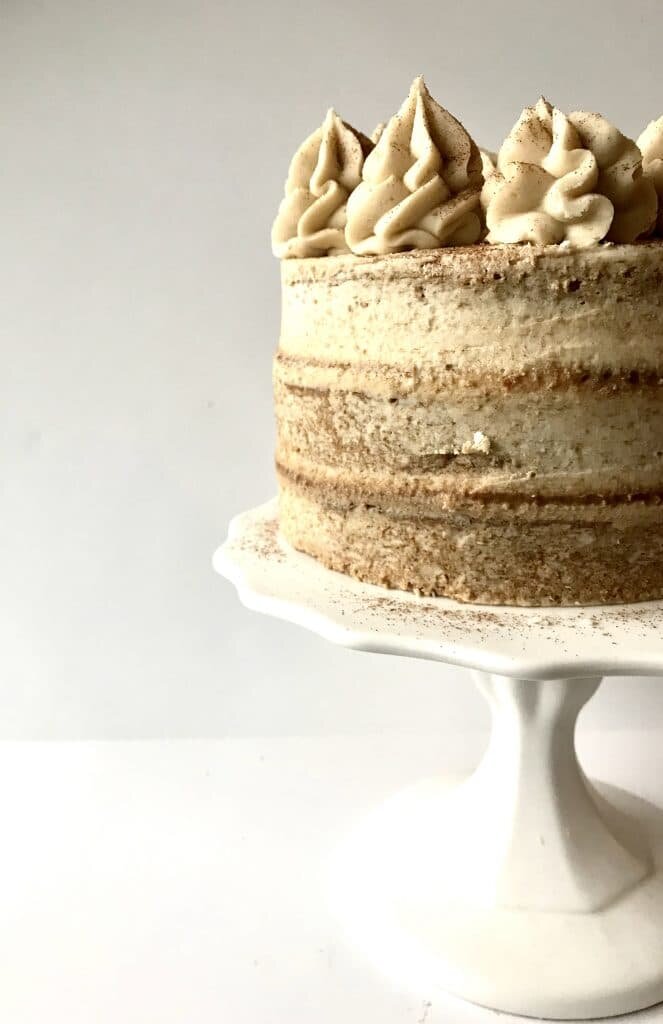
Row of three olive oil pumpkin cupcakes with the rosemary buttercream.
How to make these olive oil pumpkin cupcakes
Combine all of the dry ingredients and sugars into a large bowl.
Using a whisk, mix the dry ingredients together.
In another bowl, combine all of the wet ingredients.
Mix the wet ingredients together with a whisk.

5-6. Pour the wet ingredients into the bowl of the dry ingredients and mix together.
7. Using a cookie scoop, portion the batter into the cupcake tin.

How to make rosemary buttercream
It's incredibly easy to make a simple rosemary buttercream. You just need to make a simple buttercream and then add in some finely chopped rosemary! That's all there is to it.
Make a simple buttercream by mixing butter and powdered sugar.
Remove the rosemary from the stem and finely chop it.
Add into the buttercream and mix it for a minute to incorporate.

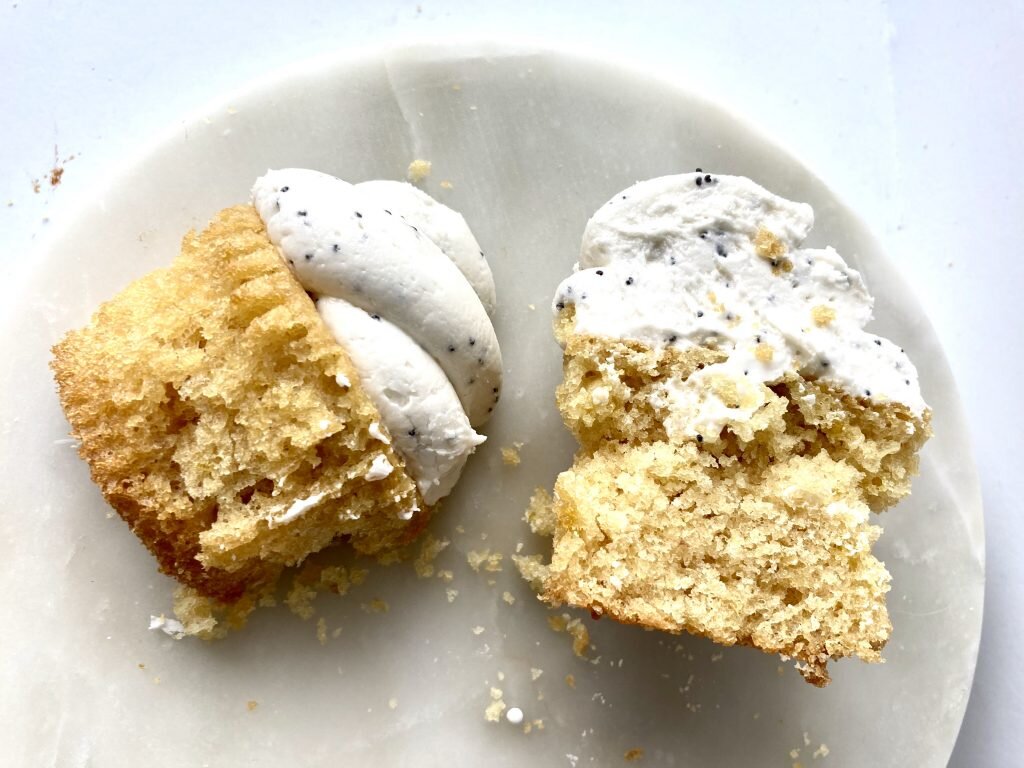
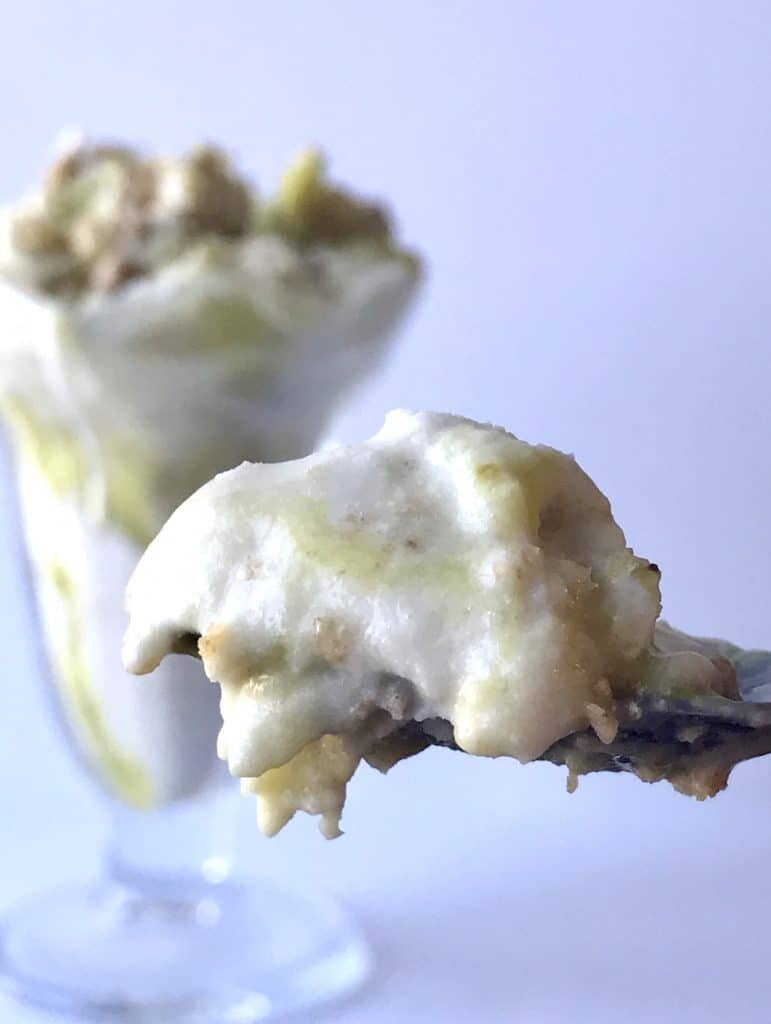
Olive oil pumpkin cupcakes unwrapped and cut open face.
Tips & Tricks
Not sure if you'd like these olive oil pumpkin cupcakes with rosemary buttercream? No worries! You don't have to use olive oil. It can easily be replaced with regular vegetable or canola oil and just be a simple pumpkin cupcake. Not sure about having rosemary in the frosting and think that it might be a bit too weird? You can just skip it completely and make a cream cheese buttercream instead if you want! Either way it will be a delicious pumpkin cupcake!
Other recipes to try!
______________________________________________________________________________________
olive oil pumpkin cupcakes with rosemary buttercream

these pumpkin cupcakes are on the savory side with olive oil and a sweet rosemary buttercream
cupcakes
1 1/2 cup all-purpose flour
1/2 cup granulated sugar
1 tsp baking soda
1/2 tsp salt
1 1/2 tsp cinnamon
1/2 tsp ginger
1/4 tsp cloves
2 eggs
1/2 cup olive oil (you can use canola oil as well)
1 tsp vanilla extract
1, 15 oz can pumpkin puree
1/2 cup milk
buttercream
3 sticks salted butter
4 cup powdered sugar
2 tsp vanilla extract
1-3 tbsp heavy cream
1-2 tbsp finely chopped rosemary sprigs
cupcakes
preheat the oven to 350 degrees F and line cupcake pans with liners. in a large bowl, combine the flour, sugar, baking soda, cinnamon, ginger, and salt and mix until incorporated. in another bowl, combine the olive oil, eggs, vanilla, pumpkin puree and milk and whisk together. pour the wet ingredients into the dry and mix until fully combined. scoop the batter in the cupcake pan and bake for 12-15 minutes or until a toothpick comes out clean. let the cake cool for 10 minutes before frosting.
buttercream
put all of the ingredients into the bowl of an electric mixer fitted with a whisk attachment. start slow and then gradually increase the speed. whip on high until light and fluffy, about 3 minutes. add in the rosemary.

Scooby Doo Haunted Castle Cake Tutorial
This haunted castle cake featuring Scooby Doo and Shaggy is not only easy to make, but is an instant cake that any child or adult will fall in love with. With just a few tools and simple steps, you can create this cake at home too!
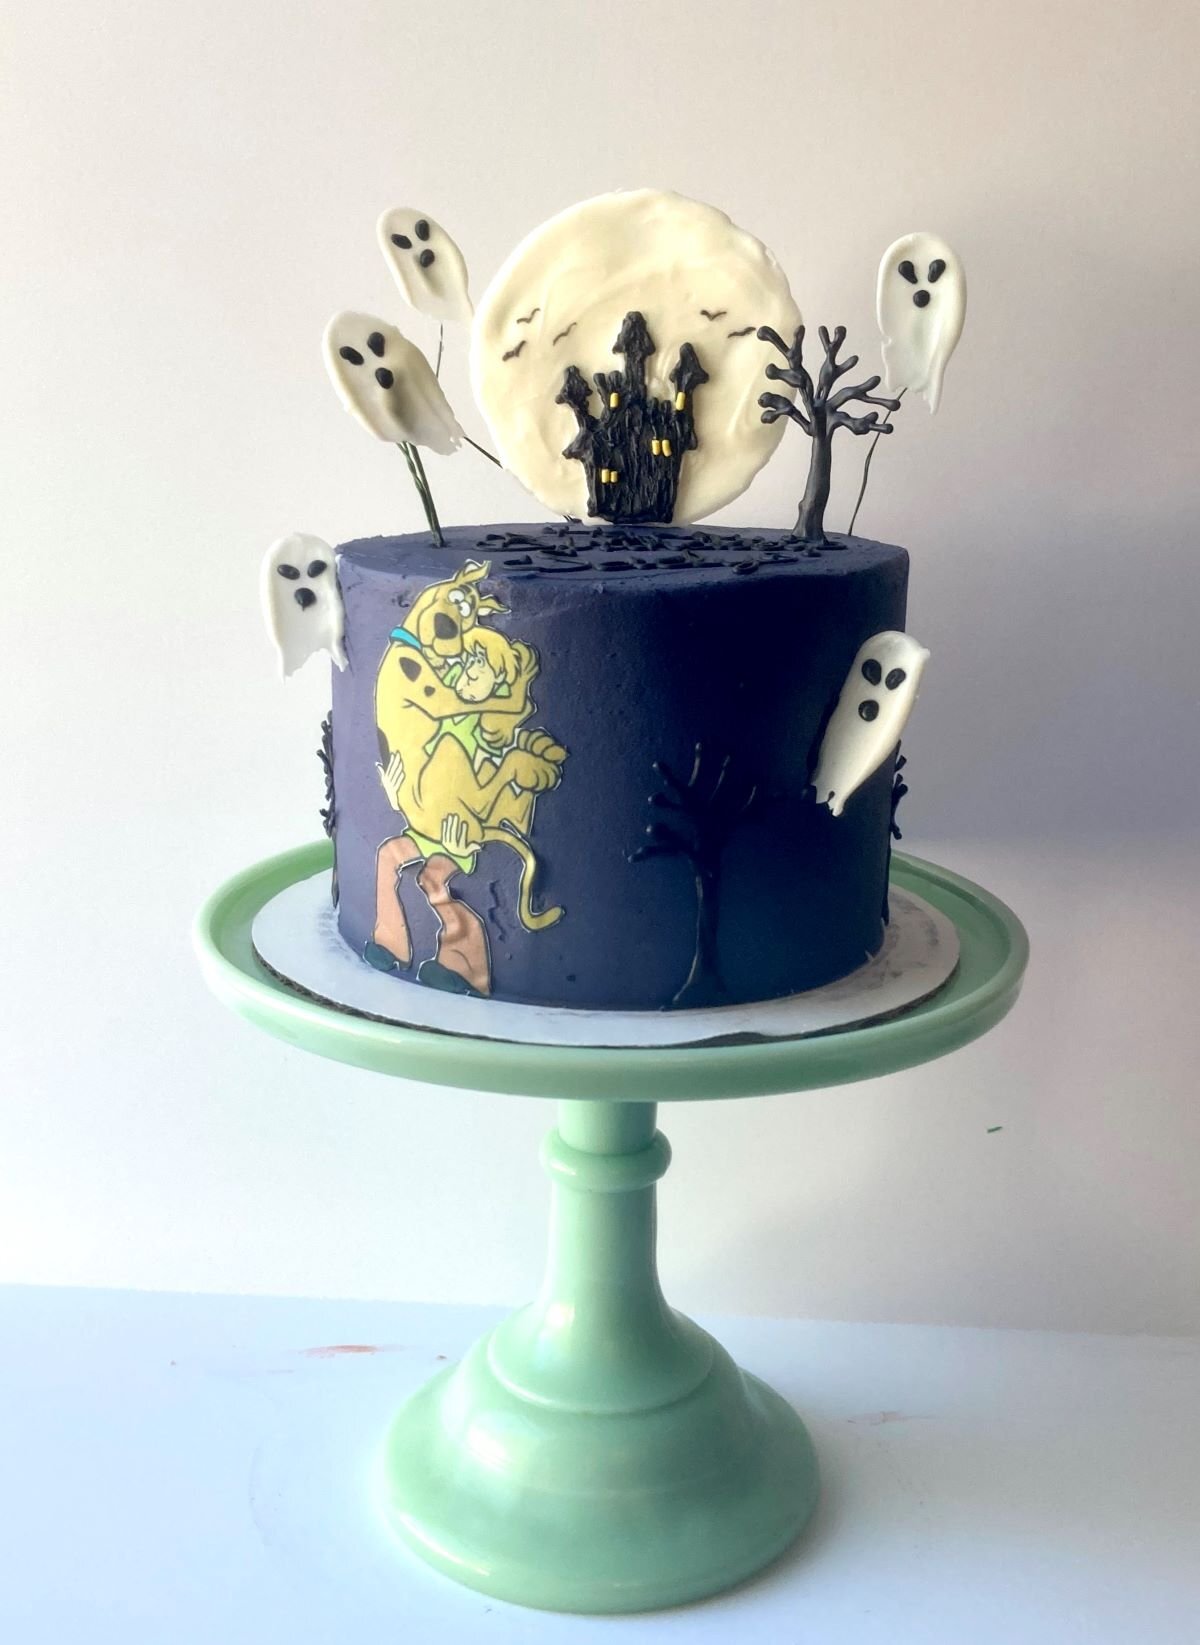
I had so much fun making this Scooby Doo haunted castle cake! My sister requested a birthday cake a few weeks back wanting it to be Scooby Doo themed. Like always, I have to research Pinterest for ideas, which usually ends up being combining 2 or even 3 different cake ideas into one. And then this haunted castle cake came about. Something easy, simple and not difficult to make at all. Just a few simple tools and pieces of equipment that are easy to find at your local craft store.
What You Will Need
- Cake: 3, 6-inch cake layers of your choice of flavor.
- Buttercream: 1 large batch of simple butter cream in a dark purple color.
- Black candy melts
- White candy melts
- Yellow jimmy sprinkles
- Floral wire
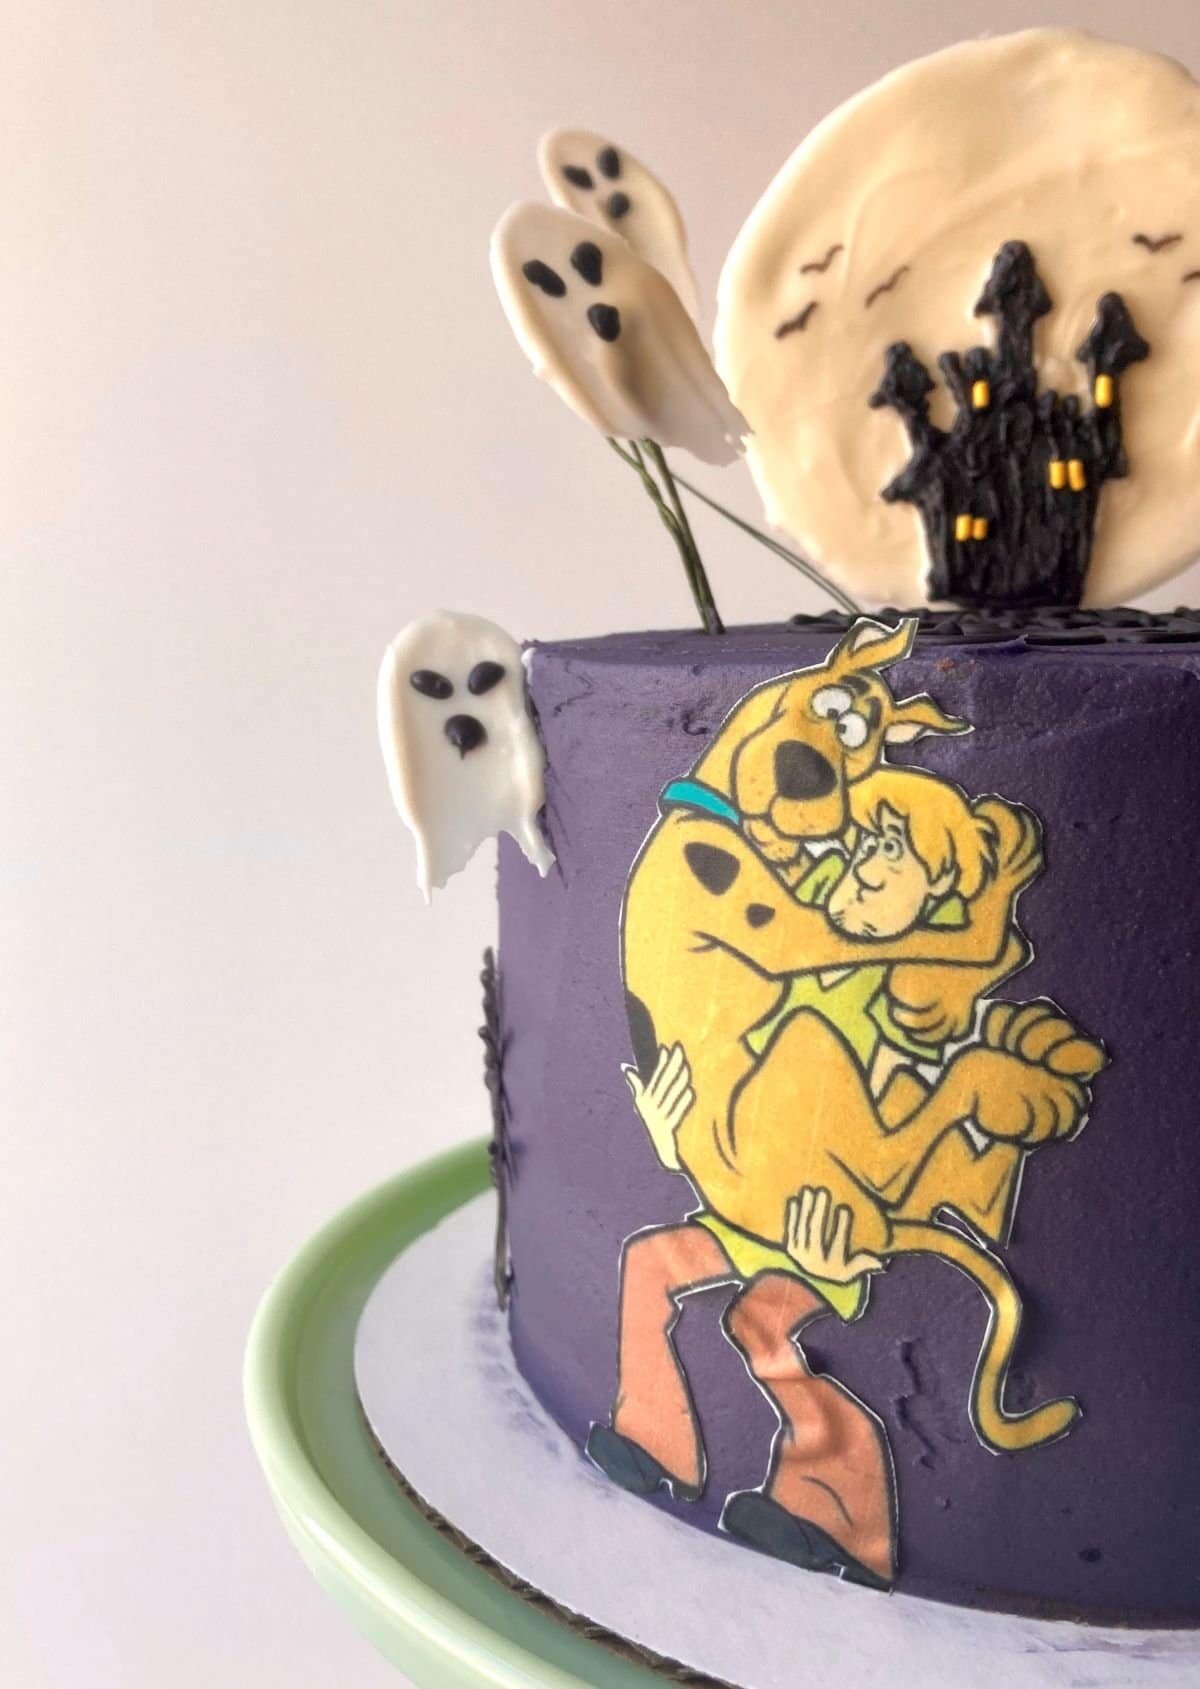
- Edible images of Scooby and Shaggy (optional).
How to Make This Haunted Castle Cake
Making this cake is really only a few simple steps that requires using candy melts! It's easy, straightforward, and customizable too! All you need is a few tools and some wax paper to get your chocolate decorations just right!
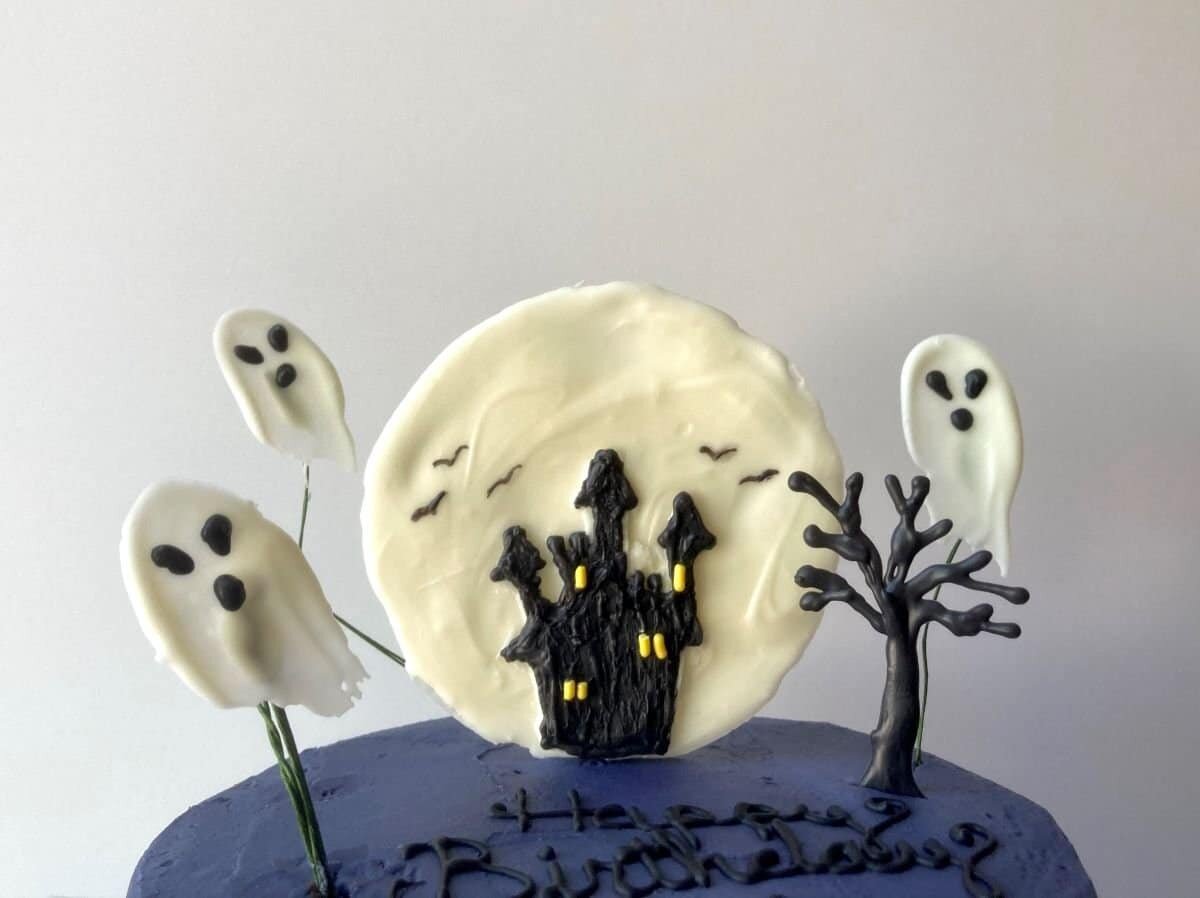
How To Make The Moon & Haunted Castle

- Melt the white candy melts and create a large round, about 4-5 inches in diameter.
- Melt the black candy melts and free hand a castle.
- Add some yellow jimmy sprinkles to the castle for the lights.
- When dry, flip over and place the large lollipop stick to the back of the chocolate moon and glue it with more chocolate.
How To Make The Ghosts

- Place a small dime size of melted white candy melts on some wax paper.
- Take a small offset spatula and place on the chocolate and drag down.
- Take a small piping bag of black candy melts and pipe a ghost face.
- Glue the floral wire to the back of the ghost.
Tips & Tricks
- Take the black candy melts and free hand some spooky trees to help bring the cake together even more! You can even add in some classic Scooby Doo spooky eyes to the side of the cake too.
- On the chocolate "moon", you can take a small paint brush and some black food color and paint on some bats for an added effect and to make the castle pop!
- If you don't have a way to get any edible images of Scooby Doo and Shaggy, then you can completely omit it. The cake will still look absolutely amazing either way! Or you can pipe it out using candy melts and a printed image as a stencil to place on the side of the cake instead!
Other Recipes You May Like
Scooby Doo Ice Cream Sandwiches
Scooby Doo Haunted Castle Cake
A easy cake tutorial on creating a haunted castle scene made with candy melts, featuring Scooby Doo and Shaggy.
- 1 cup white candy melts
- 1/2 cup black candy melts
- 1 cake (3, 6-inch layers)
- 1 batch buttercream (colored dark purple)
-
Frost your choice of cake with the dark purple buttercream. Let chill until the buttercream has set.
Chocolate Moon & Haunted Castle
-
Place a piece of wax paper on the counter. Melt the white candy melts in a piping bag, in 15 second intervals, until melted. Pipe out a large round, about 4-5 inches in diameter. Let set.
-
Melt the black candy melts in a piping bag and free hand a castle on top of the chocolate "moon". Before the chocolate starts to set, place the yellow jimmy sprinkles to resemble the windows of the castle. Let set.
-
Take the large lollipop stick or skewer and glue it to the back of the chocolate "moon". Let set.
Chocolate Ghosts
-
For the chocolate ghosts, pipe dime size rounds of the white candy melts on wax paper. Take a small offset spatula or a butter knife and gently place on top of the chocolate and drag down. Let set.
-
Take the black candy melts and pipe on the faces of the ghosts. Let set.
-
Using the floral wire, gently flip the chocolate ghosts over and glue the floral wire to the back of them using a little more white candy melts. Let set.
Assembly
-
To assemble, carefully place the lollipop stick with the chocolate "moon" into the cake.
-
Carefully take the chocolate ghosts on the floral wire and place randomly on the cake.
-
If you have edible images of Scooby and Shaggy, then carefully brush the back of the image with some corn syrup and place on the cake.

Alien Cake Pops

Out of this world alien cake pops makes for a fun treat this Halloween! Easy to make with only a few ingredients and steps to create these fun cake pops.

Cake pops are all the rage these days as they are a easy, handheld treat that comes in all shapes and colors. Kids love them with all of the fun designs that the cake can be molded into, like these aliens!
I went on a crazy chocolate mold shopping spree awhile back and I had saw this alien mold. When I saw it I knew that I had to buy it! It's meant to be a chocolate lollipop mold, but that doesn't mean you can't get creative with it. That's when I thought of making them into alien cake pops!

What You Need
- Chocolate mold: You will need this alien chocolate mold.
- Lollipop sticks
- Cake: Bake whatever kind of cake you like! It can be your family's favorite from scratch or just a simple box mix.
- Frosting: You will need a small batch of simple buttercream. You can always use store bought frosting too.
- Candy melts: Green and black candy melts are the main colors that you will need, but you can always use a different color.
How to Make the Alien Cake Pops
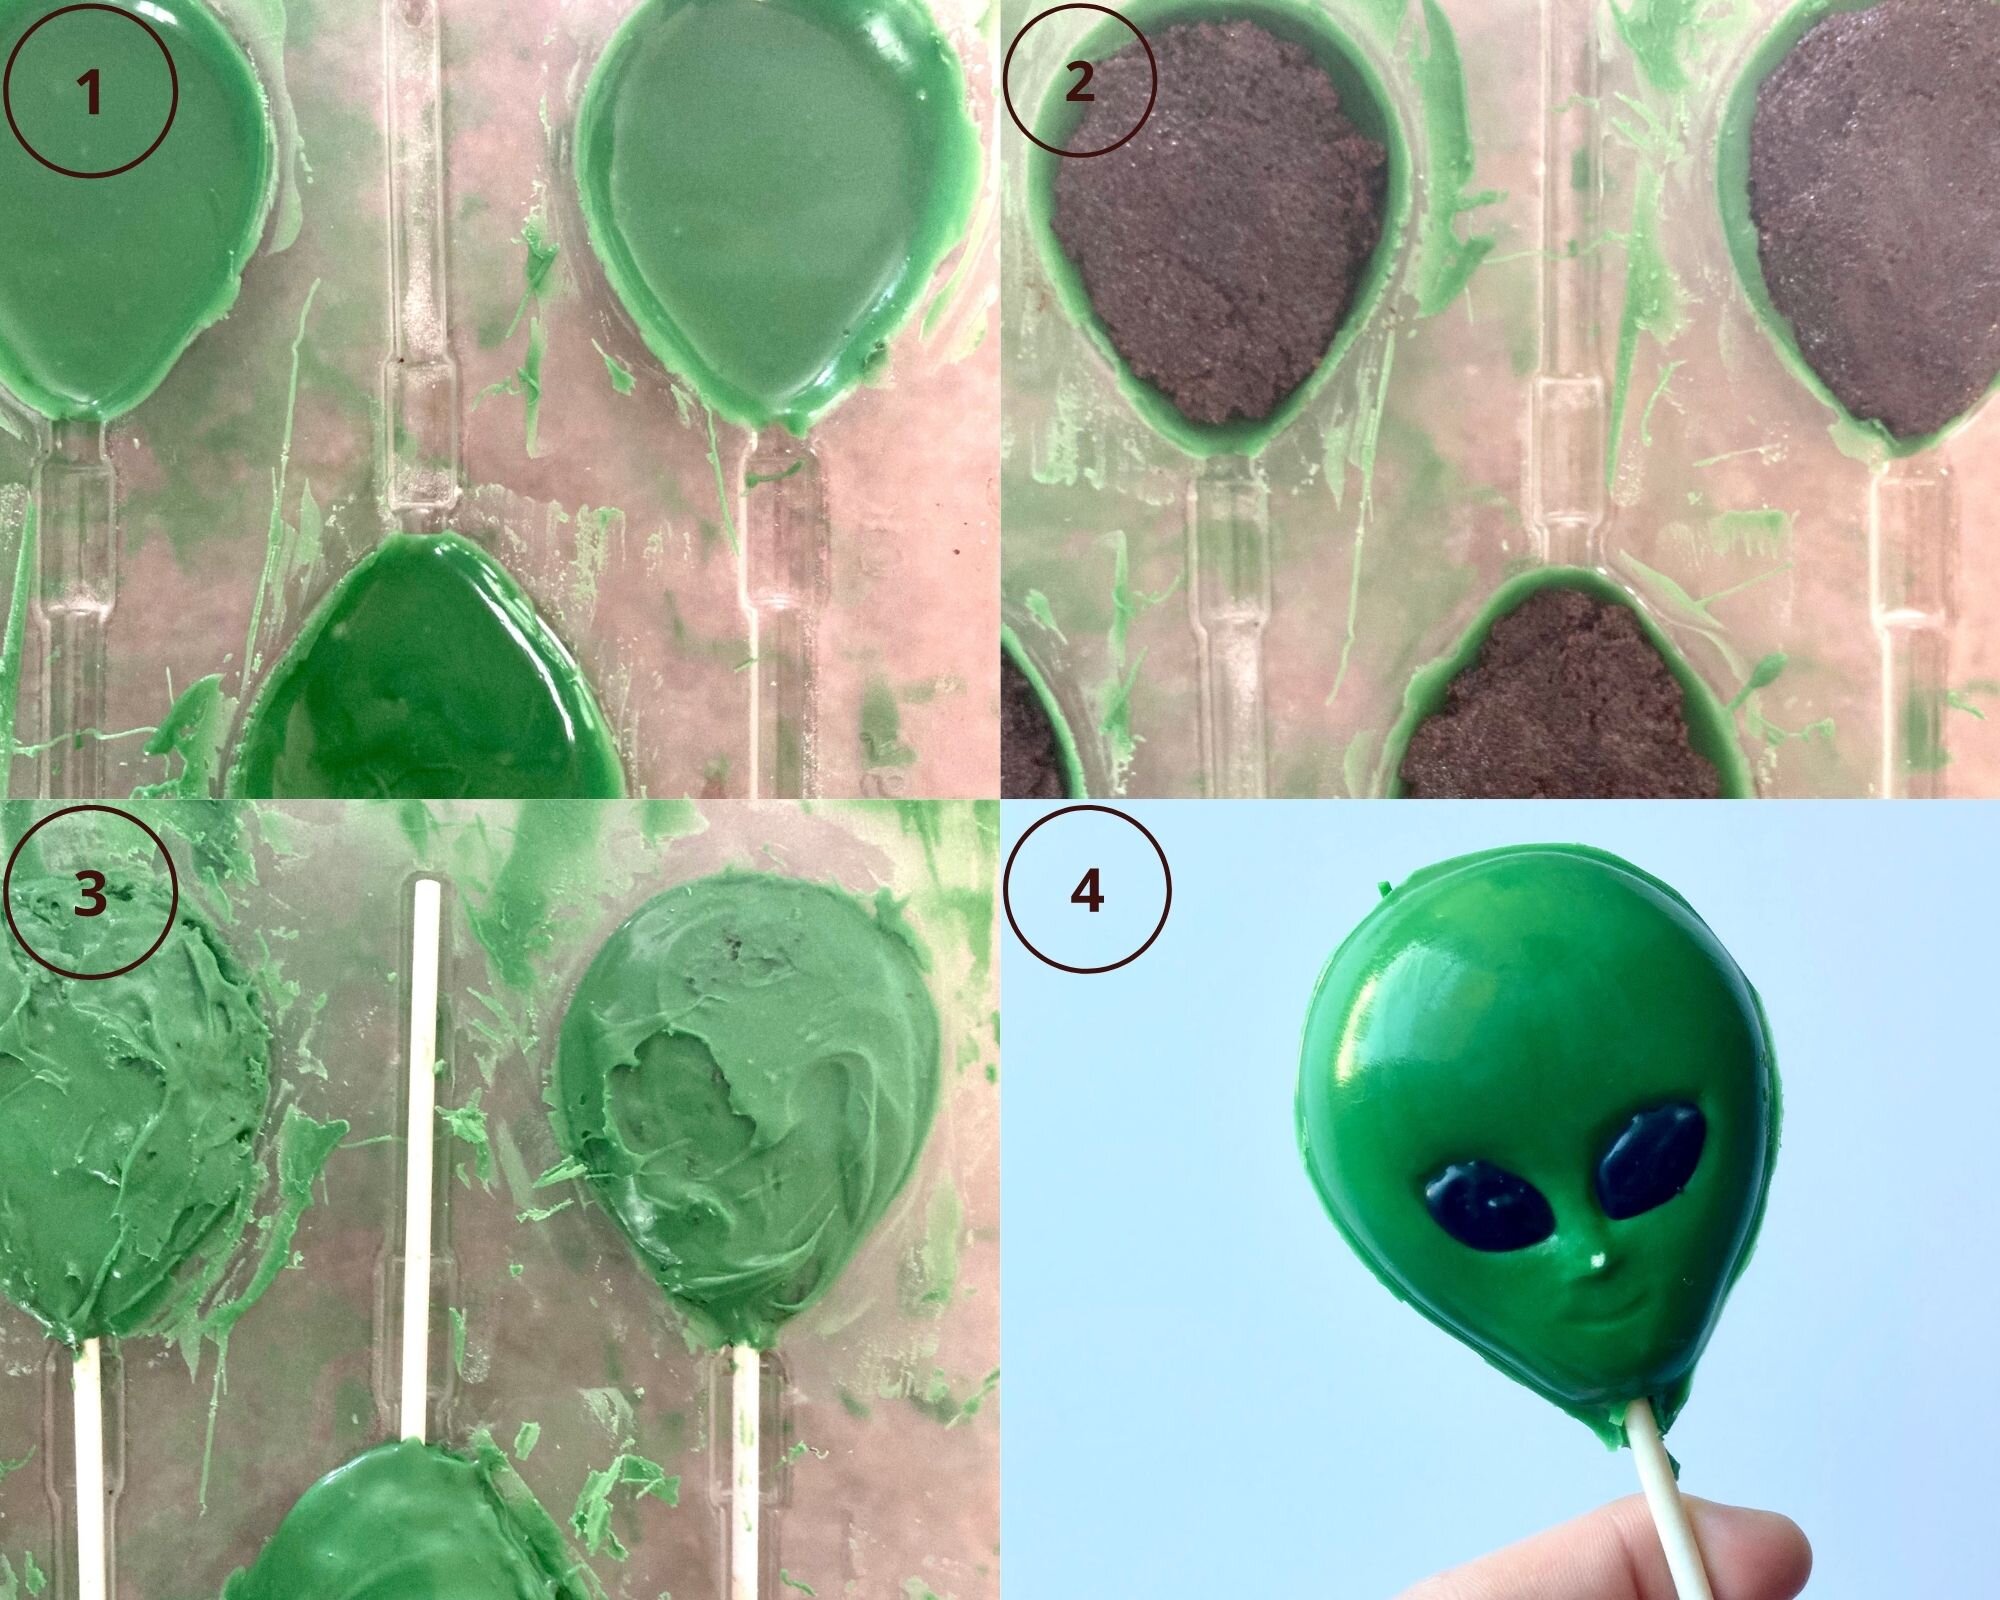
- Start by melting the candy melts and putting a little into each mold and spreading it around to create a nice smooth base.
- Fill each mold 3/4 of the way with the cake pop mixture.
- Top with more chocolate and let harden.
- Remove the alien cake pops from the mold and add the details with the black chocolate.
Tips & Tricks
- Tap the mold against the counter to create that nice smooth finish for when you take the cake pop out of the mold.
- Make sure not to fill it too much with the cake mixture or else when you add the rest of the chocolate it won't get that flat surface, but it doesn't have to be perfect either.
- You can always add in the black chocolate details beforehand. Just take a small piping bag and pipe in the details. Let it harden and then continue following the rest of the steps to make these cake pops.
Other Recipes You May Like
Vanilla Cake with Pumpkin Spice White Chocolate Ganache
Alien Cake Pops

Cake pops made in the shape of alien faces with the help of a chocolate mold.
- 1 bag green candy melts
- 1/4 cup black candy melts
- 1 cup frosting
- 1 cake (baked in a 8x8 inch pan)
-
Take the cake and crumble it up. Add in the frosting and mix it up until the cake starts to stick together easily and can be formed into balls. Cover and set aside.
-
Melt the green chocolate and spread a thin layer into each mold. Let set.
-
Add in enough cake pop mix to fill up 3/4 of the mold. Insert the lollipop sticks and cover it with the cake.
-
Top with more chocolate and let set until firm.
-
Once firm, carefully remove from the mold and add in the details of the eyes with the black chocolate.
This can be time consuming if you only buy 1 chocolate mold. You can always make cupcakes and use a few cupcakes instead of making a cake for these cake pops.

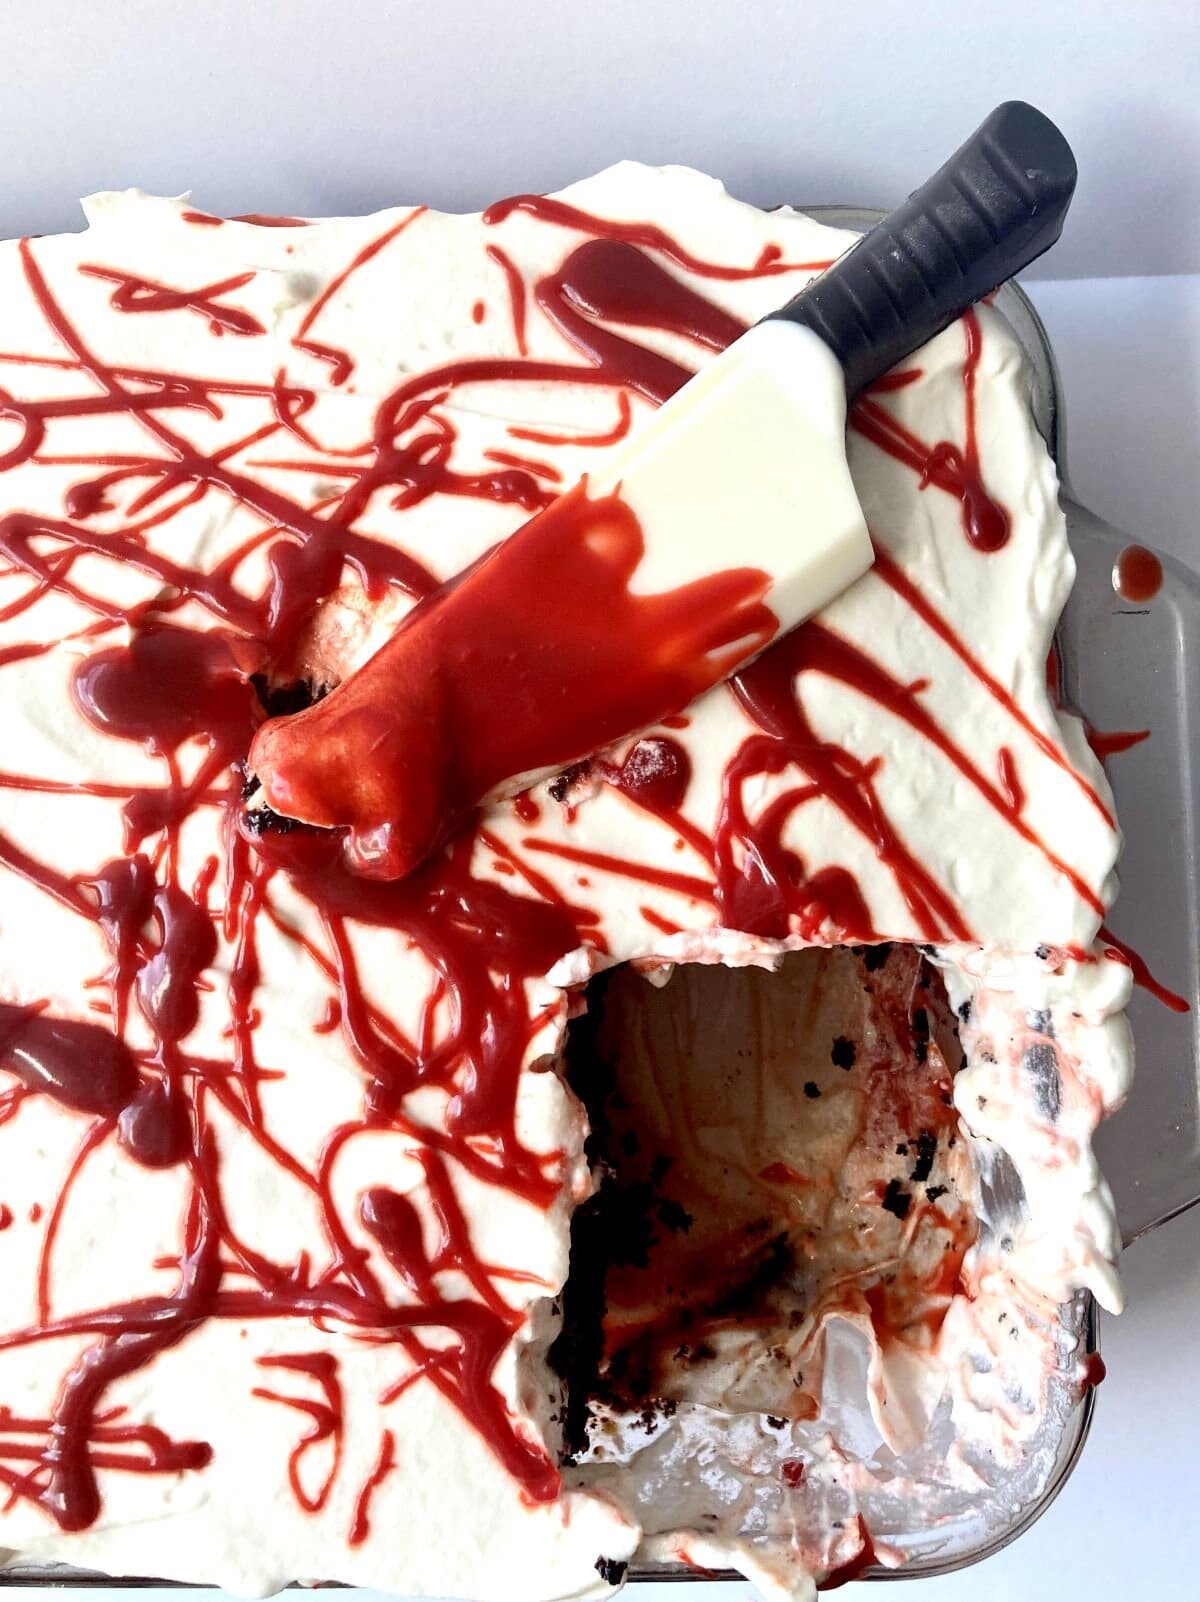
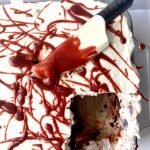
Butterfinger Poke Cake

This Butterfinger poke cake is filled with caramel, sprinkled with crushed Butterfinger candies and topped with a smooth layer of fresh whipped cream. It's easy to make and a crowd pleaser favorite!
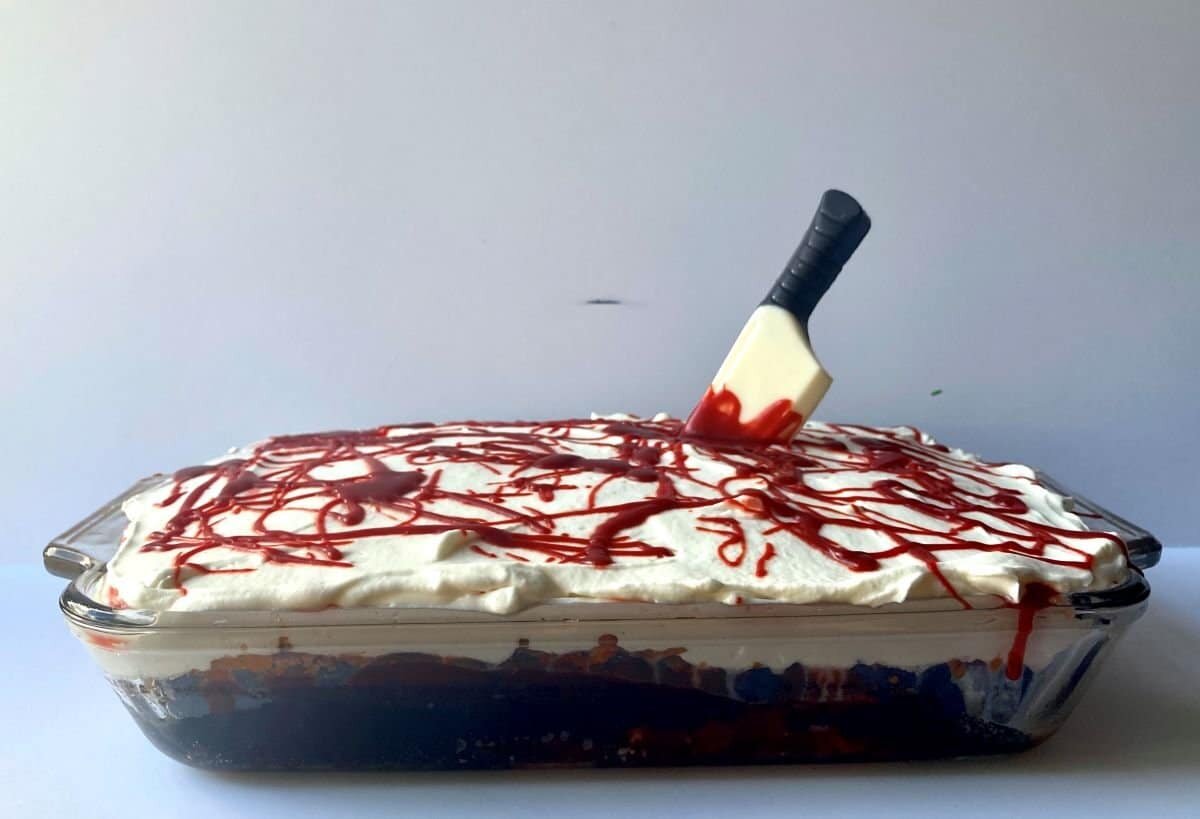
It’s almost Halloween and although this year hasn’t been the best, it doesn’t mean that you can’t celebrate a fun holiday! Grab your Scream mask from your hallway closet and show off this fun Butterfinger poke cake!
I made this Butterfinger poke cake into a gory scene by simply adding some red food color into the caramel sauce. It’s so easy and simple to make this cake as well. You can use just plain old box mix cake or go all out and make it from scratch! I highly suggest making homemade caramel sauce for this cake though. It amplifies the flavor and makes it easier to add in the red food color.
What You'll Need
- Chocolate sheet cake- you can use this recipe or you can use your favorite. Box mix works too!
- Caramel- this is important to make the cake flavorful and moist!
- Candy- I used Butterfingers but Heath bars would work really well with this too.
- Whipped cream- adding whipped cream to the top of this cake brings it to a whole new level.
How to Make This Butterfinger Poke Cake
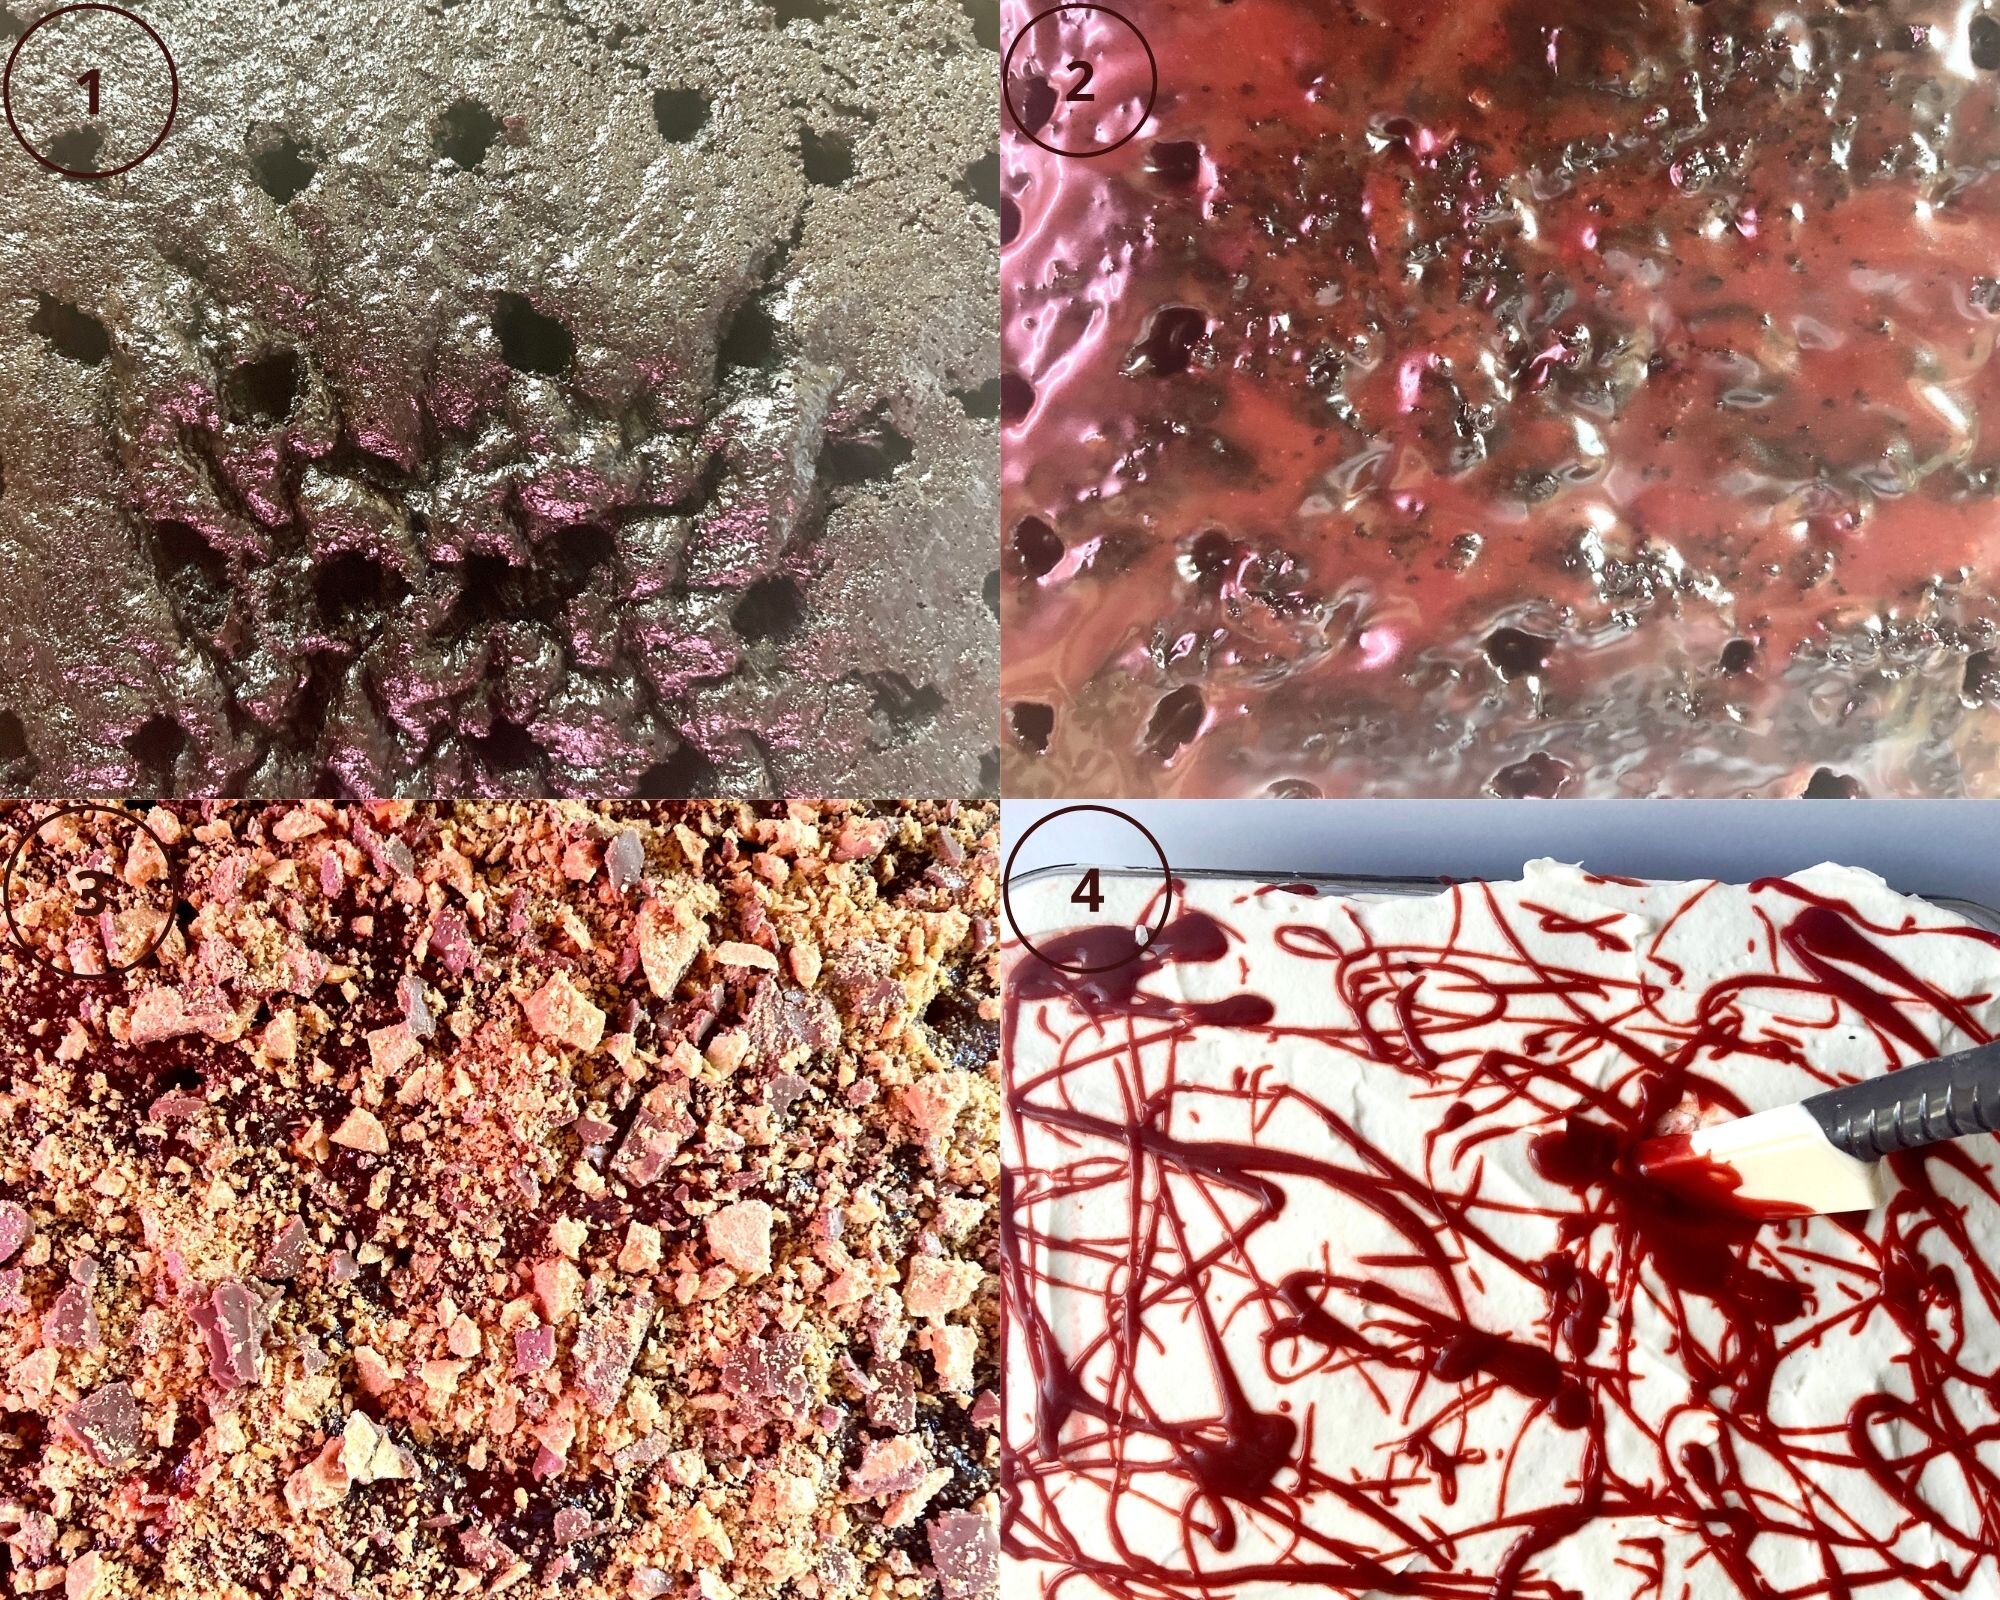
- Take your baked sheet cake and using either a large straw or a thick skewer, poke holes all throughout the cake.
- Pour the caramel over the cake, ensuring that it soaks into the holes of the cake.
- Take the Butterfinger candy and smash it into pieces. Sprinkle it all over the top of the cake.
- Spread the whipped cream over the top of the cake. You can then drizzle with more caramel and more candy pieces.
Tips & Tricks
To make this Butterfinger poke cake for Halloween, you simply just tweak one thing. The caramel. Just simply add in some red food color so it resembles blood and then add a chocolate knife on top to complete the murder scene.
Other ways to change it up is to use Heath candy bars instead of Butterfingers. It will add more of a crunch and a toffee flavor, but will still be delicious!
Other Recipes You May Like
Butterfinger Poke Cake
Chocolate cake that is soaked with a caramel sauce, topped with Butterfinger candy and fresh whipped cream.
Cake
- 3/4 cup all-purpose flour
- 3/4 cup granulated sugar
- 1/2 cup cocoa powder
- 1 tsp baking soda
- 1/2 tsp salt
- 2 eggs
- 2 tsp vanilla extract
- 1/2 cup oil
- 1/3 cup sour cream
- 1 cup buttermilk
Caramel Sauce
- 1/4 cup water
- 1/4 cup light corn syrup
- 1 cup granulated sugar
- pinch salt
- 2 tbsp unsalted butter
- 1 tsp vanilla extract
- 1/2 cup heavy cream
Topping
- Butterfinger candy (crushed)
Whipped Cream
- 1 cup heavy cream
- 1/2 cup powdered sugar
- 1 tsp vanilla extract
Cake
- Preheat the oven to 375*F and grease and line a 9.25 x 13.25 inch pan. In a large bowl combine the flour, sugar, cocoa powder, baking soda, and salt and mix to combine. In another bowl combine the eggs, oil, sour cream, buttermilk, and vanilla and whisk together. Slowly add the wet ingredients to the dry and mix to combine. Pour the batter into the prepared pan and then sprinkle as much chocolate chips as you want on top of the batter. Bake for 30-35 minutes or until a toothpick comes out clean in the center (although be careful to not mistake melted chocolate chips for batter). let the cake cool completely.
Caramel Sauce
-
Place the water, corn syrup, and sugar into a small sauce pot and place over medium high heat. Bring to a boil until the sugar starts to caramelize and turns a light brown, about 10 minutes.
-
Remove from heat and add in the butter. Mix until the butter is fully incorporated. Then slowly pour in the heavy cream, whisking at the same time. Once the heavy cream is fully added in, mix in the vanilla and salt.
Whipped Cream
-
Put all of the ingredients into the bowl of a stand mixer fitted with a whisk attachment, Whip on high until stiff peaks form.
Assembly
-
Take a straw or a thick wooden dowel and poke holes into the cake. Pour The caramel over the cake so that it soaks through completely. Sprinkle with the Butterfinger candy and then top with the whipped cream.
To make the cake gory, add in 1-2 tsp of red food color into the caramel sauce when you add in the heavy cream.
Reserve 1/4 cup of the caramel sauce to splatter the top of the cake with.
Decorate with a chocolate knife or even fake vampire teeth!

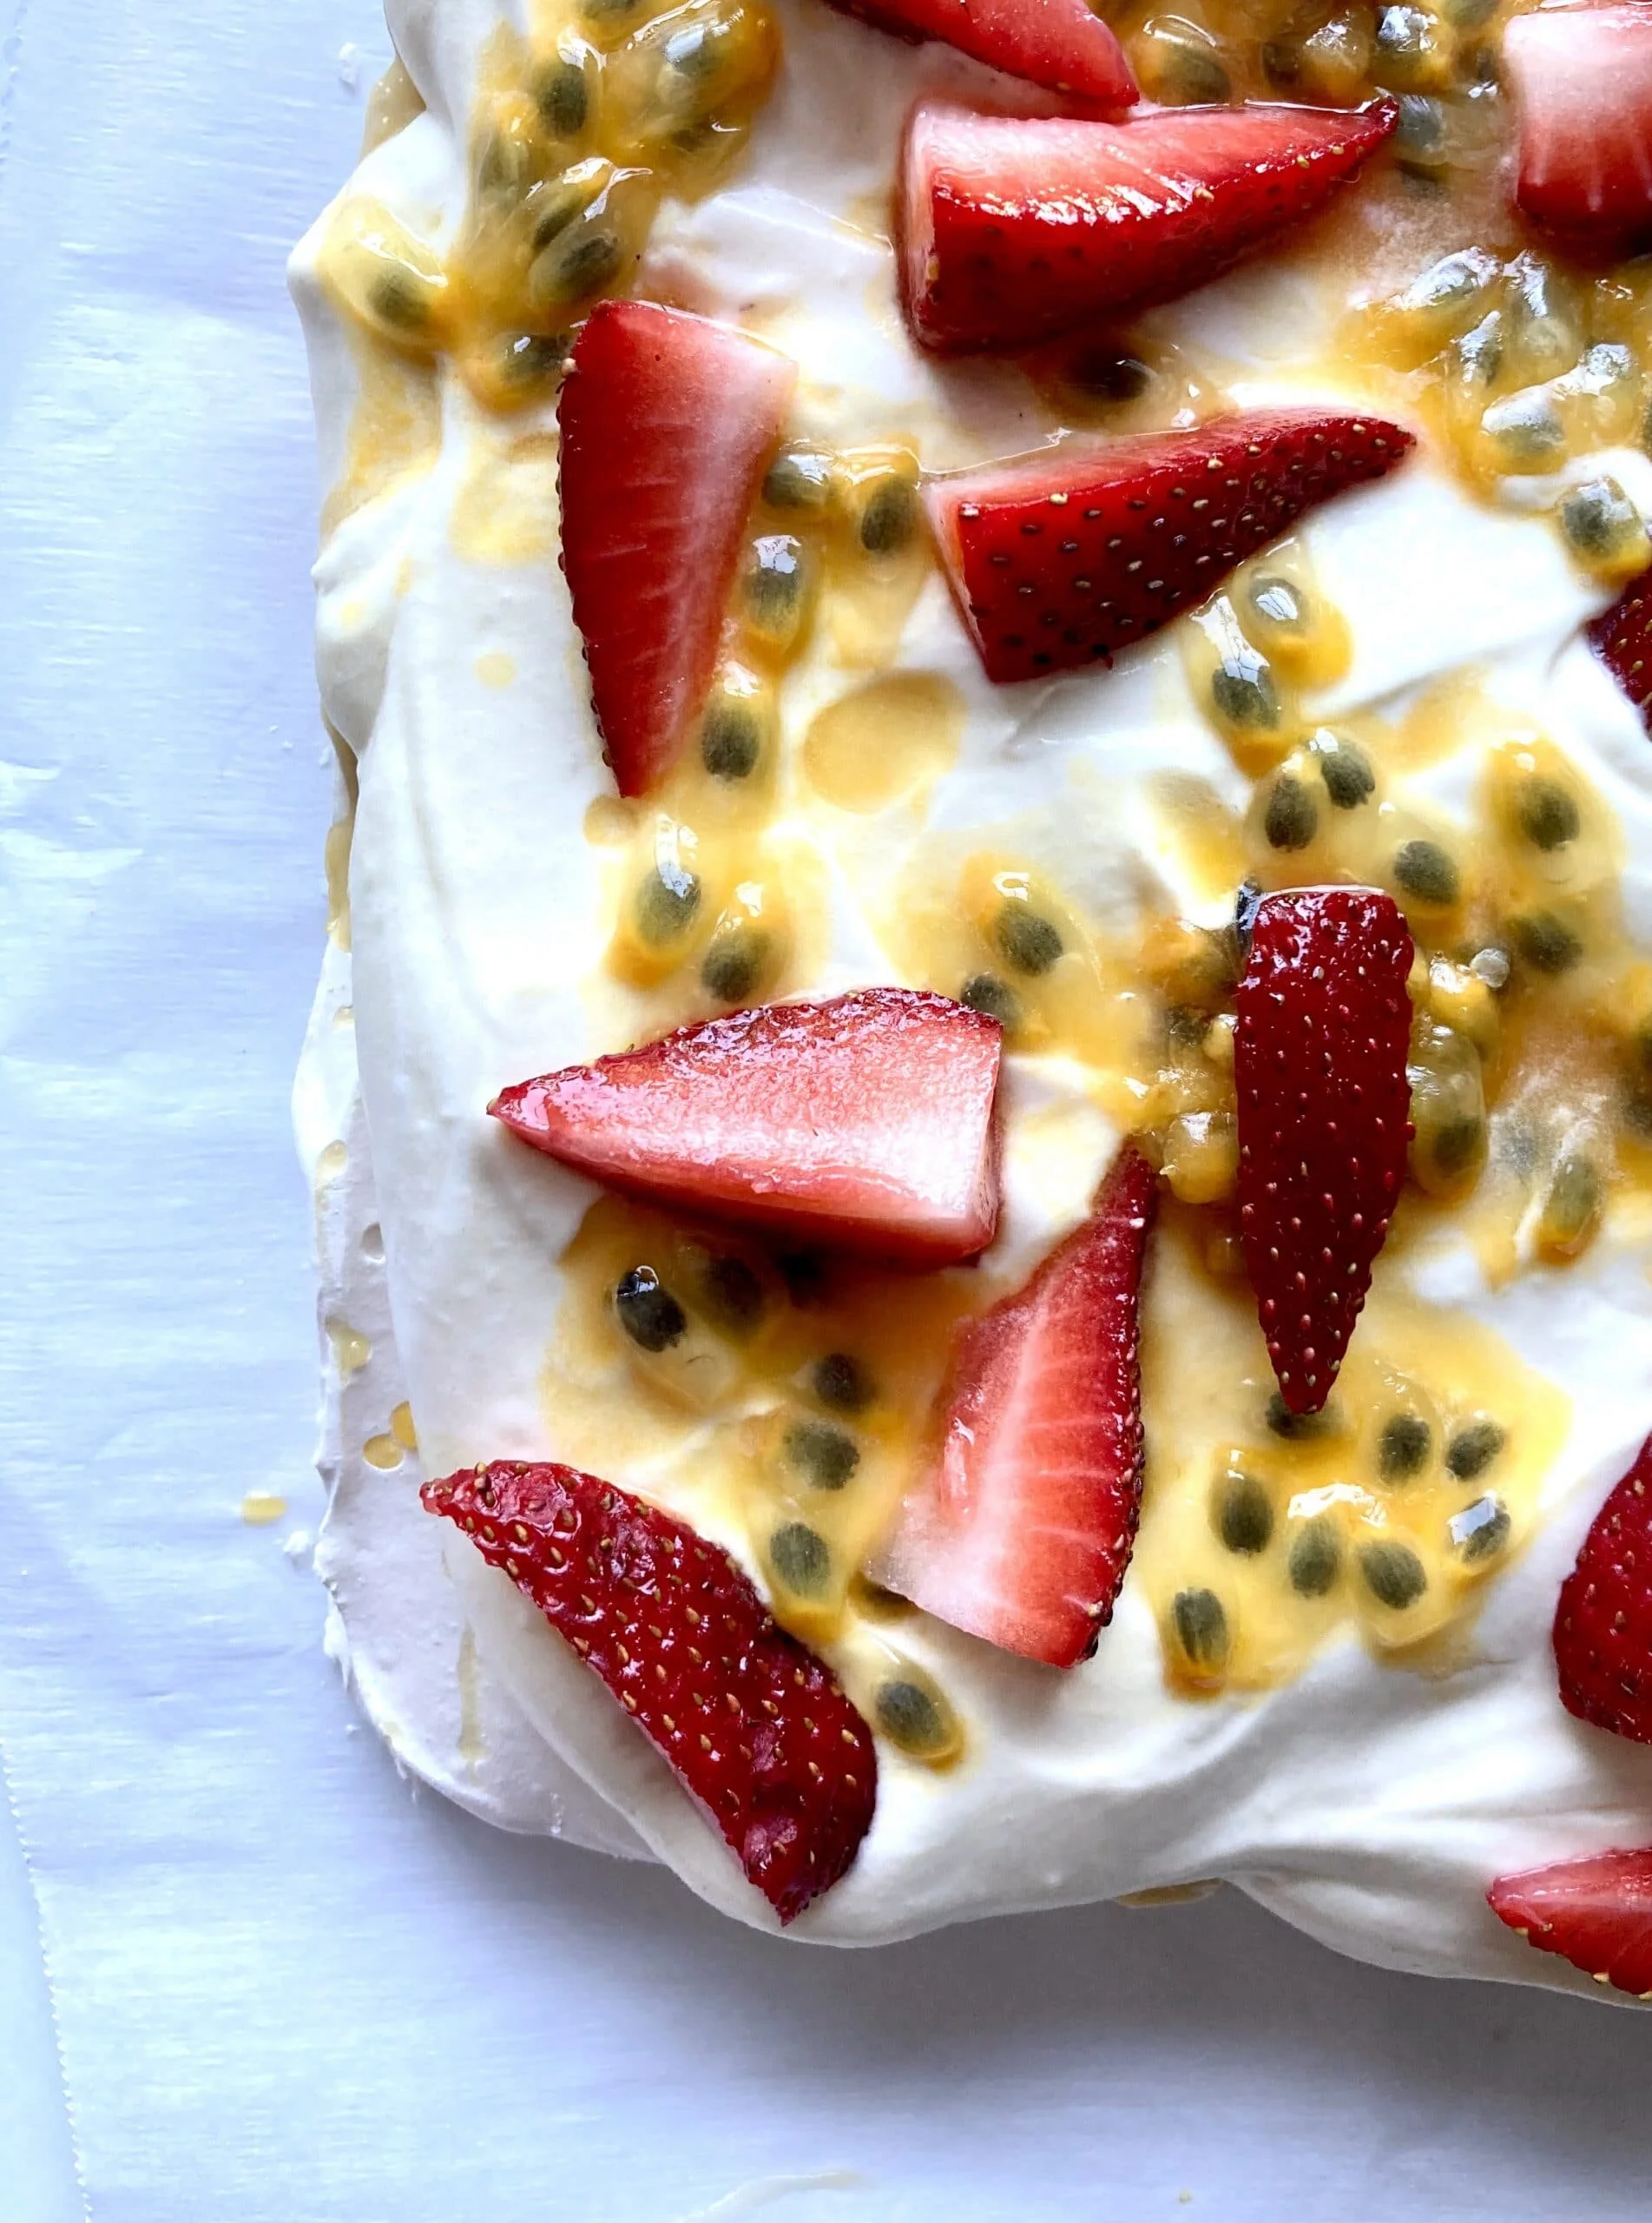
Passion Fruit Pavlova

*Disclaimer: This post contains affiliate links. To learn more, please go here.
This passion fruit pavlova is creamy, tart, and light. It's also incredibly easy to make! All you need is some egg whites and sugar to make a meringue, some whipped cream and fruit! It's that easy!
I made a lemon whipped cream and then topped it with fresh passion fruit and strawberries. Makes it perfect for summer because it's not a heavy dessert for a hot day.
Change it up!
I know that passion fruit isn't easy to find, but what's great about pavlova is that you can use whatever kind of fruit you'd like. Top it with blueberries, raspberries, pineapple or even kiwi. Literally you can add whatever your favorite fruit is on top of a pavlova.
Edible printing
Want to learn how to get images onto cookies and even cakes and chocolates? Then check out my new online edible printing course that will guide you through everything you need to know about edible printing, from start to finish! You won't regret it! Not too sure if you want to buy something so pricey if you aren't sure you'd like it? Ten you can certainly check out my array of edible paper images you buy and try out before making such a huge purchase. You can even buy these images here in my shop!


Products I recommend


Above are some products that I personally use and recommend for this recipe and to have for everyday use. One I highly suggest is the silpat. This is a great tool to have in your kitchen! It may be on the expensive side but it's a reusable alternative to parchment paper and is worth the investment.
passion fruit pavlova
light and airy pavlova topped with lemon whipped cream and fresh passion fruit and strawberries
pavlova
- 5 egg whites (room temp)
- 1 1/4 cup granulated sugar
- pinch salt
- 1 tsp vinegar
- 1 tbsp cornstarch
lemon whipped cream
- 1 1/2 cup heavy cream
- 1/2 cup powdered sugar
- 1 tsp vanilla
- 1 tbsp lemon zest
- 2 tbsp lemon juice
- 3 passion fruit (pulp scraped out)
- 1/2 cup strawberries (quartered)
pavlova
-
preheat the oven to 350 degrees F and line a sheet pan with parchment paper. in the bowl of an electric mixer, whip the egg whites until foamy and then add the cream of tartar. continue whipping on high until soft peaks start to form and then gradually add in the sugar and whip until stiff peaks form and the meringue is nice and glossy. add in the cornstarch. put the meringue onto the sheet pan and form into a mound. turn the heat down to 235 degrees F and bake for 2 hours. turn the heat off and leave in the oven for 20 minutes. open the oven door slightly and let cool for an additional 2 hours or over night.
-
I made 2 pavlova shells by splitting the meringue in half and baking them on separate sheet pans and adding one sugar sheet on one of them before baking. but you can make one large pavlova instead if you'd like.
lemon whipped cream
-
add all of the ingredients into the bowl of a stand mixer fitted with a whisk attachment. whip until stiff peaks form and spread on top of your baked pavlova. top with fresh fruit.

Birthday Cake Ice Cream Sandwich


*Disclaimer: This post contains affiliate links. To learn more, please go here.
Birthday cake ice cream sandwiches. May I need say more? I think not. These ice cream sandwiches are so good by the way. The ice cream is a basic vanilla base with some birthday cake extract mixed in. But what makes it fun, is the swirls of pink buttercream in it and the French macaron cookies holding it all together.
The buttercream gives it that actual birthday cake feel and adds in a little texture and flavor. While the French macaron cookies gives it more of a fancy twist, with the chewy yet delicate cookie, it makes this ice cream sandwich complete. Go here to get the French macaron recipe!
Change it up!
Not wanting to go all fancy with the French macarons? Don't worry about it, those little cookies may be delicious but they can be a handful to make with the outcome being 50/50 success.
Instead use whatever cookie you'd like! Make some sugar coated sugar cookies and use those! Or just go to the grocery store and get those addicting soft frosted cookies in the bakery and use those instead of swirling buttercream in the actual ice cream. Makes it a little easier for the busy folk! I won't judge either, because now I'm tempted to do that myself!


Products I recommend


Above are some products that I personally use and recommend for this recipe and to have for everyday use. I highly suggest the ice cream maker that I listed above. It's cheaper than others and it does it's job just like the other's. It's also easy to clean and super easy to use!
birthday cake ice cream
a sweet treat for those who love birthday cake!
- 1 3/4 cup heavy cream
- 2 cup milk
- 3/4 cup granulated sugar
- 1 tbsp birthday cake flavor (i used amoretti brand)
- 1/4 tsp vanilla
- pinch salt
- 1/4 cup buttercream (optional)
-
place the heavy cream, milk, sugar, salt, birthday cake extract, and vanilla into a pot and mix together. put over medium-high heat and bring to a simmer. remove from the heat and cover with cling wrap and place the ice cream base into the fridge overnight to cool and to let the flavor increase.
-
following the manufacturer's instructions of your ice cream machine, turn the base for 20-25 minutes. place the ice cream into a freezer safe container. swirl with the buttercream and top with sprinkles and freeze overnight to firm up.
assembly
-
take your choice of cookies and take a scoop of the birthday cake ice cream and place on top. add another cookie and freeze until ready to serve.


Toasted Coconut Ice Cream


*Disclaimer: This post contains affiliate links. To learn more, please go here.
Toasted coconut ice cream. This stuff is so good! I swear I couldn't stop eating it, it's so addicting! It's the perfect ice cream to treat yourself to on a hot day this July; especially on top of a sugar ice cream cone!
To get the natural flavor in this ice cream, I used toasted coconut and steeped it in the ice cream base over night. I figured it would be so much better to do it this way than to use the awful artificial extract that tastes nothing like the real deal. But by steeping the toasted coconut into the base instead, leaving it over night, makes this ice cream a coconut lovers dream! It's that good guys, you have no idea!
Amplify it!
This ice cream reminds me of an almond joy candy bar in a way. The only thing that's missing is almonds and chocolate. You can easily replicate it to be like an almond joy by just topping the ice cream with some chocolate sauce and some sliced almonds and a touch of toasted coconut on top.
Now I added in some toasted coconut into this creamy cold stuff, but I discovered that that was a mistake to do. It tastes amazing, but adding in too much texture as it did was off putting for me. I'd definitely prefer to sprinkle a little bit on top instead of mixing it in.


Products I recommend


Above are some products that I personally use and recommend for this recipe and to have for everyday use. I highly suggest the ice cream maker that I listed above. It's cheaper than others and it does it's job just like the other's. It's also easy to clean and super easy to use!
toasted coconut ice cream
this ice cream is steeped in toasted coconut that gives it a delicious natural coconut flavor
- 3/4 cup shredded coconut (toasted)
- 15 oz can cream of coconut
- 1 cup heavy cream
- 1 1/2 ` cup milk
- 2/3 cup granulated sugar
- 1 vanilla bean (scraped)
- pinch salt
-
toast the coconut in a 350 degree oven for about 10-15 minutes. make sure to check it every 5 minutes and to toss the coconut for even toastiness and to prevent burning. remove from oven when golden brown.
-
place the heavy cream, milk, cream of coconut, sugar, salt, vanilla bean, and the toasted coconut into a pot and mix together. put over medium-high heat and bring to a simmer. remove from the heat and cover with cling wrap and place the ice cream base into the fridge overnight to cool and to let the flavor increase.
-
strain out the toasted coconut using a fine mesh sieve.
-
following the manufacturer's instructions of your ice cream machine, turn the base for 20-25 minutes. place the ice cream into a freezer safe container and freeze overnight to firm up.

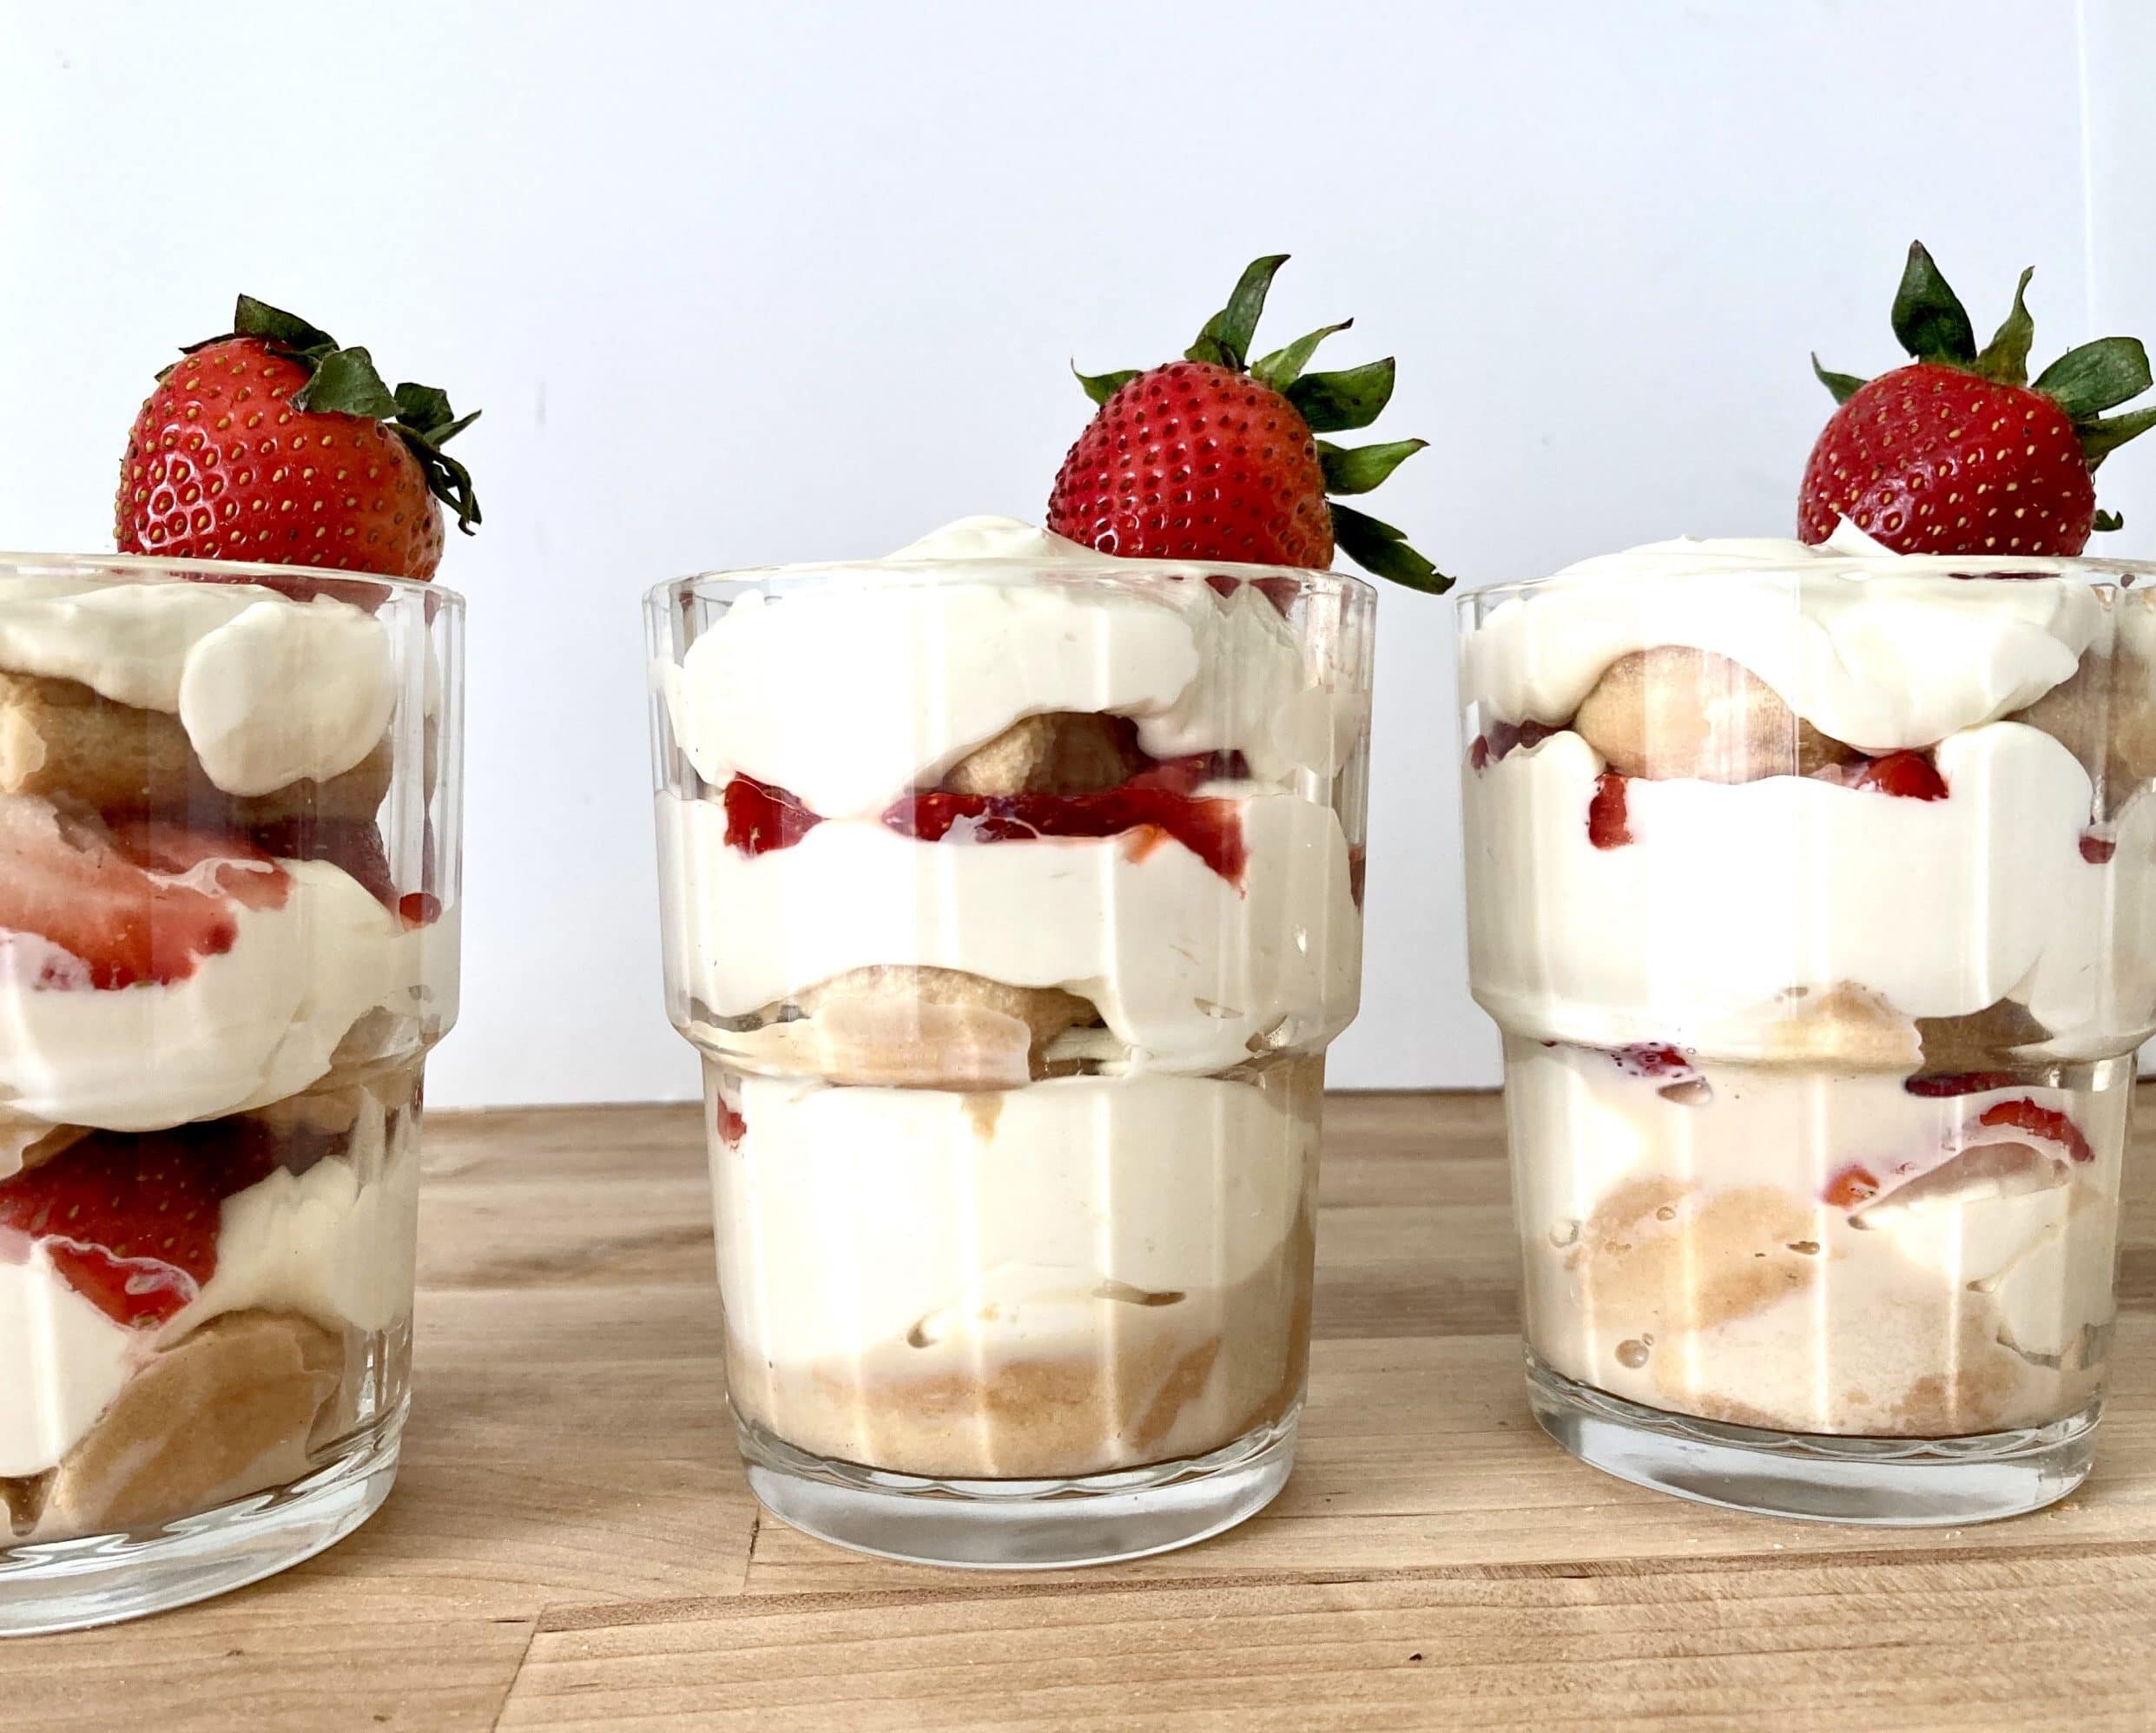
Strawberry Tiramisu


*Disclaimer: This post contains affiliate links. To learn more, please go here.
This is by far not your traditional tiramisu. Its tart, sweet, and perfect for this seasons strawberry pickings. Strawberry tiramisu is a perfectly light dessert for this summer. And it's also incredibly easy to make too! It's so easy you can make it within 20 minutes! It's also super easy to switch it up and make it your own too!
Change it up!
There are lots of ways to make tiramisu unique and fun! This strawberry tiramisu is delicious, but you can always replace the fruit with something else if you'd like. You can even change the soaking liquid for the lady fingers too! Instead of using bailey's you can use:
Vodka! Grab a flavored vodka that will pair up well with the fruit or filling you've chosen. Like white chocolate or lemon!
Rum chata! Did you know that they make a lemon rum chata? That would be delicious with the strawberries or even blueberries!
Malibu rum! This would be an interesting one to soak the lady fingers in if you are wanting something tropical. If you are in an area that has mango's or passion fruit that would go perfect with this!


Products I recommend


Above are some products that I personally use and recommend for this recipe and to have for everyday use. If you can't find lady fingers in your local grocery store, than I suggest getting these from amazon. Most grocery stores back home in North Dakota don't have any of the fancy grocery items, like these lady fingers, so amazon is typically the way to go when I'm home.
strawberry tiramisu

this tiramisu is filled with bailey's soaked lady fingers, mascarpone, and fresh tart strawberries.
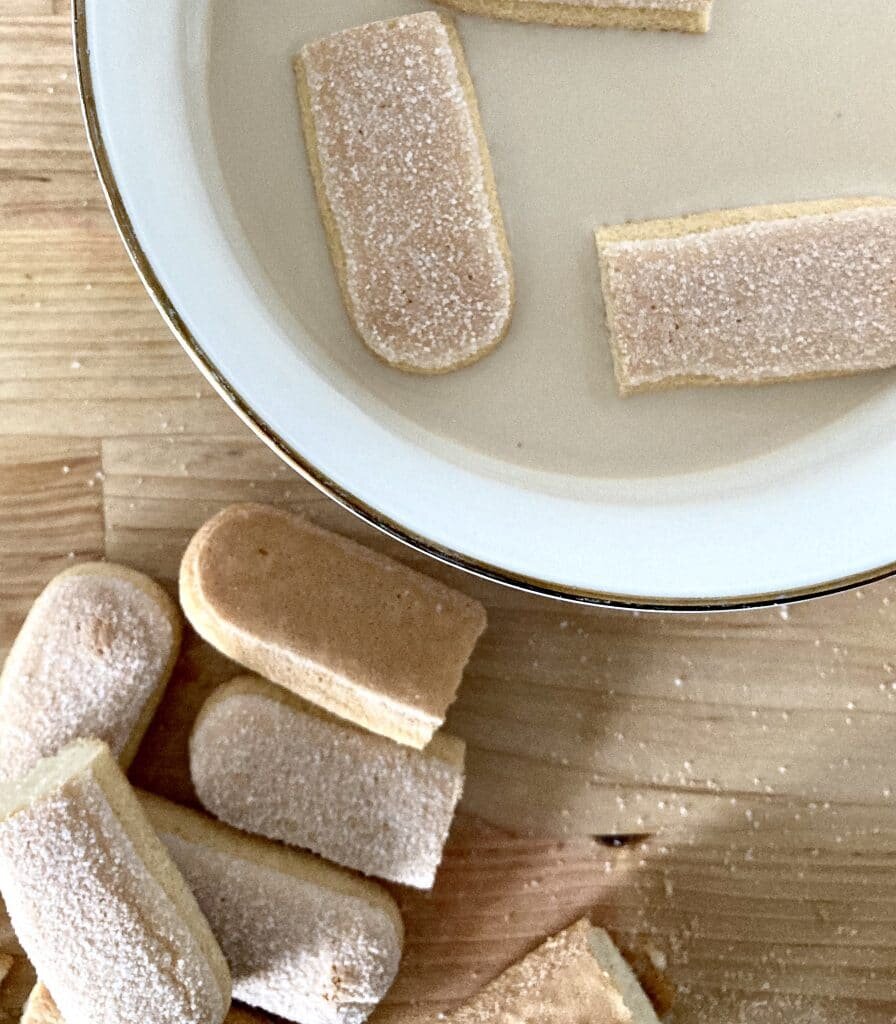
- lady finger cookies
- strawberries (sliced)
mascarpone mousse
- 8 oz mascarpone
- 1/2 cup powdered sugar
- 1 tsp vanilla
- 1 1/2 cup heavy cream
Soak
- 1/2 cup bailey's
- 1/2 cup milk
mascarpone mousse
-
place all of the ingredients, mascarpone, sugar, vanilla and heavy cream, into the bowl of a stand mixer fitted with a whisk attachment. start on low speed, to incorporate all of the ingredients, and gradually increase and whip to stiff peaks. set aside.
soak
-
combine the bailey's (or alcohol of choice) and the milk into a bowl. set aside.
assembly
-
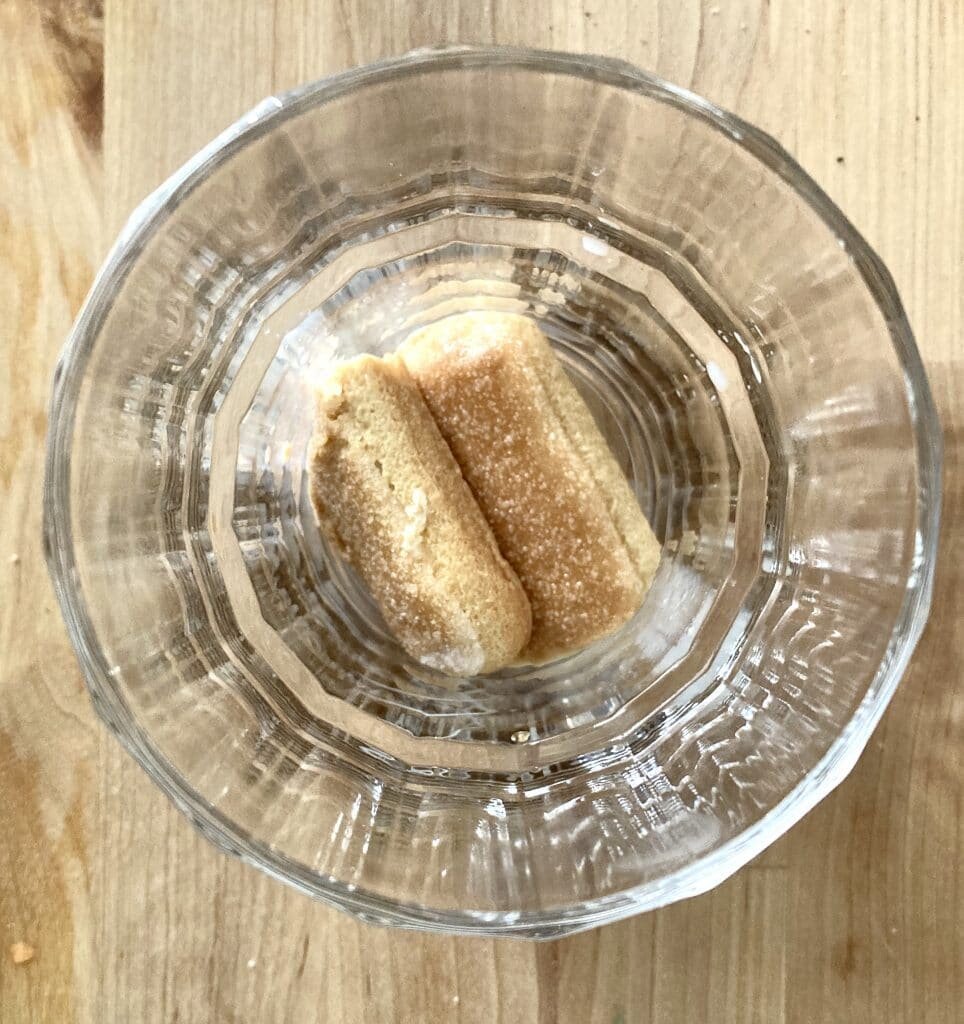
place 4 glasses or a small casserole dish onto your work space.
-
start by soaking the lady finger cookies in the bailey's soak until saturated. make sure not to soak to long for the cookies to completely disintegrate.
if you are using individual glasses, it's easier if you cut the lady fingers in half before soaking so that they fit in the glass easily.
place the soaked lady finger cookies onto the bottom of your glasses or dish.
-
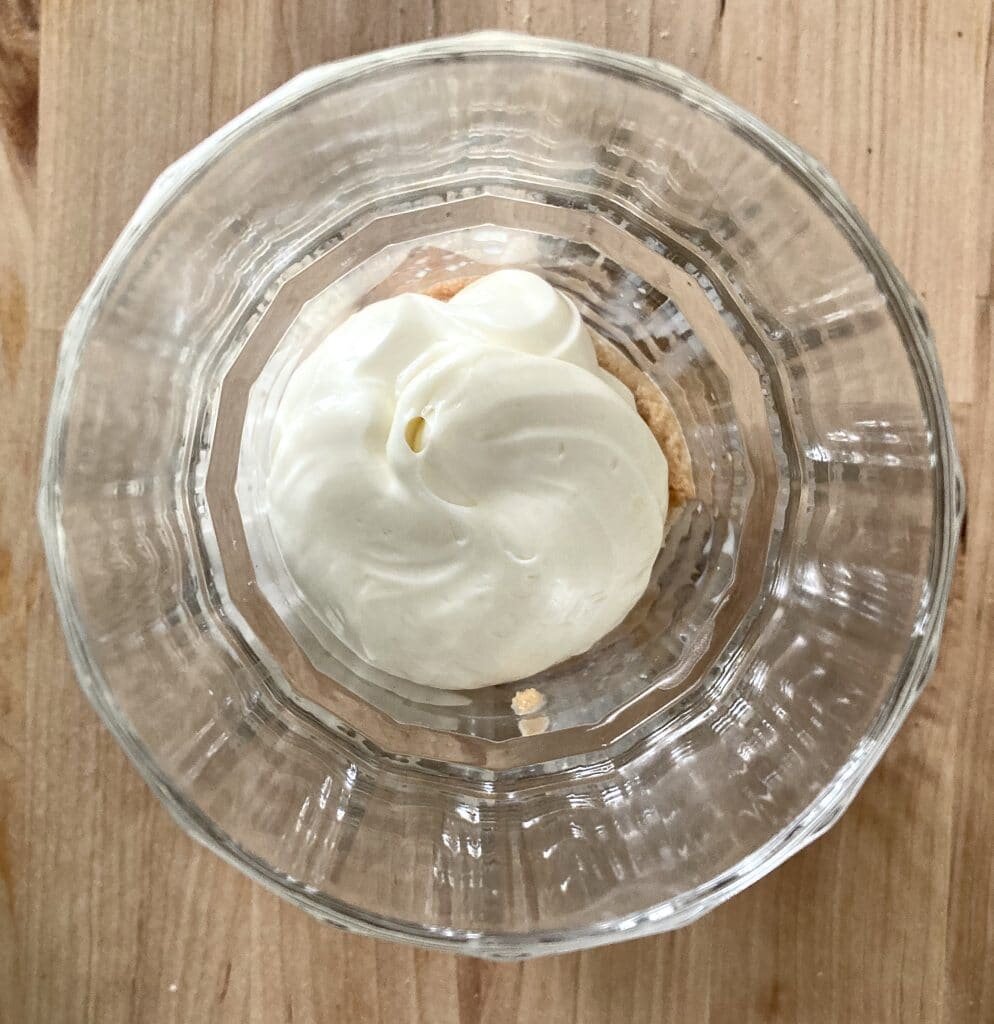
take a piping bag (or ziplock baggie) and fill with the mascarpone mousse. fill your glasses with a small layer of the mousse.
-
top with strawberry slices.
-
repeat these steps 2 more times for layering the tiramisu, ending with mousse on top and a whole strawberry. (reference the photos in the post for layering)
-
refrigerate until serving.


Margarita Cupcakes


*Disclaimer: This post contains affiliate links. To learn more, please go here.
One of my favorite cocktails is a classic margarita. Especially during these hot summer days at one of my favorite pizza places at the lake in Minnesota, Zorbaz. Since the whole virus started and everything has been mostly closed, I wasn't able to get my hands on a margarita when I was home for a few weeks back in June. So instead I made these margarita cupcakes, and let me tell you. These cupcakes are SO good!
This cupcake is flavored with fresh lime and tequila (obviously). I then soaked in more tequila (because you need all of the tequila!) Then it's topped with a simple buttercream that is flavored with more lime, and tequila (of course!) And lastly, they are topped with a sprinkling of sea salt and a candied lime to top it all off.
The first thing that you get one you take a bite of one of these babies is tequila. But that's specifically the whole purpose! It's a margarita cupcake! You can't have a margarita without tequila. If you aren't into all of the tequila, you can always omit it from the buttercream and use extra lime juice instead. Overall, these margarita cupcakes were a hit and I cannot wait to make them again. Next time with an actual margarita on the side.


Products I recommend


Above are some products that I personally use and recommend for this recipe and to have for everyday use. I highly suggest getting the maldon sea salt to top these cupcakes with. It brings it all together, like the salted rim a margarita glass holds.
margarita cupcakes
these cupcakes are filled with fresh lime juice and lots of tequila!
cupcakes
- 1 1/2 cup all-purpose flour
- 2/3 cup granulated sugar
- 1 tsp baking soda
- 1/2 tsp baking powder
- 1/2 tsp salt
- 2 eggs
- 1 tsp vanilla
- 1/3 cup vegetable oil
- 1 tbsp lime zest
- 2 tbsp lime juice
- 2 tbsp tequila (i used silver)
- 1/2 cup sour cream
- 2/3 cup milk
- 2 tbsp tequila (for soaking the cake)
buttercream
- 3 sticks unsalted butter (room temp)
- 6 cup powdered sugar
- 3 tbsp tequila (can replace with lime juice)
- 1 tbsp lime zest
- 1 tbsp lime juice
- maldon sea salt (for sprinkling)
-
Preheat the oven to 350 degrees F. Place jumbo cupcake liners into cupcake pans. Note that if you use regular liners, the time will be different for baking.
-
In a large bowl, combine the flour, sugar, baking powder, baking soda, and salt and whisk together.
-
In another bowl, combine the eggs, oil, vanilla, lime zest and juice, tequila, sour cream and milk and whisk to combine.
-
Gradually add in the dry ingredients into the wet and whisk until fully incorporated.
-
Place a 1/3 cup of the batter into each cupcake liner and bake for 12-15 minutes or until a toothpick comes out clean.
-
Once the cupcakes come out of the oven, brush with the reserved 2 tbsp of tequila, generously.
buttercream
-
Combine all of the ingredients into a bowl of a stand mixer fitted with a whisk attachment and whip on low, gradually increasing the speed, for 3-5 minutes or until light and fluffy.
-
Frost the cupcakes and sprinkle with maldon sea salt.


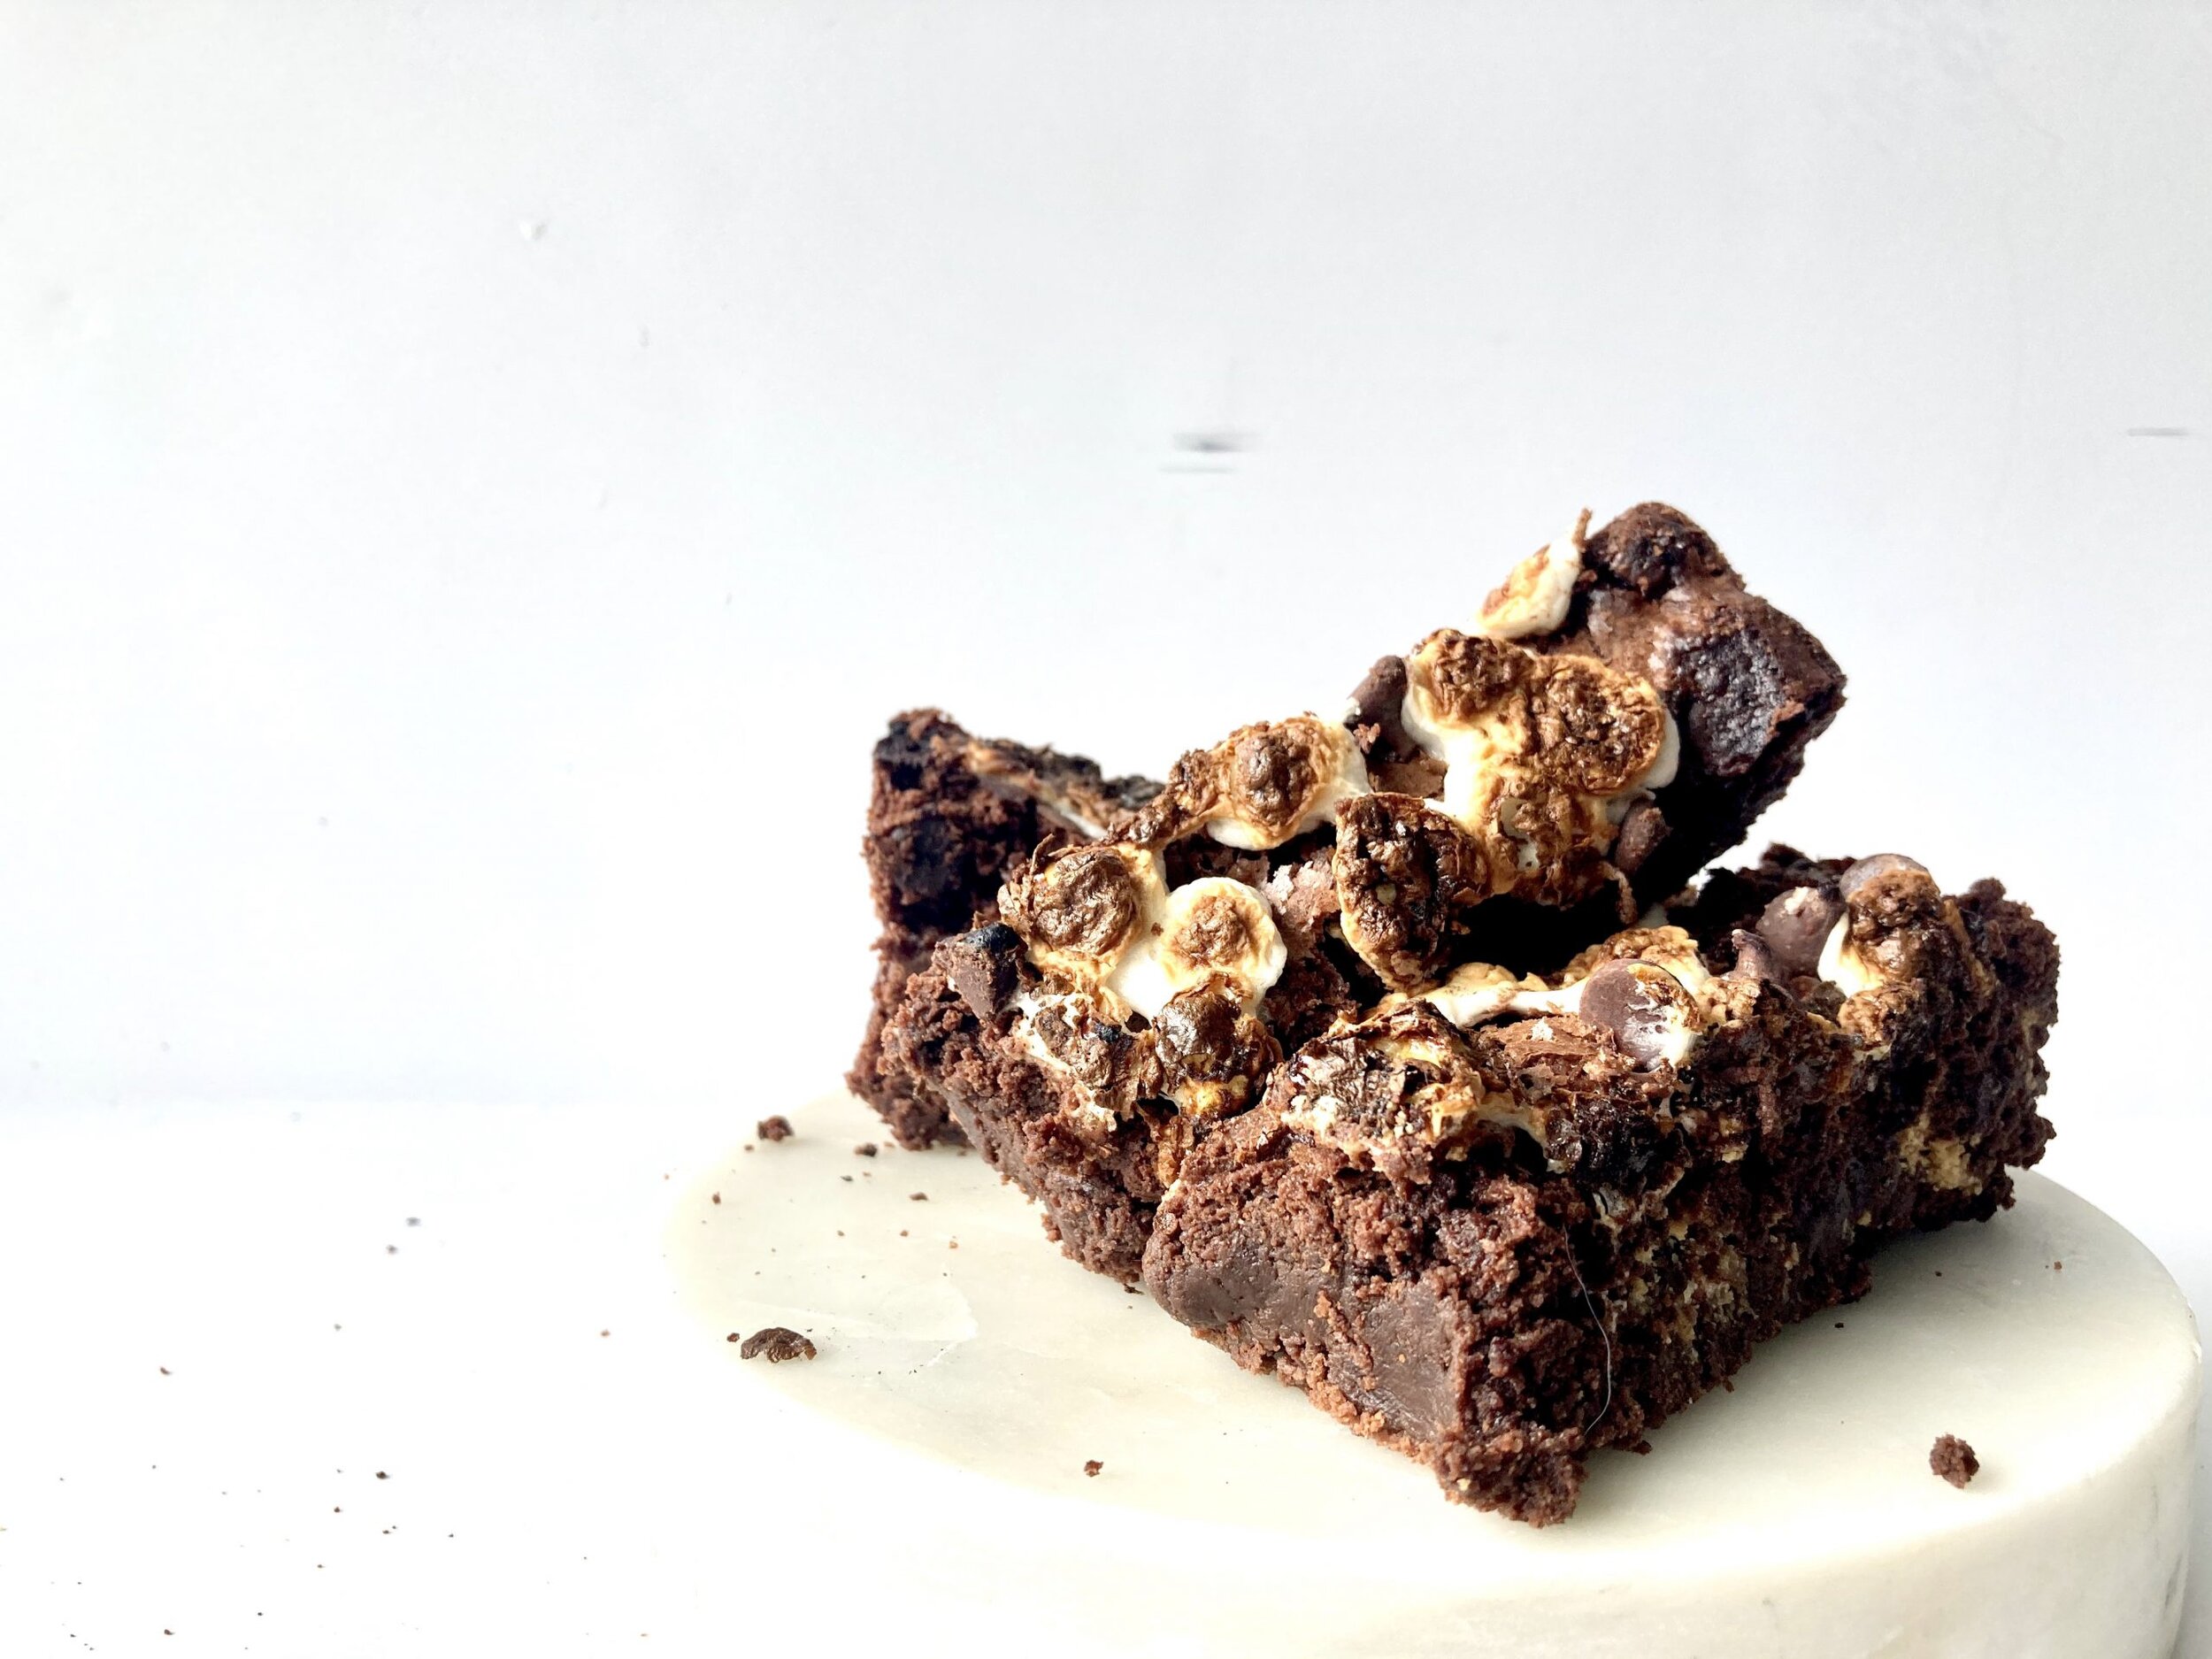
S'mores Brownies


*Disclaimer: This post contains affiliate links. To learn more, please go here.
S'mores are the treat of the summer. With the marshmallows that can either be burnt and gooey or lightly torched and soft, with lots of chocolate and graham crackers too. Why not try these s'mores brownies instead? It's chewy, soft, and gooey too. It's got everything that a regular s'mores does, but in an even better form that's not messy or a fire hazard. Plus these brownies are super easy to make too!
Change it up!
You don't have to make these as s'mores brownies if you don't want to. I've made them with as a plain brownie and topped it with a simple chocolate buttercream and sprinkles on top! You could even add in some nuts and drizzle it with caramel and serve it warm with some ice cream if you really wanted to! There really is no wrong way to go about with brownies. No matter what you do with it, it's bound to be eaten.
Quick tip!
Be careful if you decide to use the broiler when toasting the marshmallows. You have to watch it very carefully so they don't burn. I highly suggest just leaving it under the broiler for less than a minute and no longer than that. If you have a torch than I highly recommend you use that instead because you will have more control over the flame and how much the marshmallows are toasted. This will prevent the marshmallows from really burning by using a torch instead of using the broiler.


Products I recommend.


Above are some recommended tools and ingredients that I personally used when making these sinful s'mores brownies. It's extremely helpful to have a square 8x8 inch cake pan but you can also use a basic casserole pan too.
s'mores brownies

these brownies can be made simple or extra with some marshmallows and grahams.
- 3 sticks unsalted butter
- 1/2 cup chocolate chips
- 3 eggs
- 1 1/2 cup granulated sugar
- 1 tbsp vanilla
- 1/2 cup cocoa powder
- 1 1/3 cup all-purpose flour
- 1/2 tsp salt
- 2 tsp baking powder
- 1/2 cup mini marshmallows
- 1/2 cup mini chocolate chips
- 1/2 cup graham crackers (crushed)
-
Preheat the oven to 350 degrees F. Spray and line a 8x8 inch square pan.
-
Place the butter and chocolate chips into a microwave safe bowl and melt. Mix together to incorporate. Set aside.
-
In the bowl of a stand mixer with a whisk attachment, whip the eggs, sugar and vanilla to ribbon stage, or until pale and thick. Slowly add in the melted butter and chocolate and mix to incorporate.
-
In a separate bowl, sift together the cocoa powder, flour, salt, and baking powder. Slowly add into the wet mixture, a 1/3 of the dry at a time, and fold in by hand with a rubber spatula. Fold in the mini marshmallows, chocolate chips and crushed graham crackers.
-
Spread the brownie batter in a 8x8 inch square pan and bake for 40-45 minutes or until set.
-
Top with some more marshmallows and use a torch or broiler to toast the marshmallows.


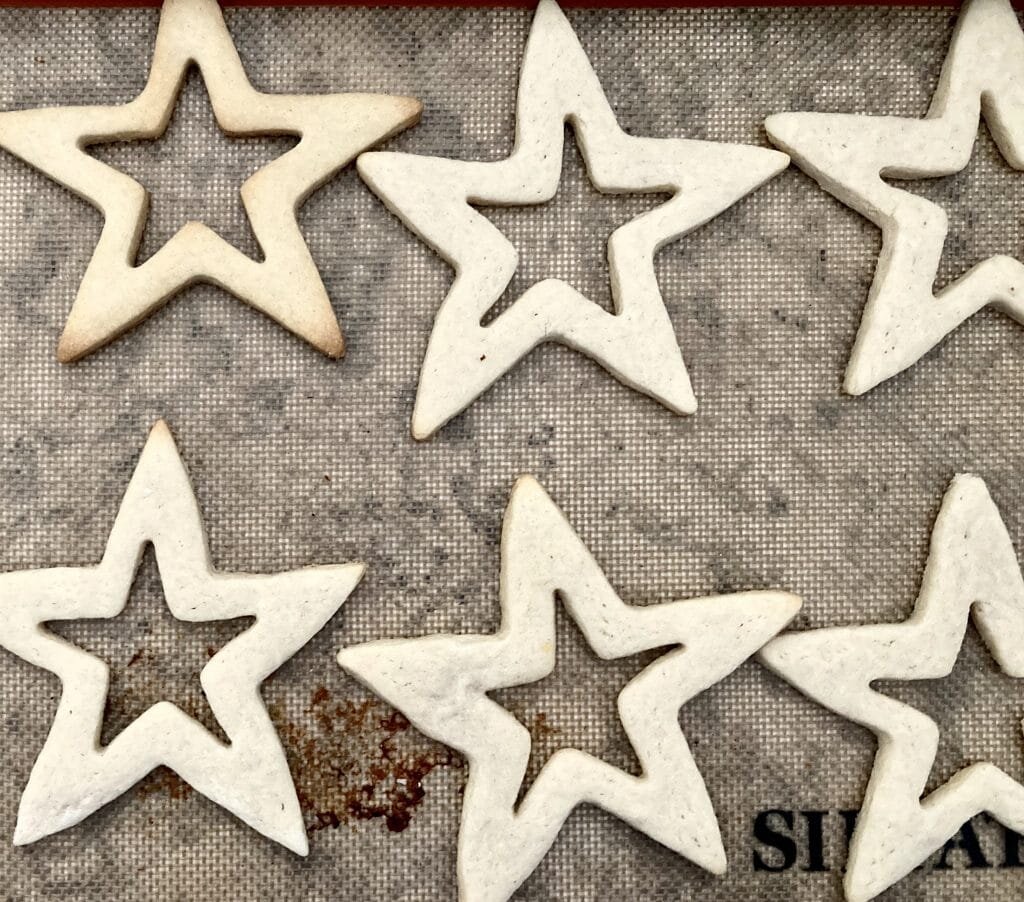
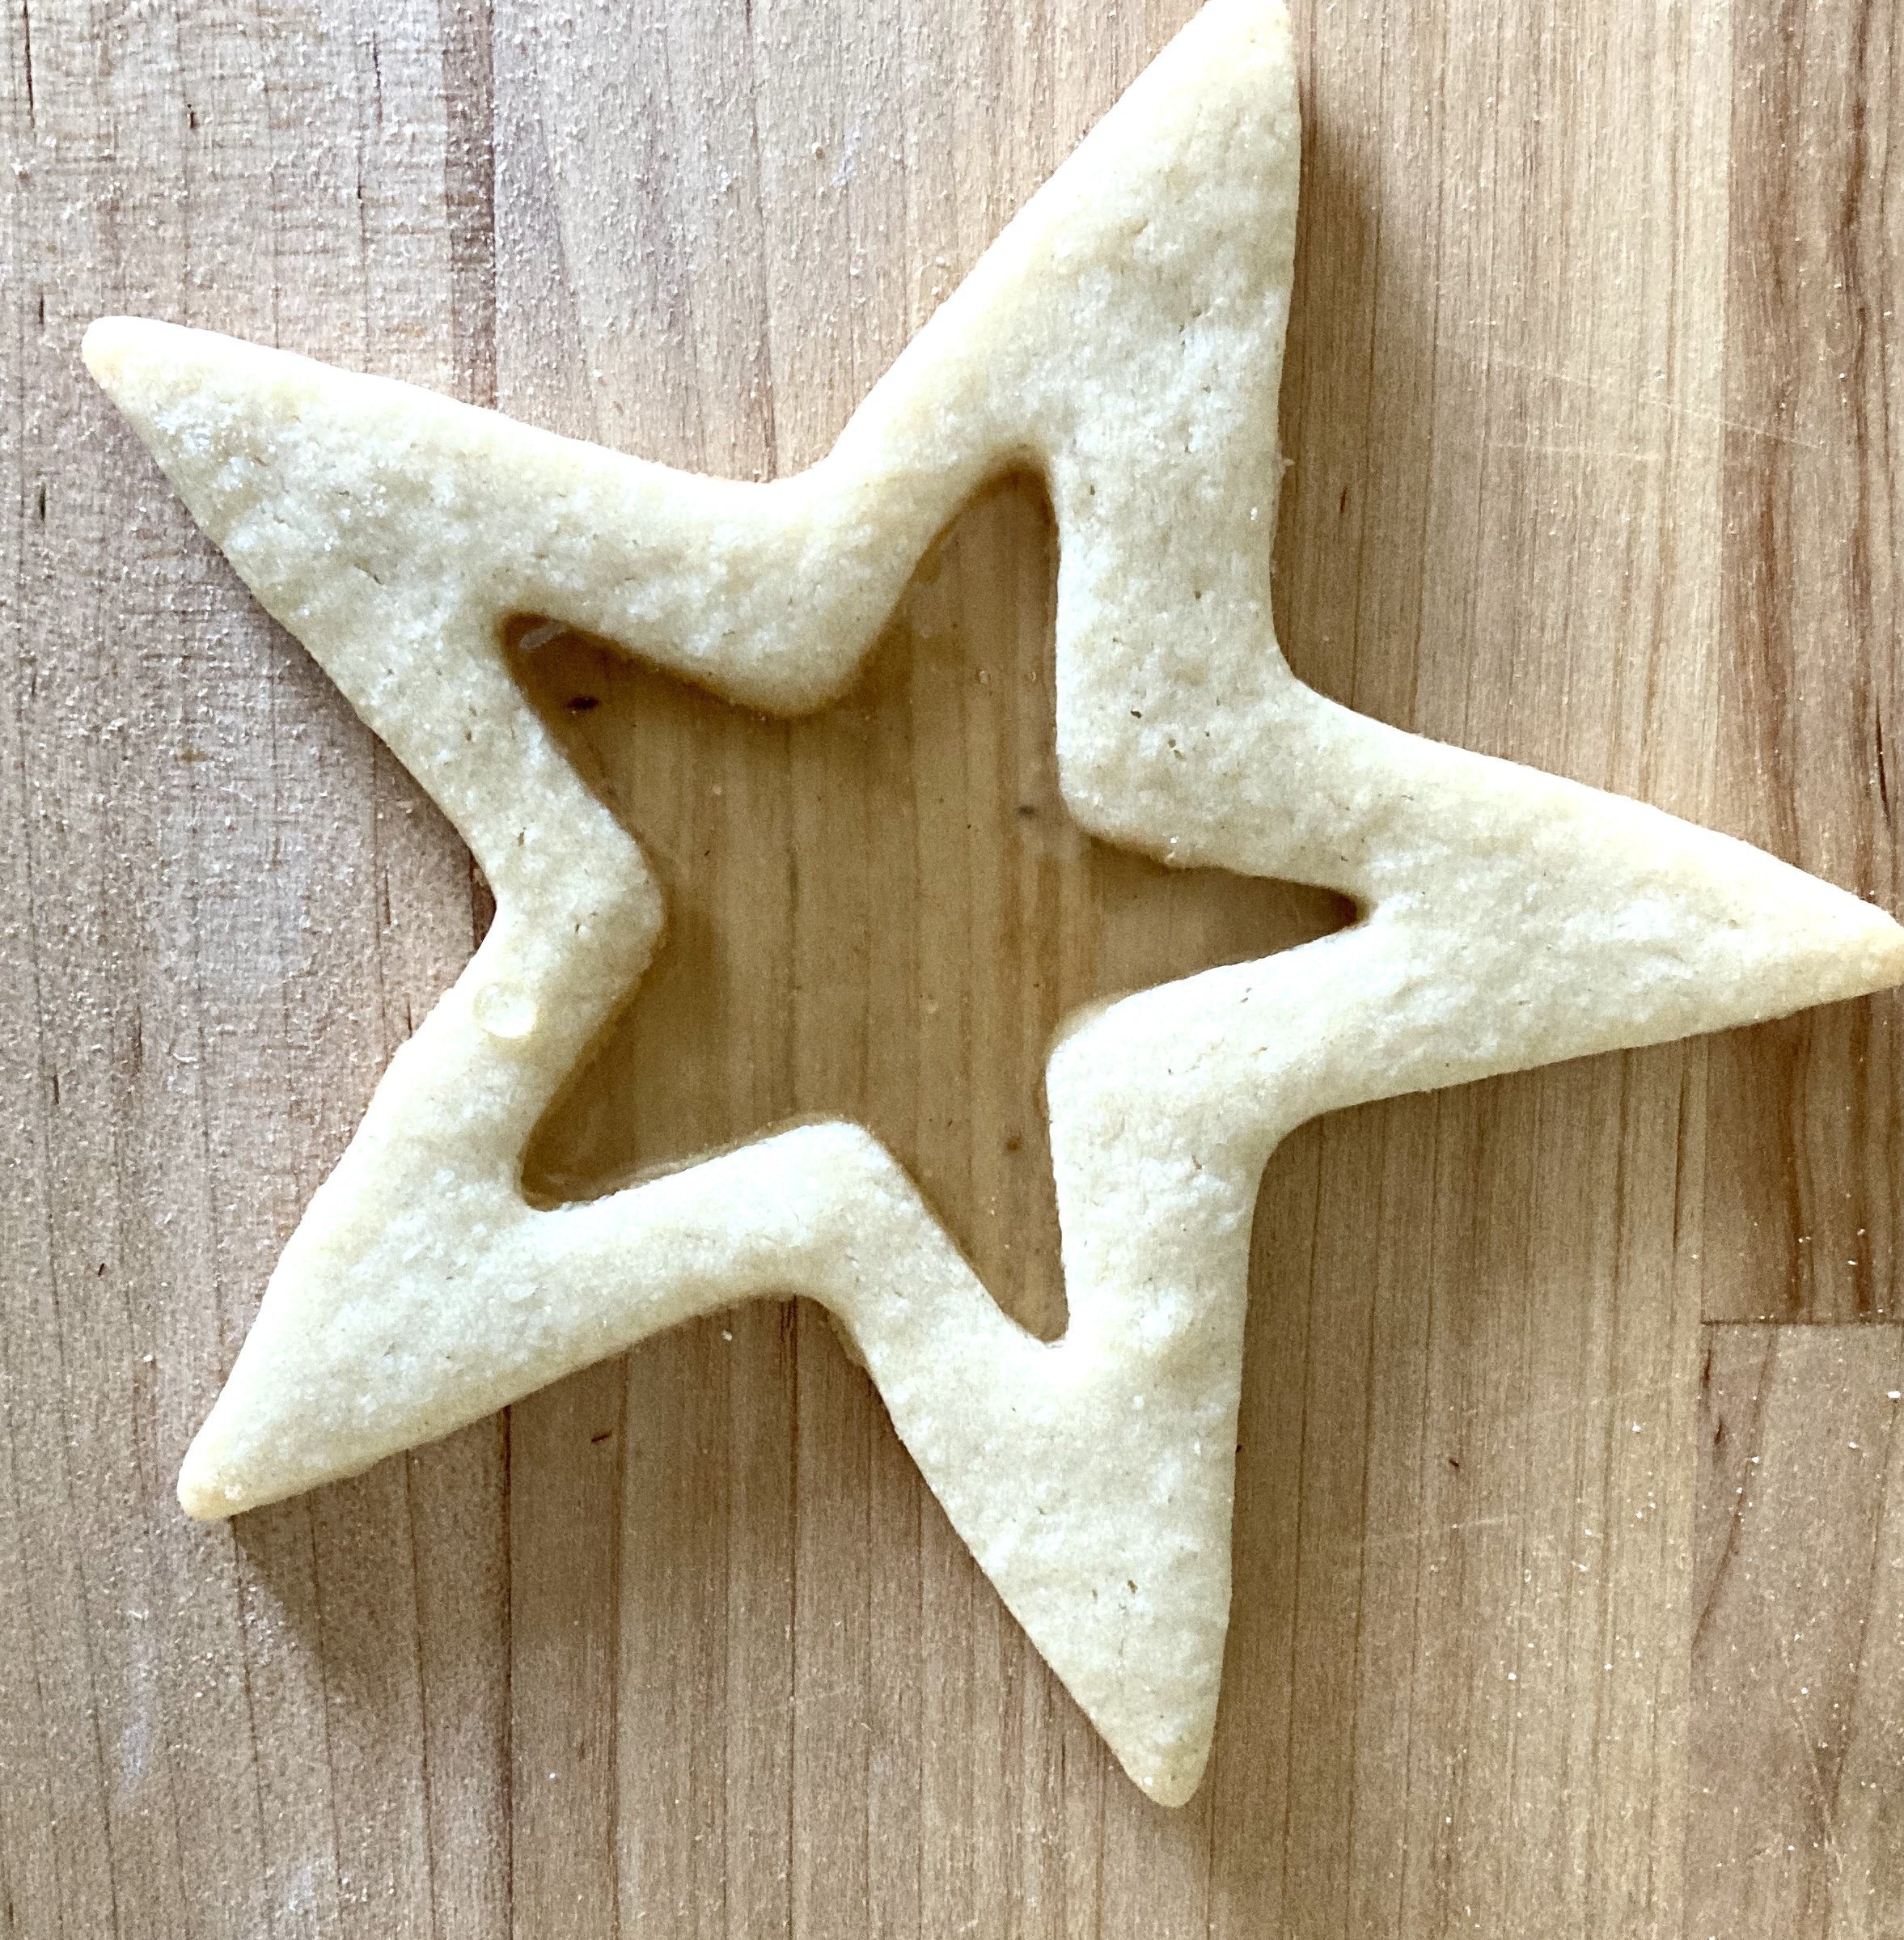
Star Shaker Cookies


*Disclaimer: This post contains affiliate links. To learn more, please go here.
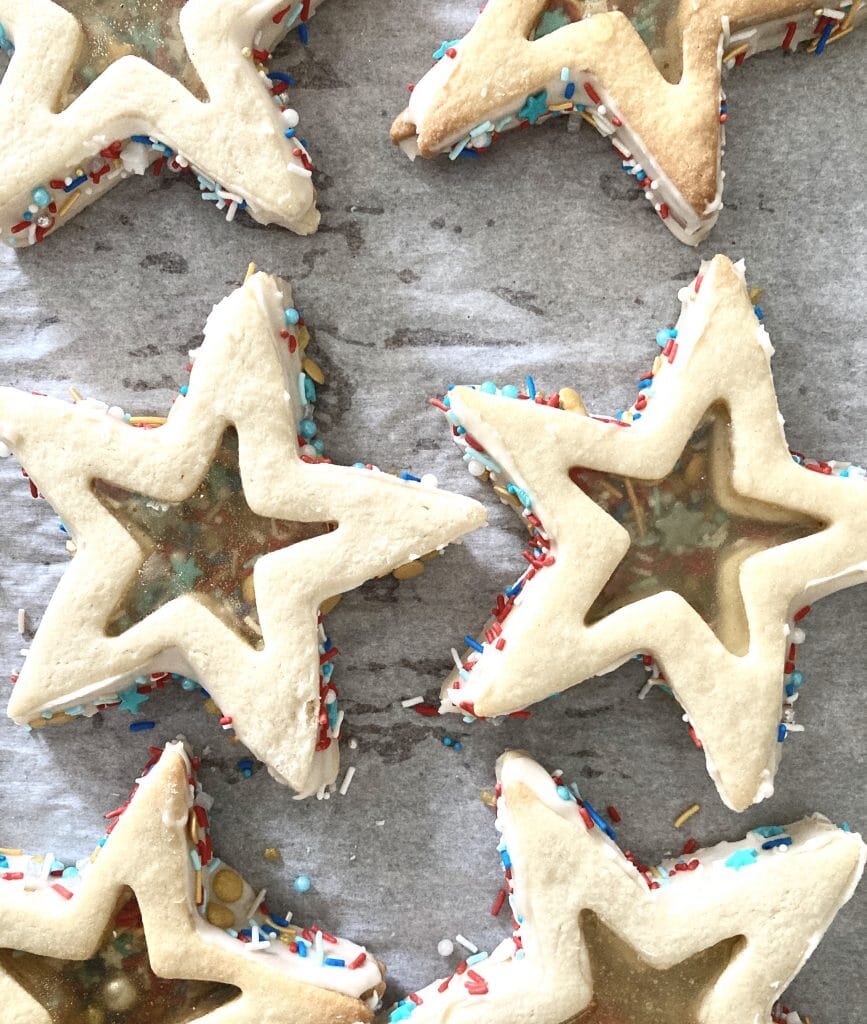
It's almost the 4th of July which means lots of BBQ's and fireworks! But you need a showstopper treat for these fun festivities, like these star shaker cookies! They may be a little time consuming, but the kids will love them! They are interactive with the little treats you can fill them with and will have everyone asking how you made them.
Amplify it!
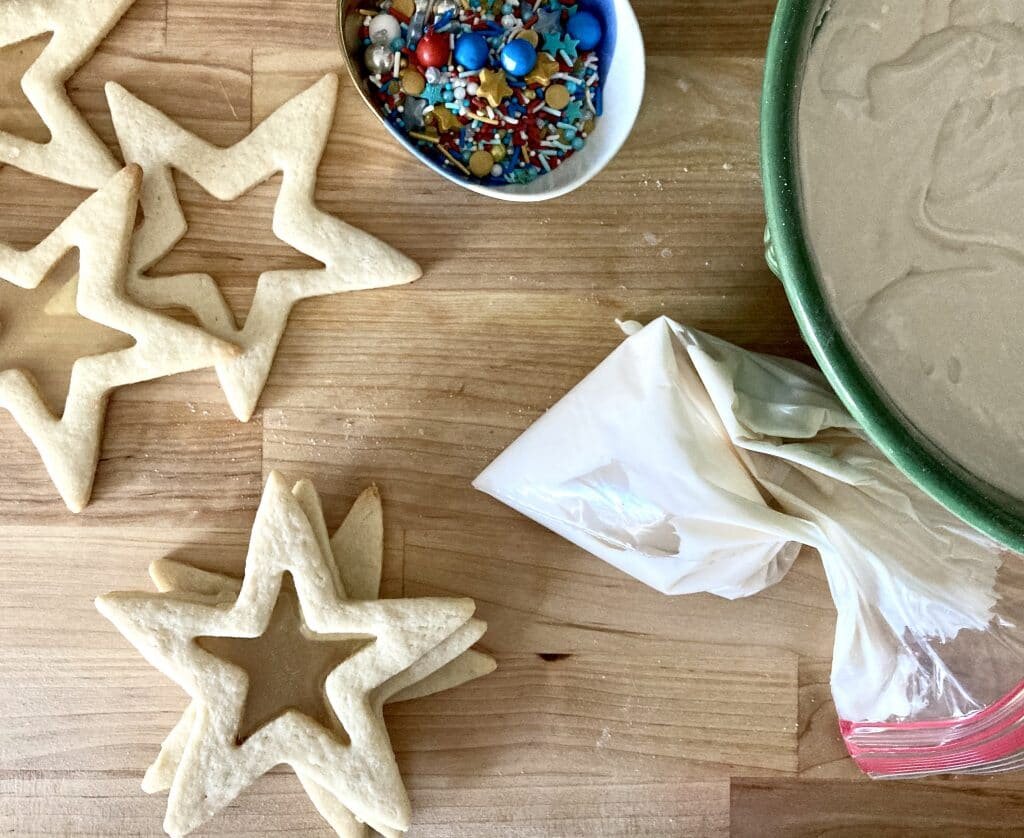
Want to make these star shaker cookies extra fun? Here is a fun list of things that you can fill them with!
- Sprinkles
- Pop rocks candy
- Mini chocolate candies
How to assemble
It's super easy to make these cookies! There are a lot of steps, but anyone can make them. Here's how!
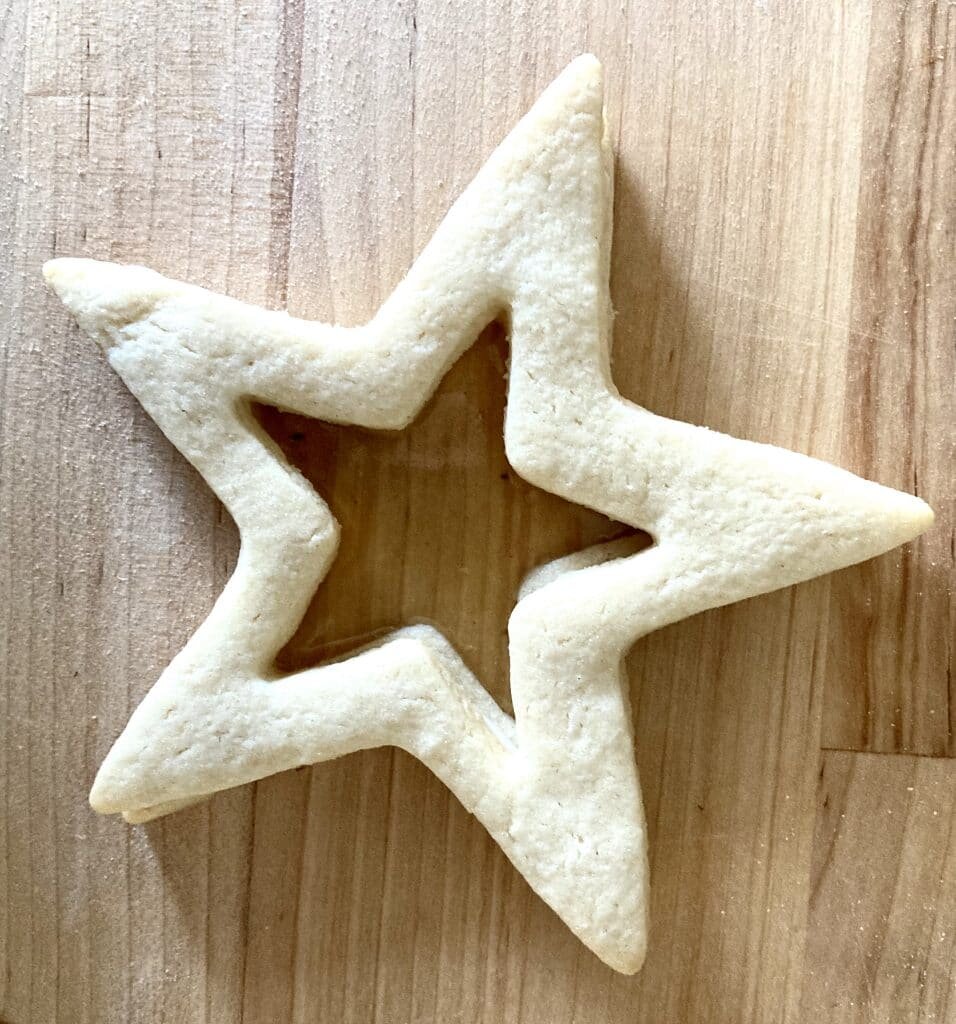
- Start by making a batch of sugar cookies. I used my sugar cookie recipe. You will need 2 cookie cutters; 1 that is larger and a smaller one to remove the middle portion of the cookie. Bake the cookies and let cool.
- After the cookie are cooled, you'll want to take 2/3 of the cookies and leave the other 1/3 of the cookies to the side.
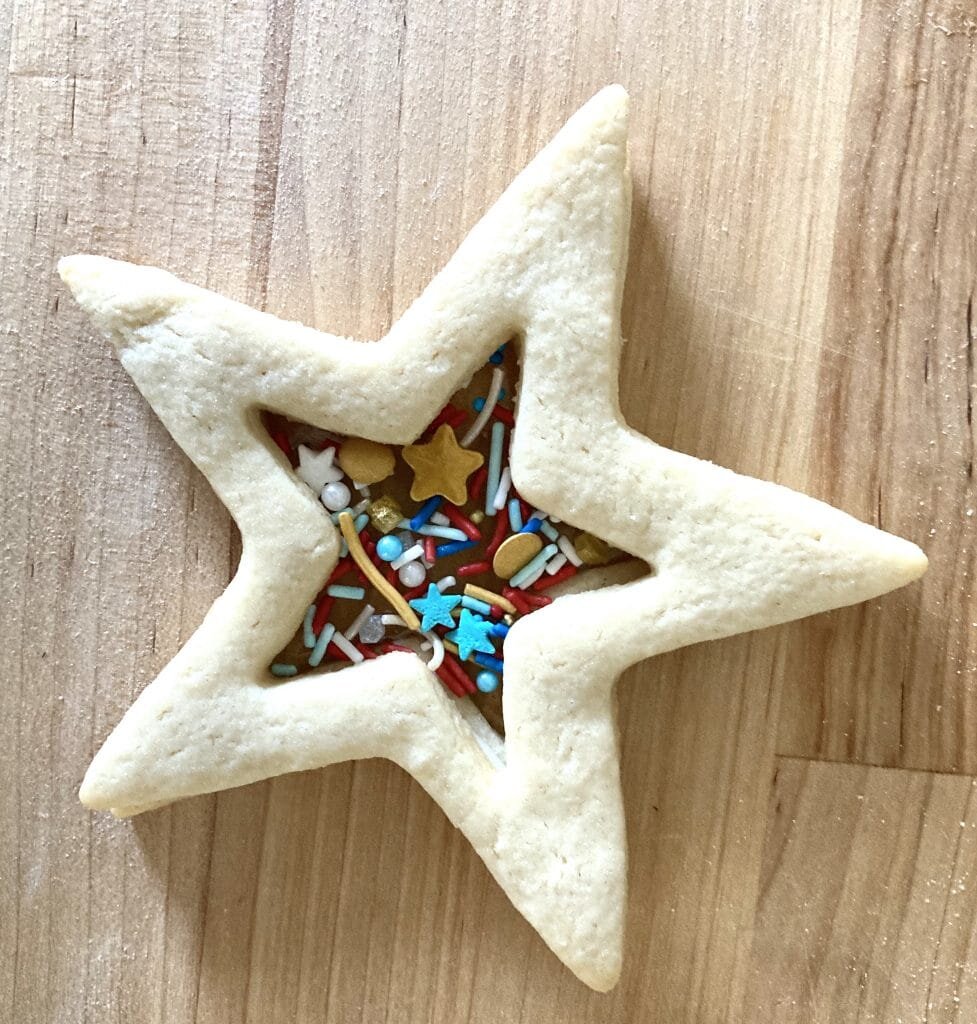
- Take the 2/3 of the cookies and lay them out on a silpat. You will then make a hard sugar candy with some isomalt (just follow the directions on the bag) and poor about a tablespoon of the hard sugar into the center of the cookies.
- Once the sugar has cooled and hardened you will then want to make a stiff royal icing.
- Lay one of the cookies with the candy center on the counter. Take the royal icing and pipe a thin layer along the edges. Place the next cookie, one that doesn't have the candy center, on top. Next place some sprinkles and candies in the center.
- Repeat the process of the royal icing and the last candy centered cookie.
- Decorate the cookies as desired!


Products I recommend


Above are some products that I personally use and recommend for this recipe and to have for everyday use. I highly suggest getting the isomalt for these cookies. It may not taste very good since it's a sugar free type of hard candy, but it gives it a super clear, non-cloudy look. You can always add in a little bit of clear flavor oil to give it more appeal. (Don't do what I did and use a candy oil that's colored, I used key lime with a green tint to it and it turned a bit murky.)
shaker cookies

create a fun cookie treat using isomalt and candies!
- 1 batch sugar cookie dough (link in post)
- 1 batch stiff royal icing (link in post)
- isomalt
- sprinkles and candies
- Start by making a batch of sugar cookies. I used my sugar cookie recipe. You will need 2 cookie cutters; 1 that is larger and a smaller one to remove the middle portion of the cookie. Bake the cookies and let cool.
- After the cookie are cooled, you'll want to take 2/3 of the cookies and leave the other 1/3 of the cookies to the side.
- Take the 2/3 of the cookies and lay them out on a silpat. You will then make a hard sugar candy with some isomalt (just follow the directions on the bag) and poor about a tablespoon of the hard sugar into the center of the cookies.
- Once the sugar has cooled and hardened you will then want to make a stiff royal icing.
- Lay one of the cookies with the candy center on the counter. Take the royal icing and pipe a thin layer along the edges.
- Place the next cookie, one that doesn't have the candy center, on top. Next place some sprinkles and candies in the center.
- Repeat the process of the royal icing and the last candy centered cookie.
- Decorate the cookies as desired!


Grapefruit Poppy Seed Cupcakes

[wprm-recipe-jump]
*Disclaimer: This post contains affiliate links. To learn more, please go here.Who's ready for some grapefruit poppy seed cupcakes?? I know I certainly am! These cupcakes are light and pack a citrus punch of grapefruit that's topped with such a simple buttercream that has a little texture and crunch from the poppy seeds. Want to add even more to the buttercream? Just add in a little bit of grapefruit zest or even make it into a poppy seed cream cheese buttercream for a little more tang. It'll be delicious either way you go!Not a fan of grapefruit? No problem! Just replace the juice with lemon, lime, or even orange juice and make it your own! I cannot say this enough and will always give you other options when it comes to baking. It's a science and it's always fun to make it your own! Just follow the recipe and just substitute out the juice and zest for what suits your needs. So instead of grapefruit poppy seed cupcakes you can make them into lemon poppy seed cupcakes! Now that sounds delicious!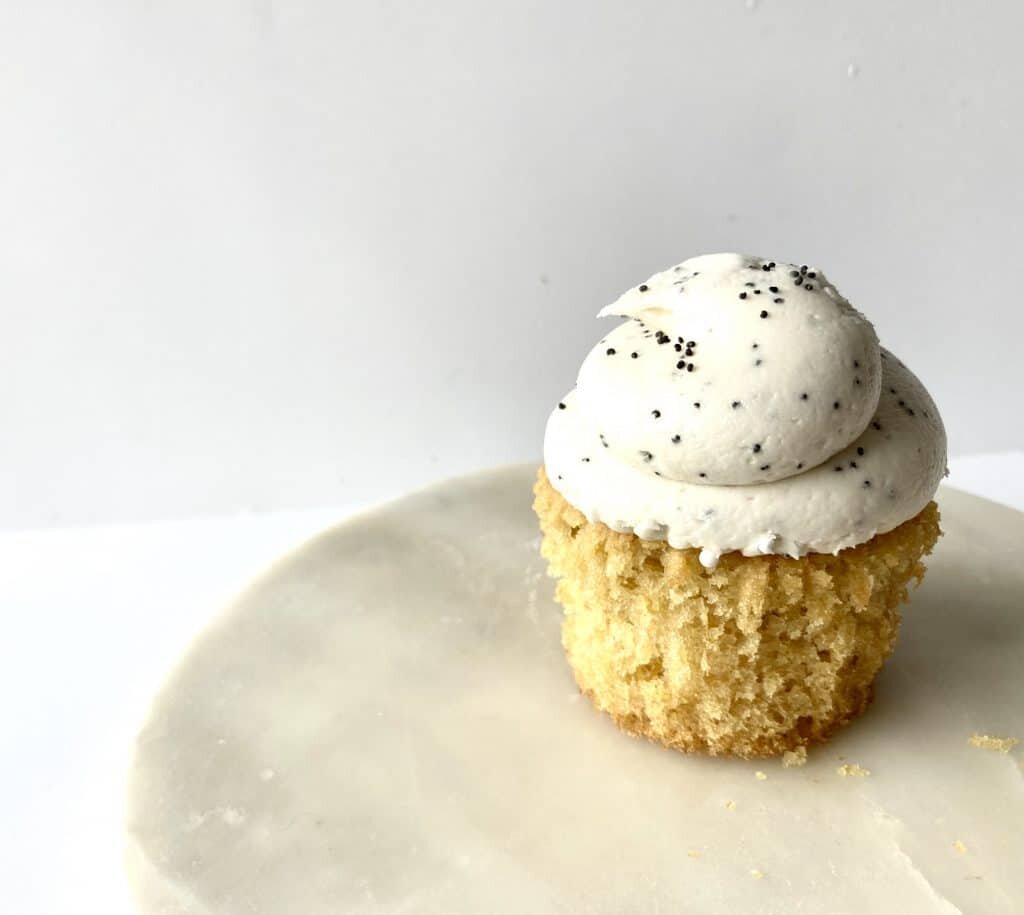
[mailerlite_form form_id=1]
Above are some products that I personally use and recommend for this recipe and to have for everyday use. I highly recommend having a cookie/ice cream scoop in your kitchen arsenal. Having one makes it easy to scoop cupcake batter into the liners and makes the batter distributed evenly.
___________________________________________________________________________________________________
grapefruit poppy seed cupcakes
light and tart cupcakes topped with a simple buttercream with poppy seeds
cupcakes
- 1 1/4 cup cake flour
- 1/2 cup granulated sugar
- 1 1/2 tsp baking soda
- 1/2 tsp salt
- 1 egg
- 1/3 cup vegetable oil
- 1 tsp vanilla extract
- 1 tbsp grapefruit zest
- 1/4 cup grapefruit juice
- 3/4 cup buttermilk
buttercream
- 1 cup unsalted butter (room temp)
- 4 cup powdered sugar
- 1 tbsp poppy seeds
- 1 1/1 tsp vanilla
- pinch salt
- 2-3 tbsp heavy cream
cupcakes
- preheat the oven to 350 degrees F and place cupcake liners into the cupcake tins. in a large bowl combine the cake flour, sugar, salt, and baking soda and whisk to combine. in another bowl, mix together the egg, oil, grapefruit zest and juice, buttermilk and vanilla. add the wet into the dry and mix until everything is fully incorporated. using an cookie scoop, distribute the batter into the cupcake tins and bake for 14-16 minutes or until a toothpick comes out clean. let cool.
buttercream
-
put all of the ingredients into the bowl of an electric mixer fitted with a whisk attachment. start slow and then gradually increase the speed. whip on high until light and fluffy, about 3 minutes.

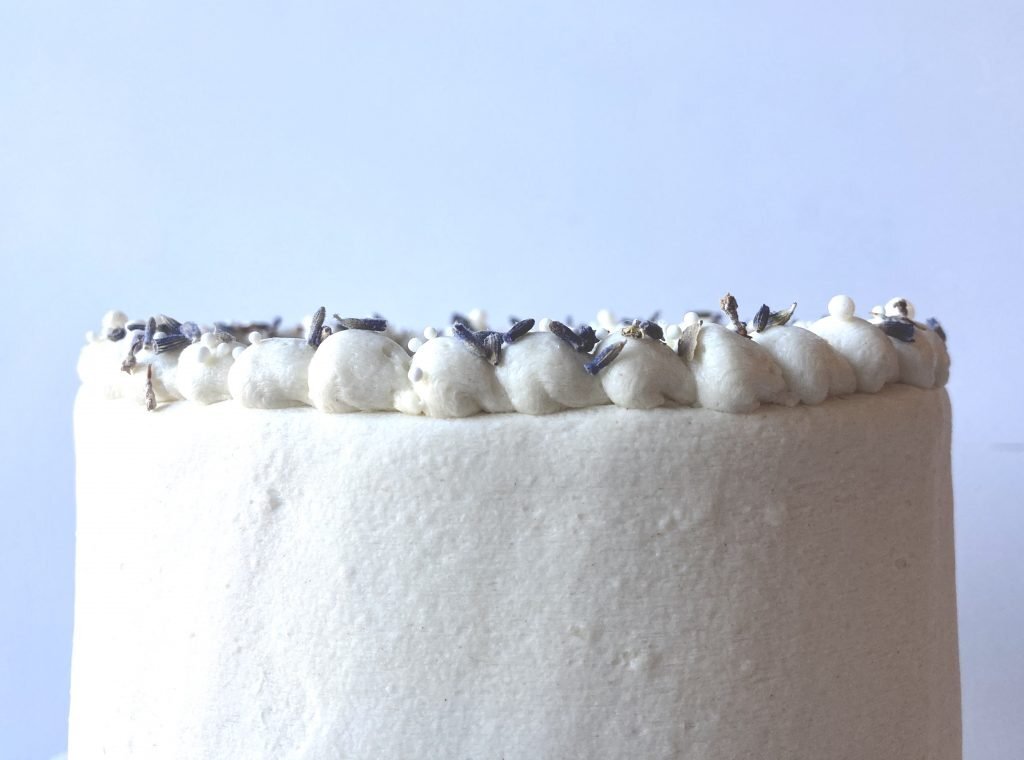
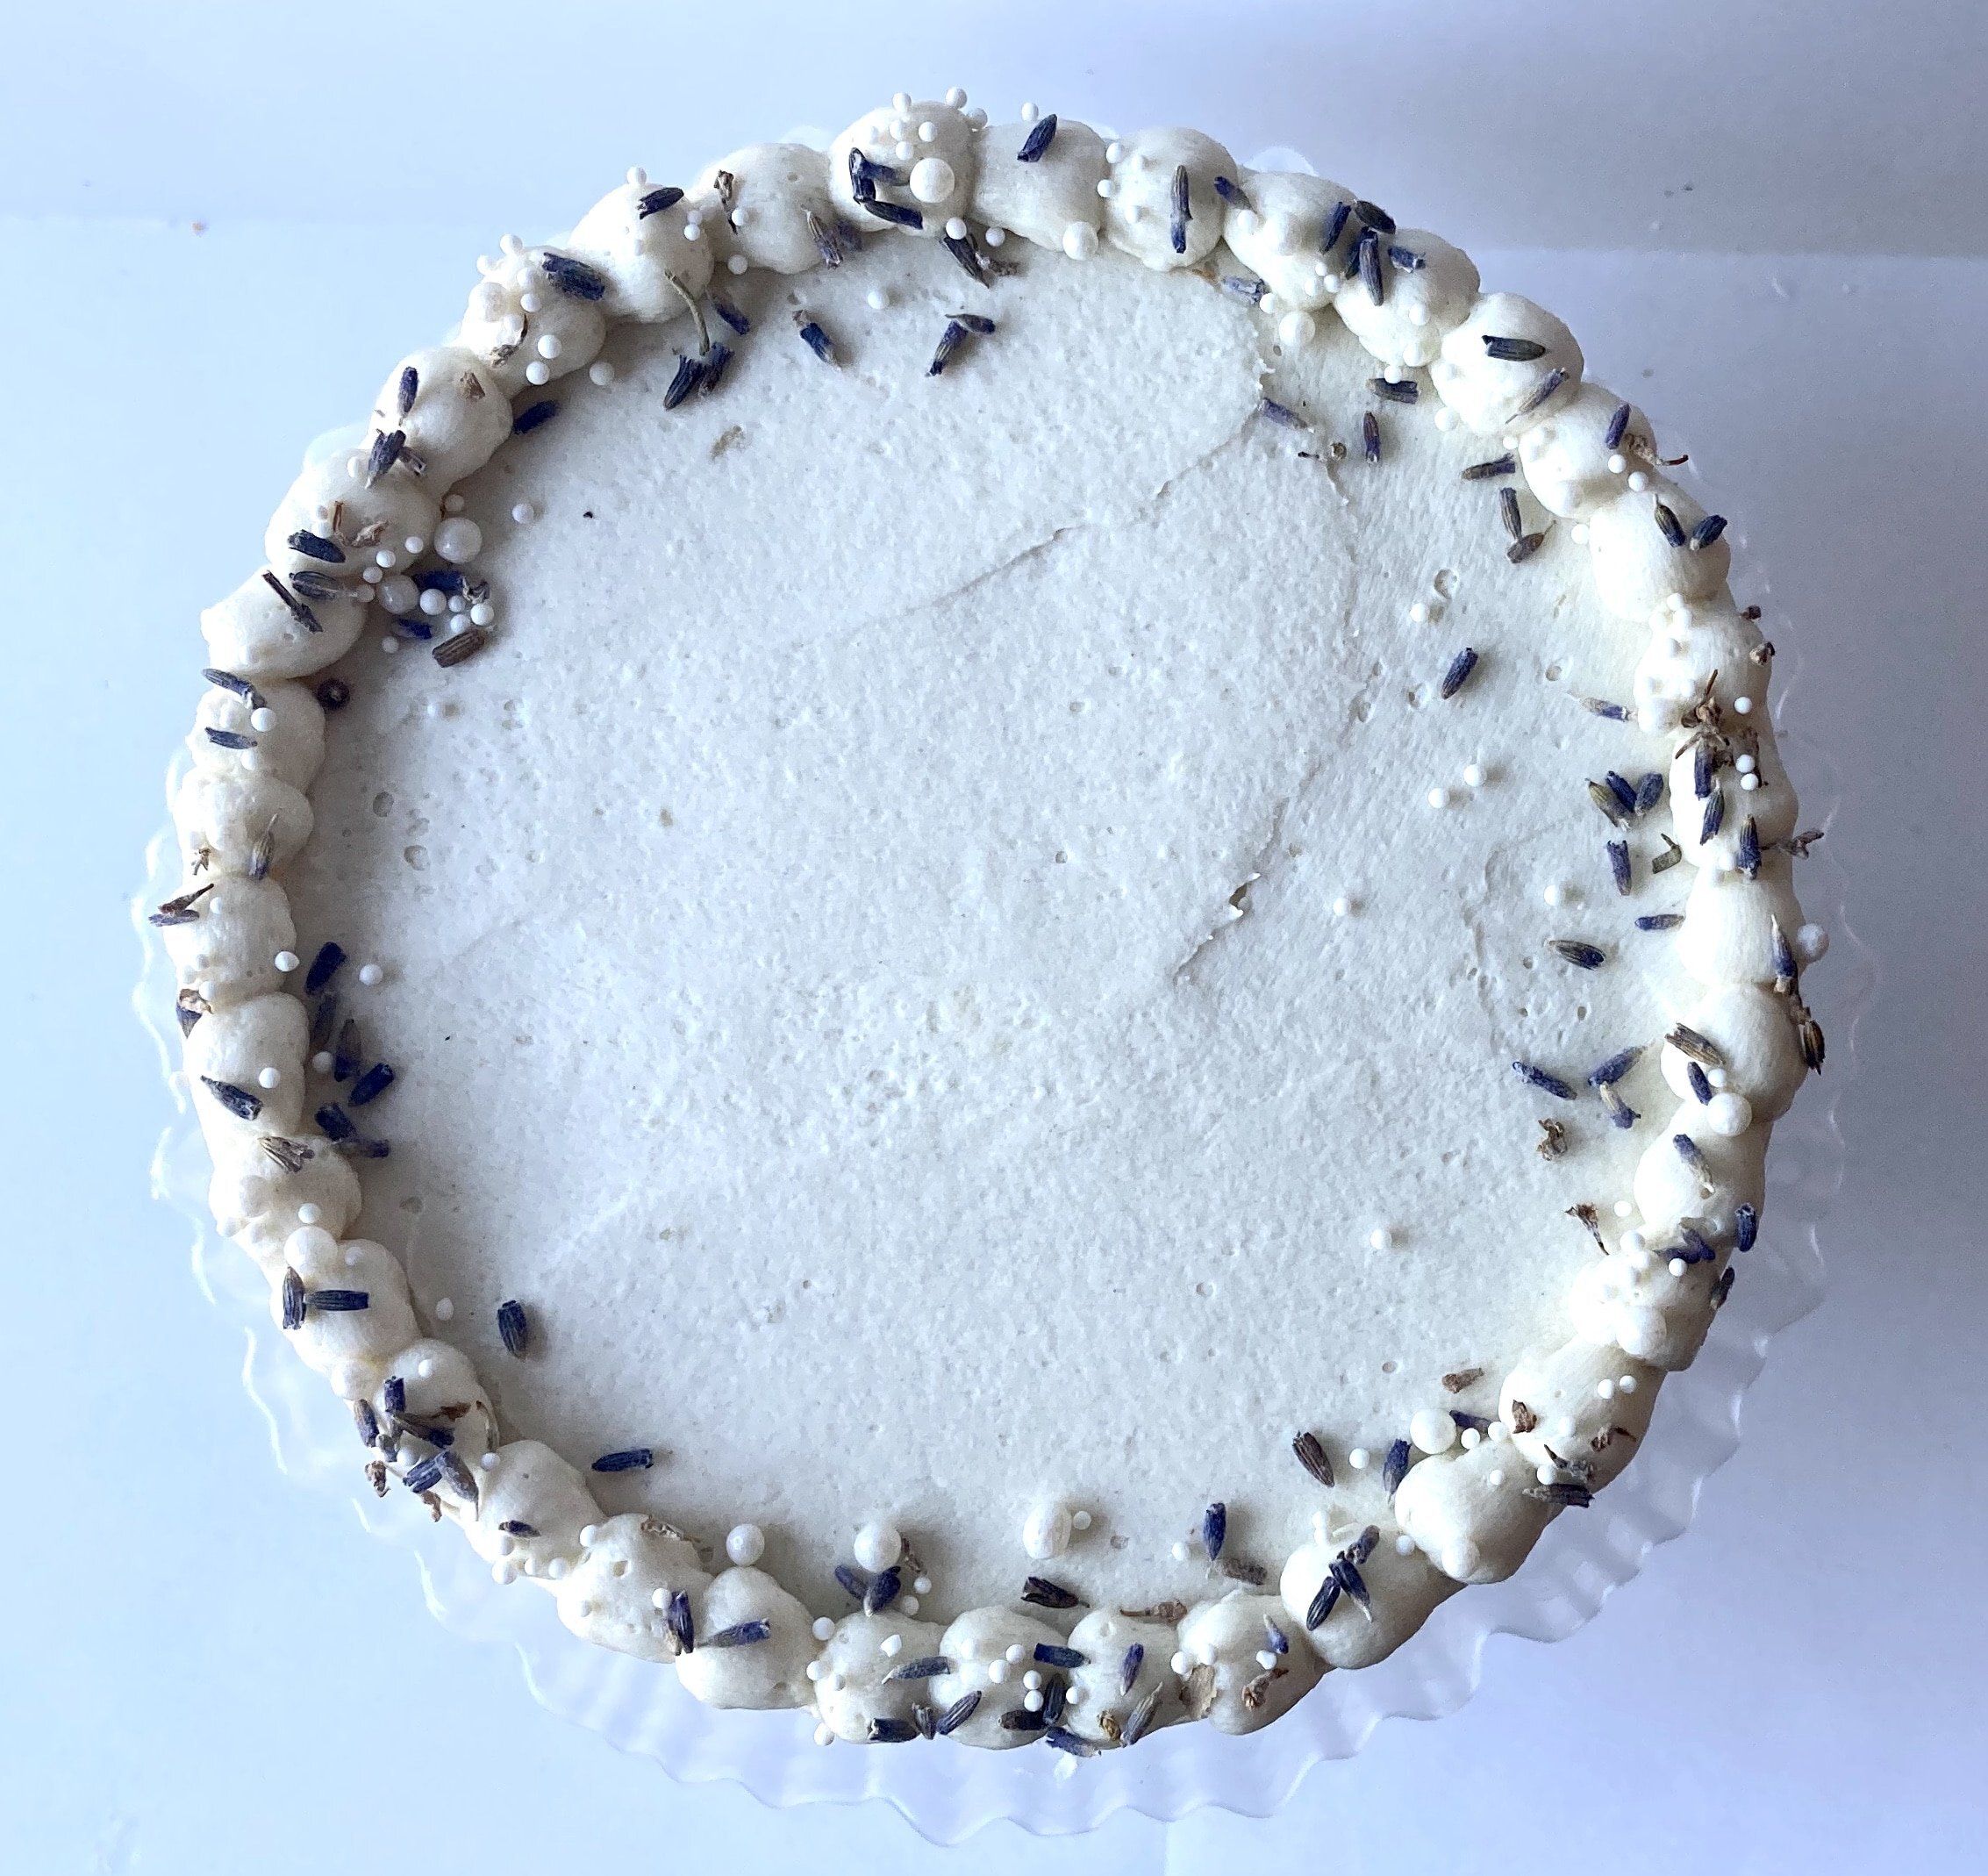
Lavender Vanilla Bean Cake

[wprm-recipe-jump]
*This post contains affiliate links. Please read disclosure to learn moreWhen I think of june I think of flowers blooming everywhere and people starting to really get into gardening for the summer. So why not enjoy a lovely lavender vanilla bean cake that is light, airy and coated in the most luscious buttercream you will ever have?The lavender in this cake is very subtle and not at all overpowering as it is only found in the buttercream and is nowhere in sight in the actual cake. It's perfect for a cute little tea party or picnic get together.Now if you don't have lavender than that is no problem at all! You can use dried rose petals, hibiscus or you can even use your favorite tea if you want to! Or you don't need to use any floral flavors at all and can just keep it simply vanilla. There is no wrong way to make a cake flavorful and everyone has different taste buds.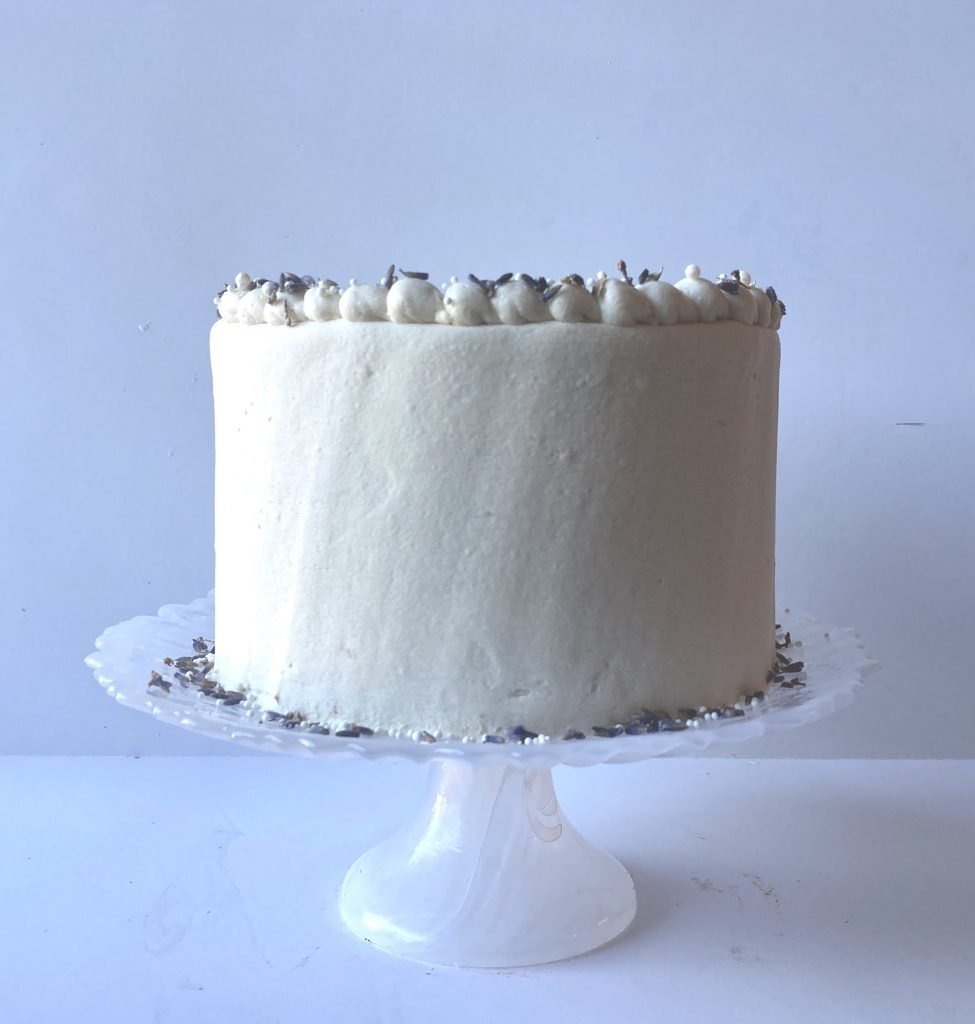
[mailerlite_form form_id=1]
Above are some products that I personally use and recommend for this recipe and to have for everyday use. When I make a cake, I will always use 6 inch cake pans. Now you don't have to use this cake pan size, but if you decide to use a different size than you will have to use some trial and error with the baking time. Baking is a science! So adjusting baking times will always be a given especially since not all ovens work the same way.
___________________________________________________________________________________________________
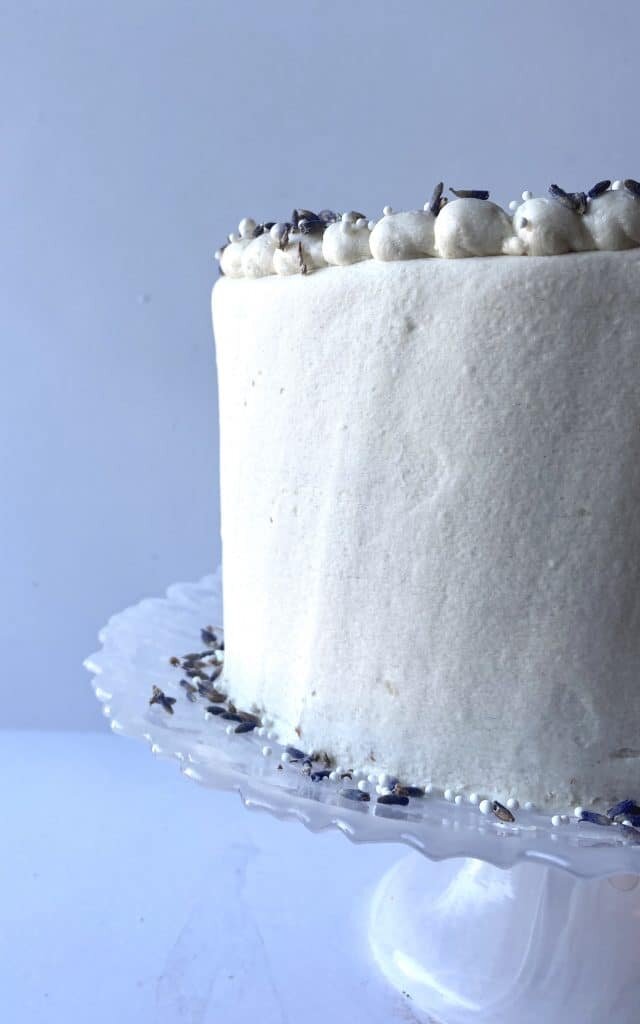
Lavender Vanilla Bean Cake
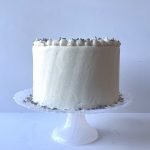
light vanilla bean cake with a lavender ermine buttercream.
makes one 3-layer, 6-inch cake
cake
- 2 cup cake flour
- 1 cup granulated sugar
- 1 1/2 tsp baking powder
- 1 1/2 tsp baking soda
- 1 tsp salt
- 2 eggs
- 4 egg whites
- 2/3 cup vegetable oil
- 1 tsp vanilla extract
- 1 vanilla bean (scraped)
- 1 1/4 cup milk
buttercream
- 1 cup milk
- 2 tbsp dried lavender
- 5 tbsp all-purpose flour
- 1 cup granulated sugar
- 1 1/2 tsp vanilla
- pinch salt
- 1 cup unsalted butter (room temp)
cake
- preheat the oven to 350 degrees F and line three 6-inch pans with parchment paper. in a large bowl, combine the cake flour, sugar, baking powder, baking soda and salt and whisk together. in another bowl, combine the oil, eggs, egg whites, vanilla bean, vanilla, and milk and whisk together. pour the wet ingredients into the dry and mix until fully combined. place the batter in the pan and bake for 20-25 minutes or until a toothpick comes out clean. let the cake cool for 10 minutes then carefully remove them from the pans to continue cooling. wrap in cling wrap until ready to use.
buttercream
-
in a saucepan combine the lavender and milk and place over medium-low heat and bring to a simmer. turn off the heat and cover with a lid and let stand for 30 minutes. strain out the lavender and place the pot with the milk back on the stove. whisk the sugar, flour and salt in a separate bowl and then slowly whisk into the milk. add the vanilla. turn the heat on to medium/high and whisk the mixture constantly until it starts to thicken, about 8-15 minutes. (this depends on if you have a gas or electric stove top.) once thick, remove from the heat. put the mixture into a bowl. place cling wrap directly over the mixture so a skin doesn’t form. let cool until room temp. once at room temp, place the butter into the bowl of an electric mixer fitted with a whisk attachment. whip until light and fluffy, about 5 minutes. add the flour mixture, a spoonful at a time, into the butter mixture. once the flour mixture is all added, whip on high for about a minute. the buttercream will resemble whipped cream.

Key Lime Pie Ice Cream
[wprm-recipe-jump]
*This post contains affiliate links. Please read disclosure to learn moreThis key lime pie ice cream is super addicting. I couldn't get enough of the creamy ice cream that's layered with the tangy lime curd and the crunch from the graham crust. It's the perfect summer treat that every one will enjoy. Add it onto a ice cream cone (waffle cones are the best!) and that will make it absolute heaven! I love this key lime pie ice cream so much and I can't wait to make it again and devour every last morsel.The vanilla ice cream is sweet and contrasts perfectly with the key lime curd and balances it out perfectly! Then you get the texture and crunch from the graham crust. Add all three things together and you have one of the best ice creams you will ever have!Want to try it differently? Make the curd lemon or even strawberry and make it unique to you! It's super easy to puree some berries or juice a pineapple to make a curd. You don't even have to add in the graham crust! Make it your own and have fun with it! That's what baking is about. It's a science and science means experimenting.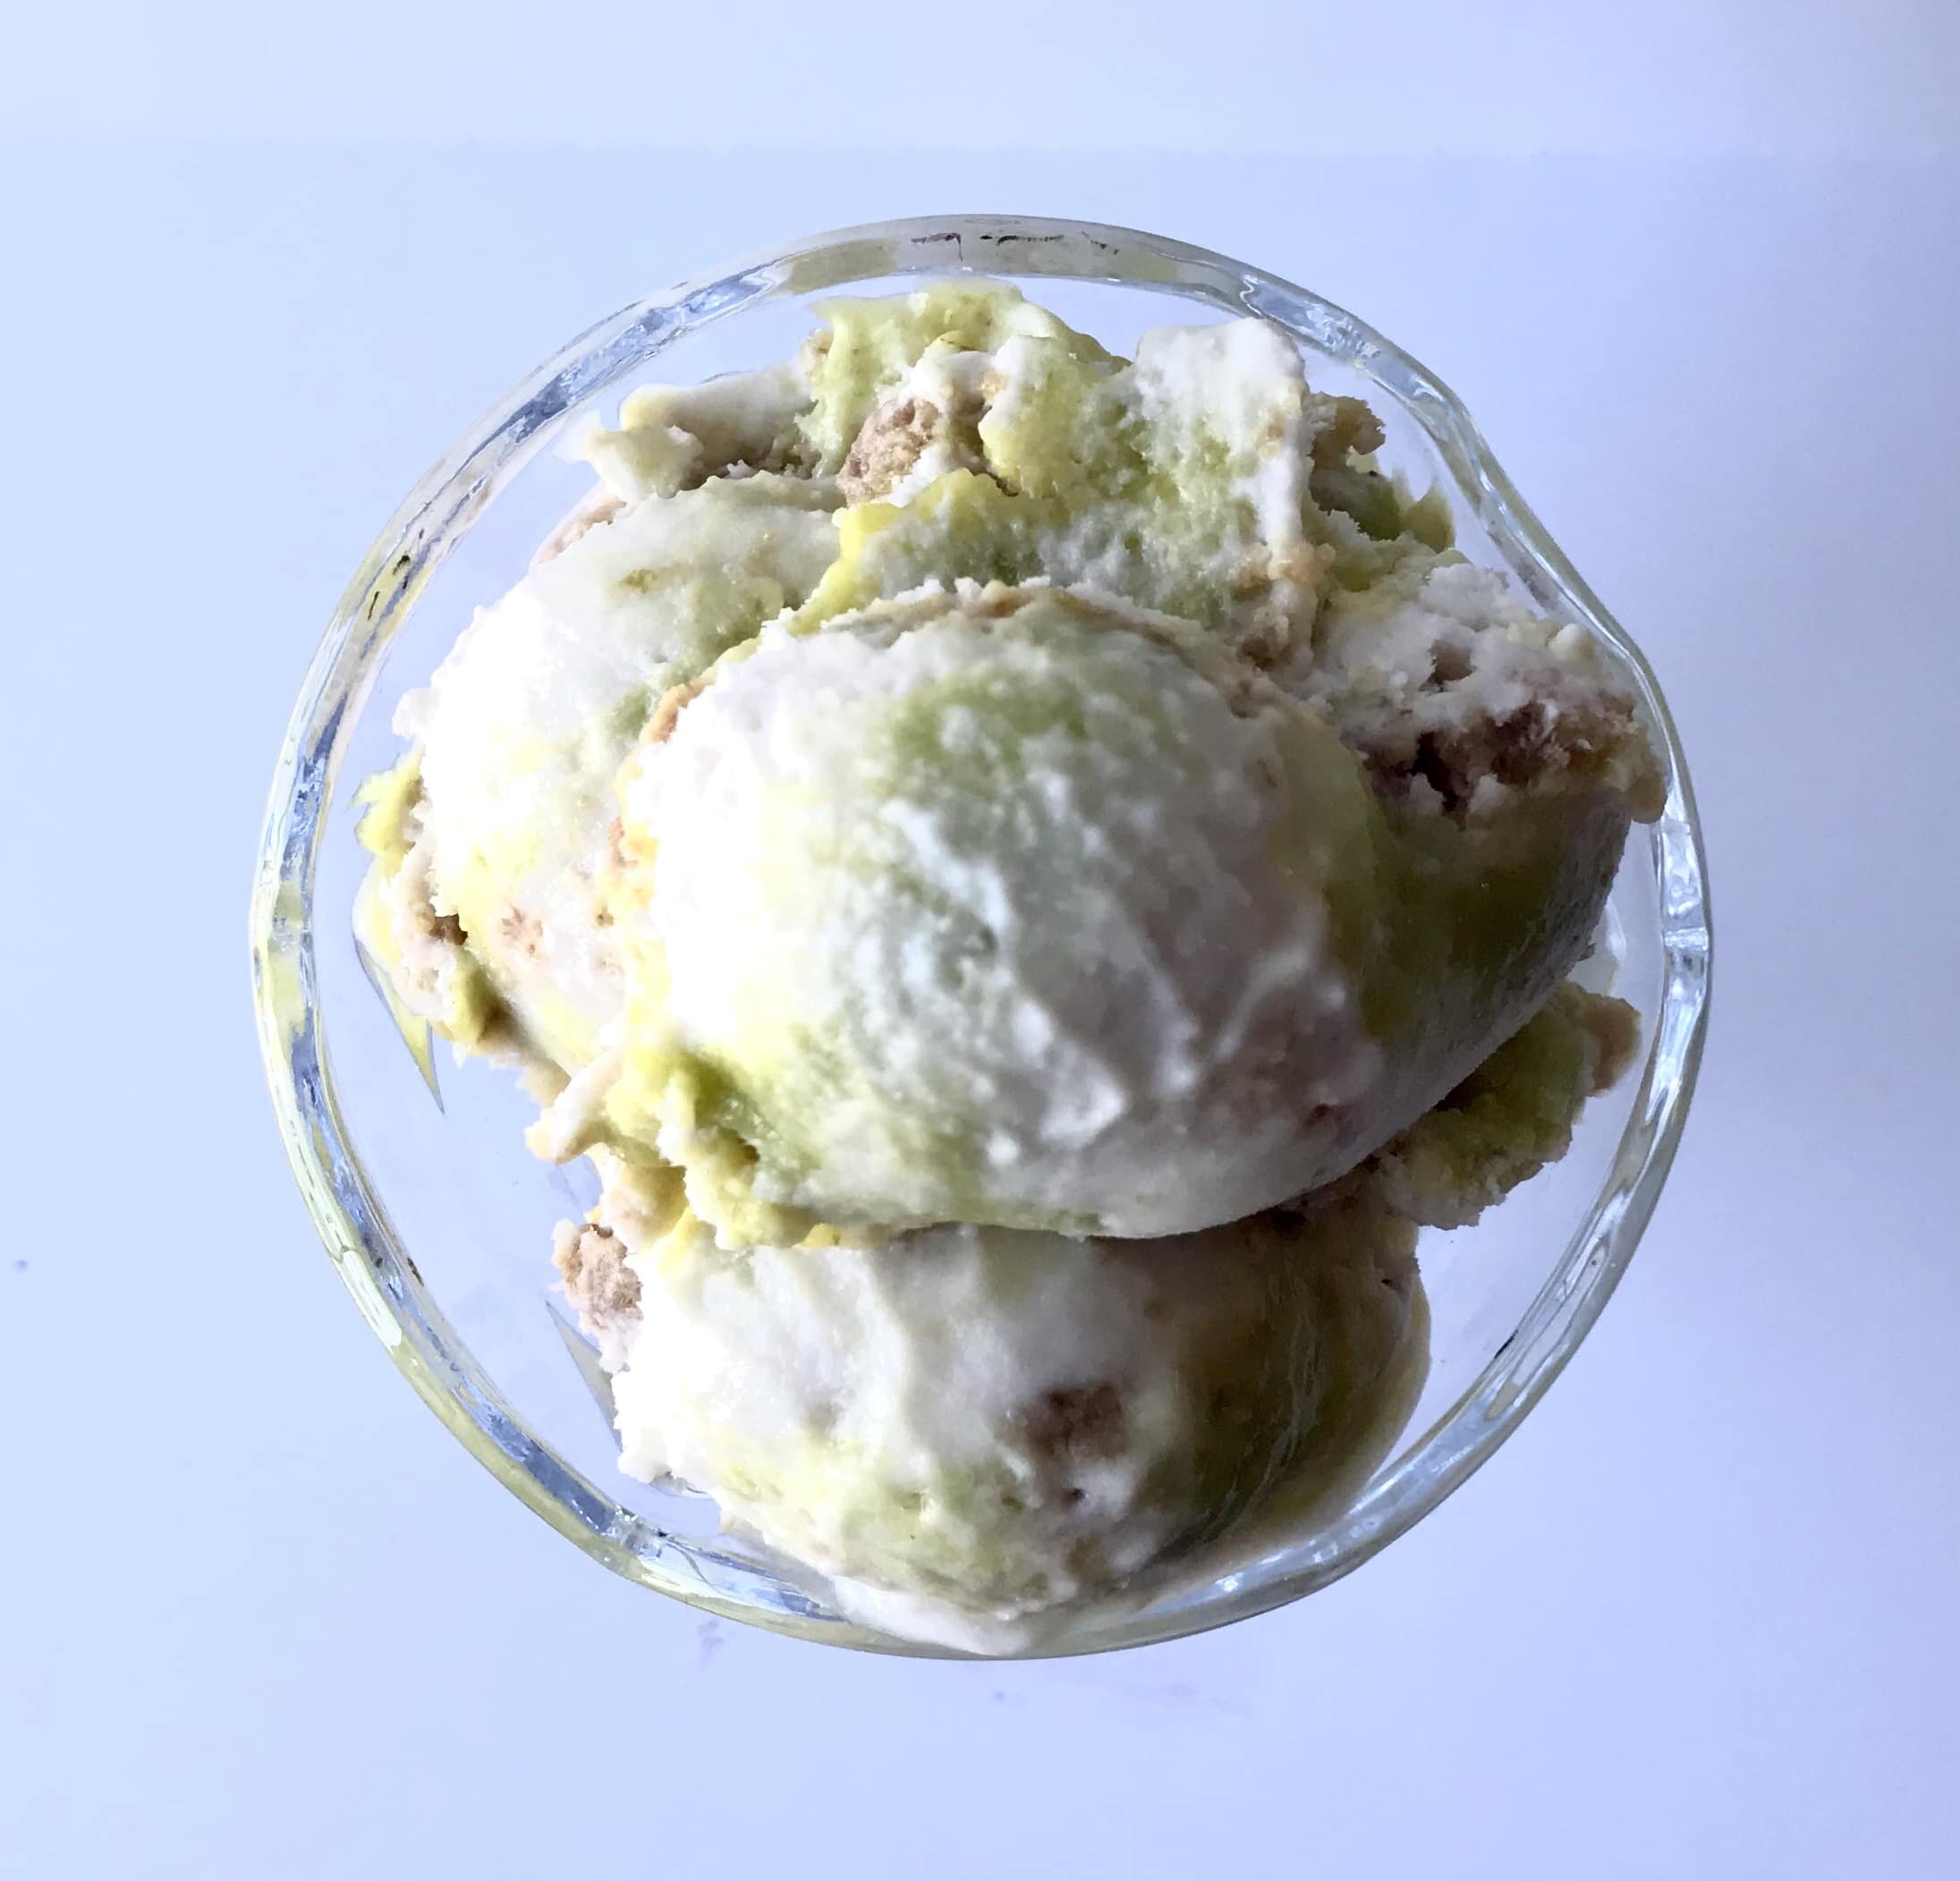
[mailerlite_form form_id=1]
[gallery size="medium" ids="4264,4265,4266"]
Above are some products that I personally use and recommend for this recipe and to have for everyday use. I highly recommend starting off with the cuisinart ice cream machine as your first ice cream maker. It's the cheapest one on amazon and I personally use it and love it! I also suggest getting a reusable ice cream container as well, it's dishwasher safe and you can use it over and over again!
______________________________________________________________________________________
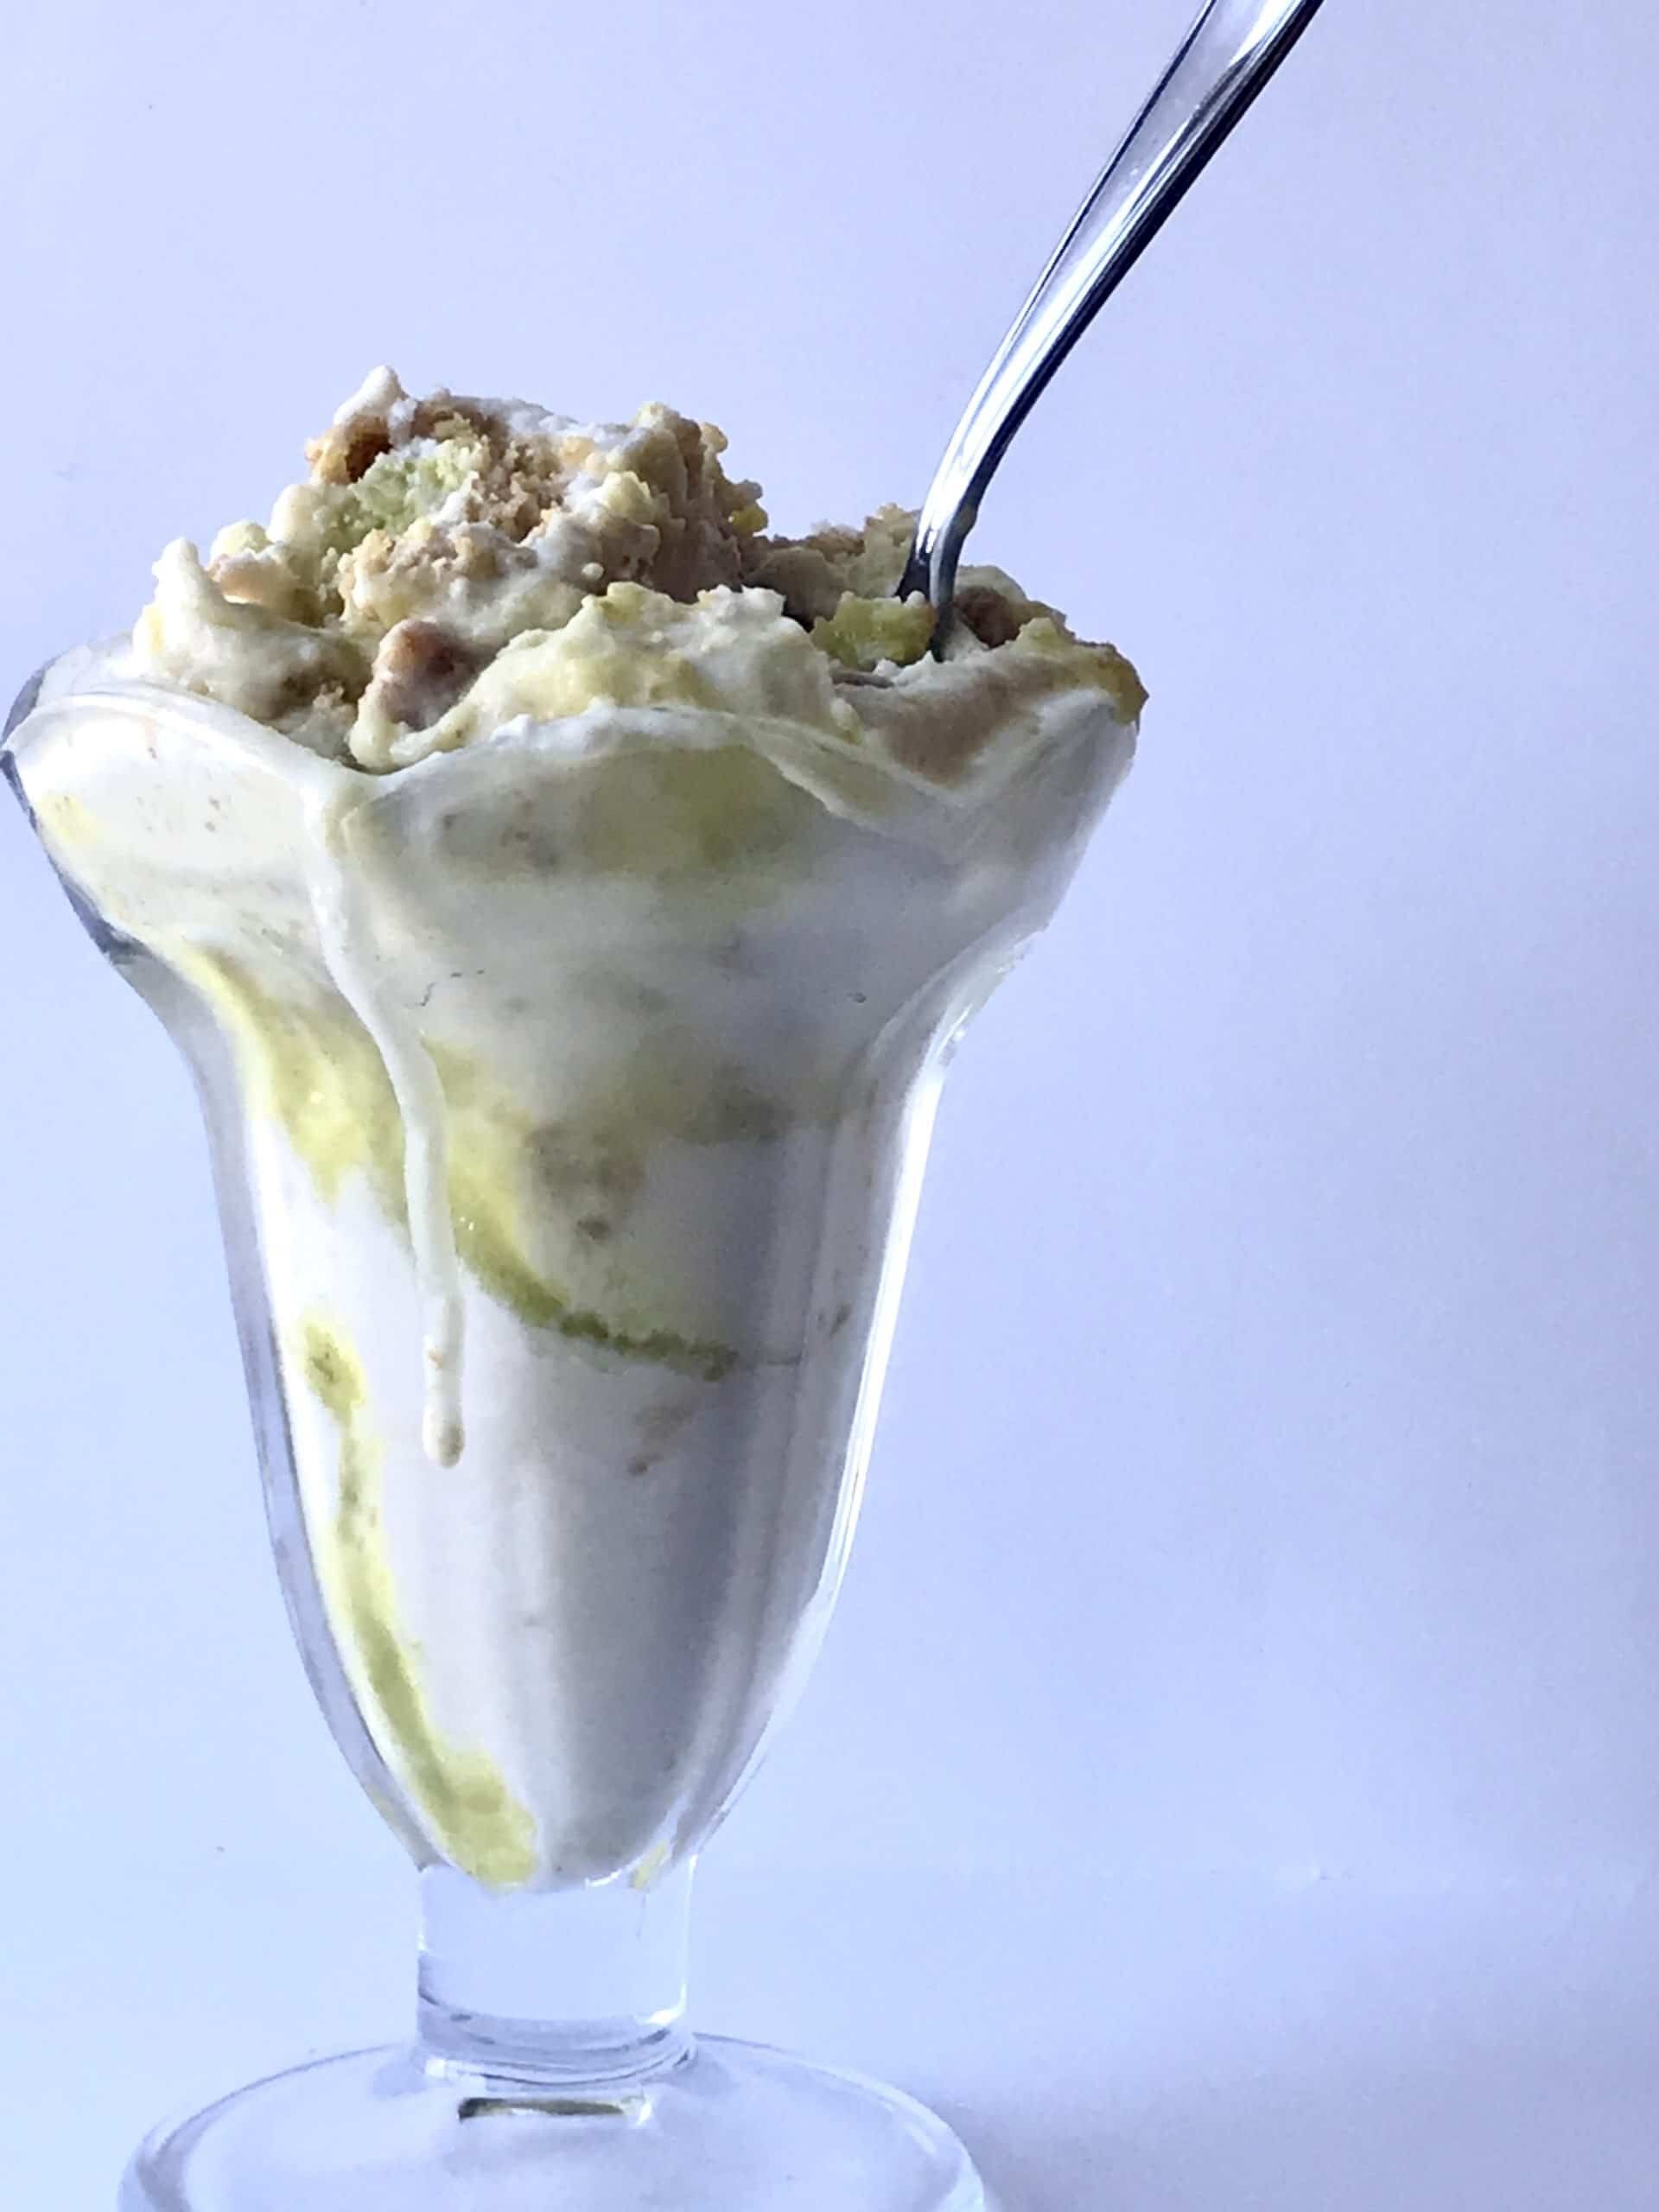
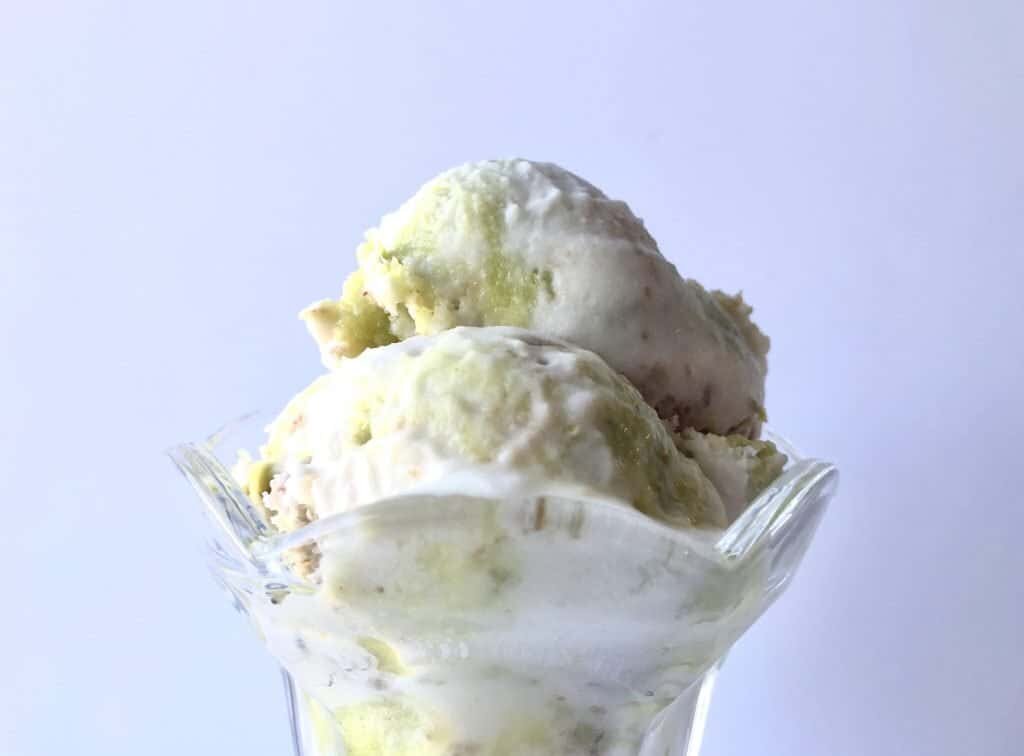
Key Lime Pie Ice Cream

a sweet and creamy vanilla ice cream swirled with key lime curd and graham crumbs.
ice cream
- 1 1/2 cup heavy cream
- 2 cup milk
- 1 cup granulated sugar
- 1 1/2 tsp vanilla
- pinch salt
key lime curd
- 1/2 cup lime juice
- 2 tsp lime zest
- 1 egg
- 3 egg yolks
- 1/2 tsp vanilla extract
- 2 tbsp unsalted butter (room temp)
graham crust
- 1/2 cup graham crackers (crushed)
- 3 tbsp butter (melted)
- pinch salt
ice cream
-
place the cream, milk, sugar and vanilla into a pot and bring to a boil, whisking to make sure the sugar dissolves. place the ice cream base into the fridge overnight to cool and to let the flavor increase. following the manufacturer's instructions of your ice cream machine, turn the base for 20-25 minutes. layer the ice cream with the lime curd and graham crust: ice cream, swirl in some lime curd and the top with a sprinkle of the graham. repeat! freeze until set and then eat all of the yummy ice cream!
key lime curd
-
in a small pot, combine the lime juice, lime zest, egg yolks, egg, vanilla, salt and sugar and whisk constantly over medium heat. make sure to continuously whisk to prevent the eggs from curdling. continue whisking until it starts to thicken. remove from the heat and add in the butter. strain through a fine mesh sieve and place cling wrap directly on top of the curd to prevent a skin from forming. place in the fridge until cool.
graham crumbs
- mix all of the ingredients together and spread a thin layer onto a sheetpan. bake at 350 degrees F for about 10 minutes. let cool.

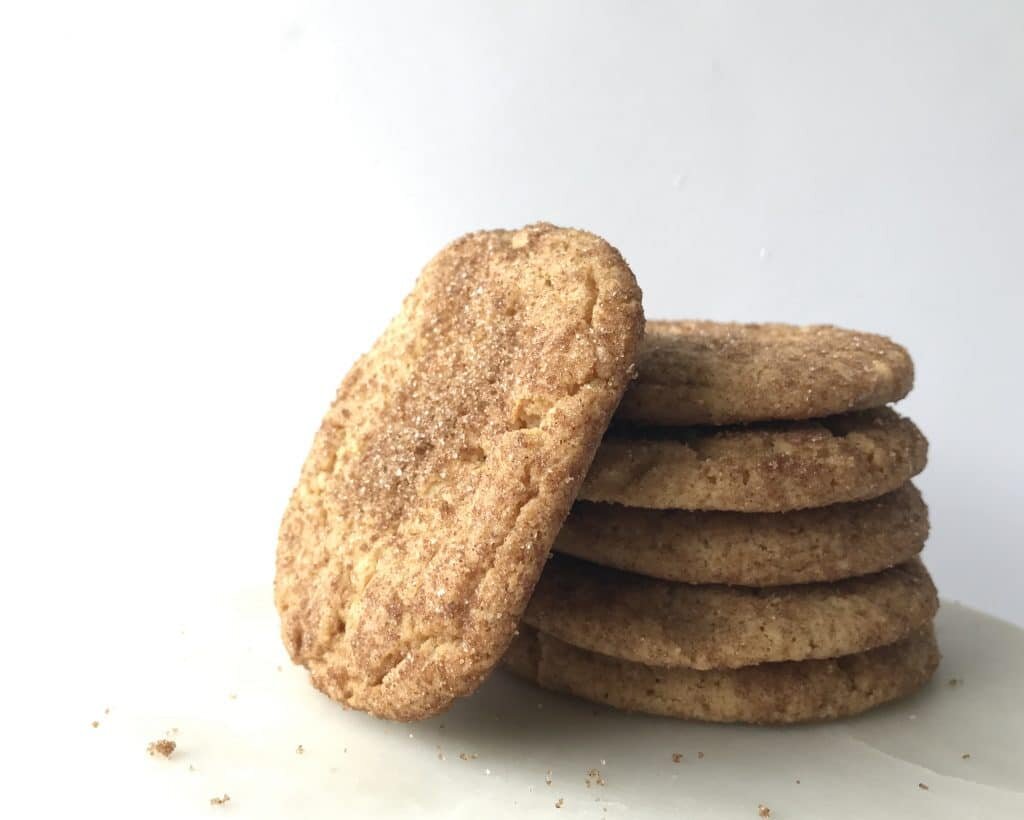
Snickerdoodles

[wprm-recipe-jump]
*Disclaimer: This post contains affiliate links. To learn more, please go here.These snickerdoodles are so good! They aren't the usual cinnamon spiced cookie you see though. I used brown sugar instead of granulated sugar to give it more depth in flavor and these do not disappoint! They are soft and not too sweet, but oh so good that it will satisfy your sweet tooth. These guys are a great treat to add to your cookie list for the holidays or even just to have something to snack on over the weekend. Kids will even love them in their lunch box.Now the reason these snickerdoodles are so good is because it's made with brown sugar! Brown sugar has molasses in it which adds so much flavor to whatever you make with it. I find that the brown sugar in these cookies elevates the cinnamon in them and just overall gives it a flavor boost. Plus I just love to bake with brown sugar!
[mailerlite_form form_id=1]
Above are some products that I personally use and recommend for this recipe and to have for everyday use. My absolute favorite is the BlueQ oven mitts. I have a collection of them and I love them! They are great quality and it's nice to have a kitchen item with a sense of humor.
__________________________________________________________________________________
Snickerdoodles
these snickerdoodles are soft and chewy and the cinnamon flavor is enhanced with the brown sugar.
- 2 sticks unsalted butter (room temp)
- 1 cup brown sugar
- 1 1/2 tsp vanilla extract
- 1 egg
- 1 tsp baking soda
- 1/2 tsp salt
- 1 tsp cream of tar tar
- 2 cup all-purpose flour
for rolling
- 1/4 cup brown sugar
- 2 tbsp granulated sugar
- 1 1/2 tsp cinnamon
-
Preheat the oven to 350 degrees F. Line a pan with parchment paper. In the bowl of an electric mixer fitted with a paddle attachment cream the sugar and the butter until light and fluffy, about 1 minute. Scrape down the side of the bowl and then add in the egg and vanilla. In another bowl combine the flour, baking soda, cream of tar tar, and salt and whisk together. Scrape down the sides of the bowl then on low speed, gradually add in the dry ingredients. In a small bowl mix the brown sugar, granulated sugar and cinnamon together. Scoop the cookie dough and roll in the cinnamon sugar and then bake for 8-10 minutes.

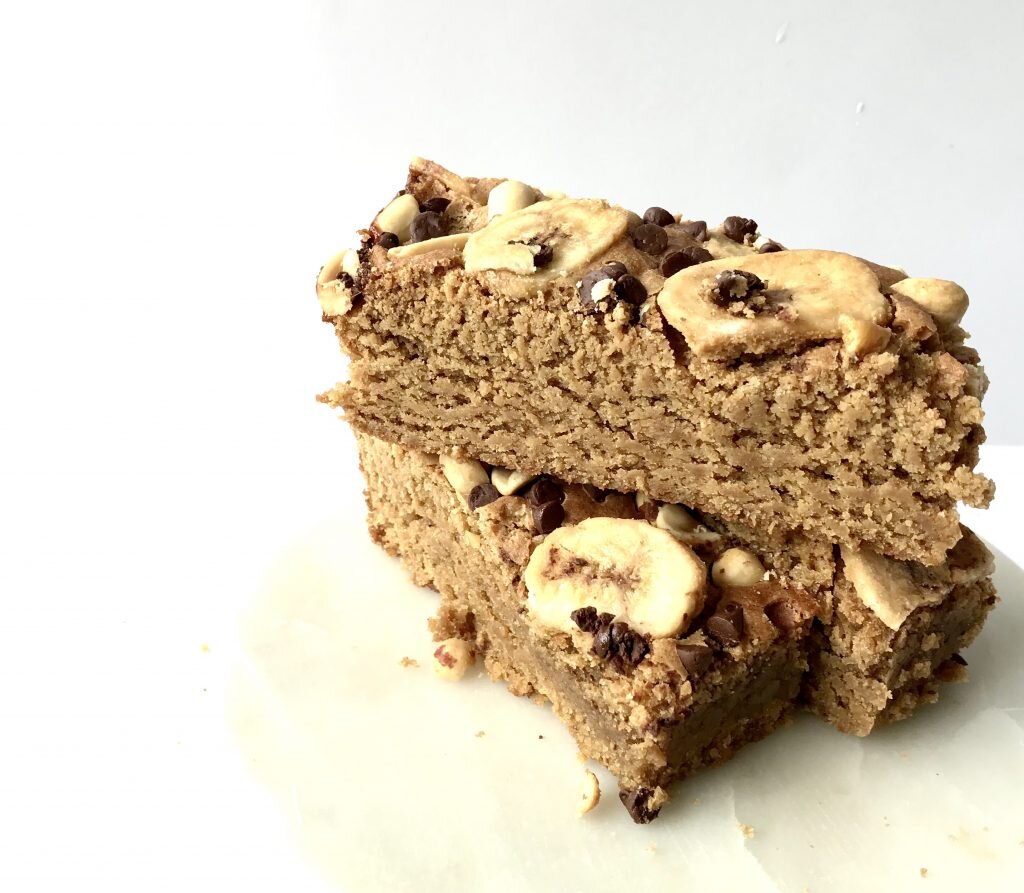
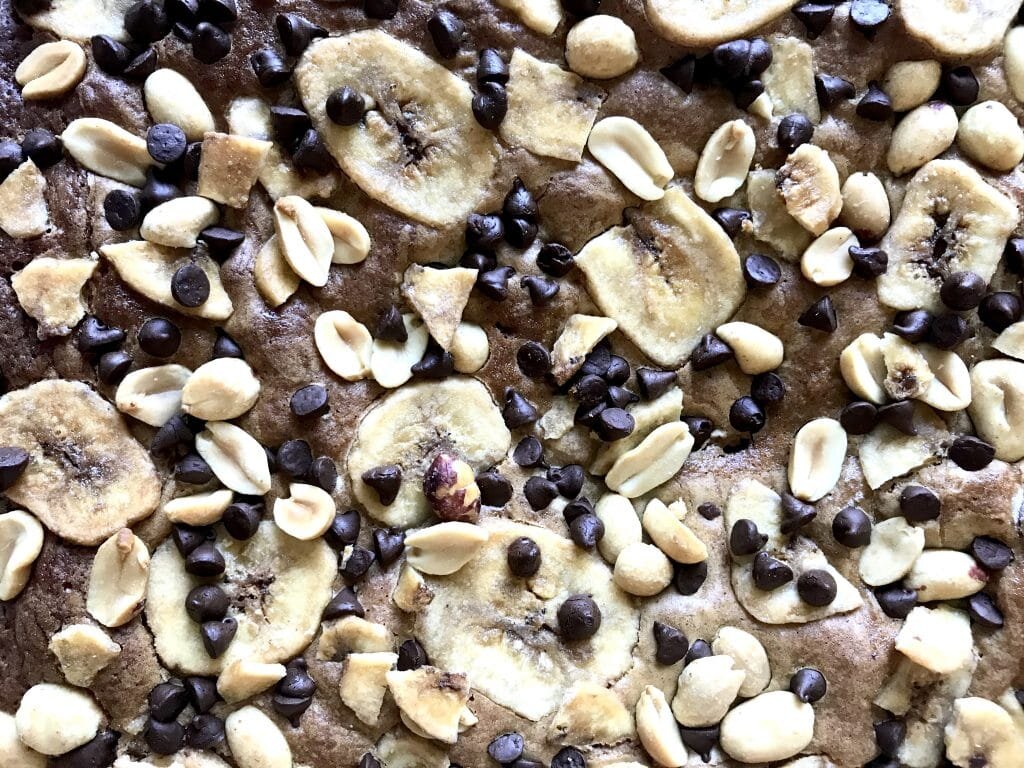
Chunky Monkey Blondies

[wprm-recipe-jump]
*This post contains affiliate links. To learn more please read the disclosure.These chunky monkey blondies are so much fun! A peanut butter blondie that is almost cake like but is dense and chewy at the same time is topped with chocolate, peanuts, and banana chips! What more could you need in a blondie???!! Now you don't need to get all fancy with the banana chips if you can't find them. I got mine at Target and I know that most grocery stores carry them. They can either be in the produce section with the nuts or in the baking aisle with all of the dried fruit. If you can't find them, than no worries! The blondies will be tasty either way since it's all peanut butter. Just add extra chocolate chips! Now these blondies are perfect for a back to school treat come fall and everyone will love them at the next bake sale!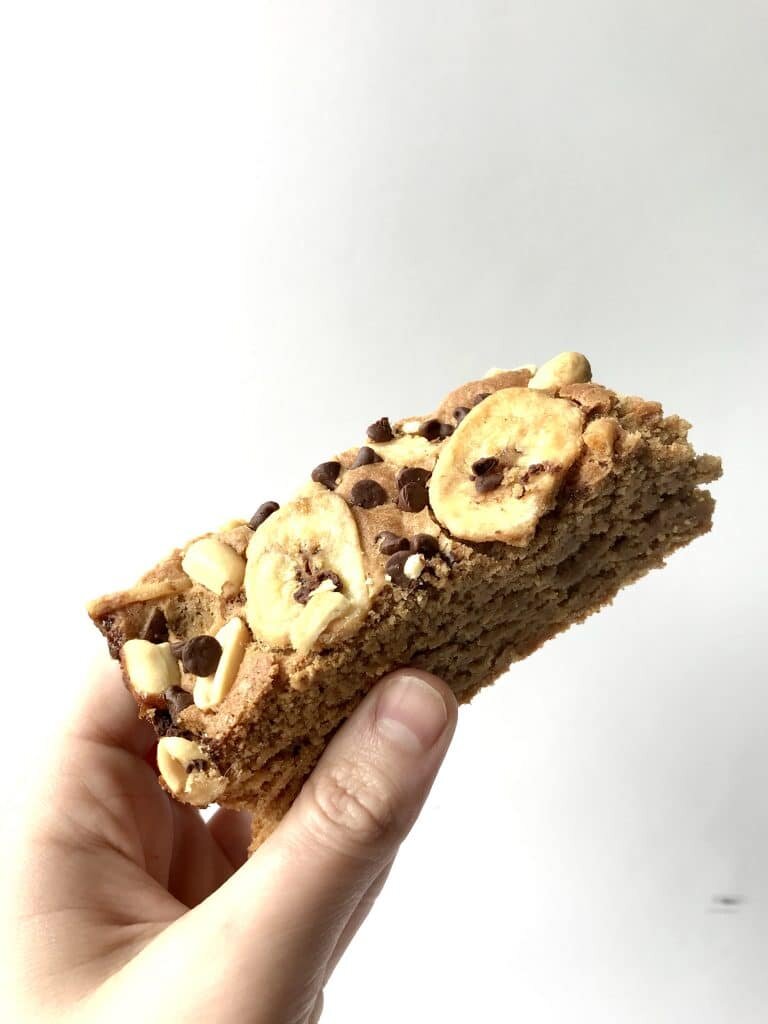
[mailerlite_form form_id=1]
Above are some products that I personally used to make these chunky monkey blondies. I recommend having a square 8x8 inch cake pan to make these but you can always use a casserole dish too. If you want the banana chips but can't find them at your local grocery store, so I provided a link!
_______________________________________________________________________________________
Chunky Monkey Blondies
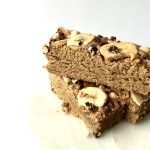
A peanut butter blondie that is topped with chocolate, peanuts and banana chips.
- 1 stick unsalted butter
- 1 cup creamy peanut butter
- 1 1/2 cup brown sugar
- 3 eggs
- 1 tbsp vanilla extract
- 1/2 tsp salt
- 1 1/2 tsp baking powder
- 1 1/2 cup all-purpose flour
- 1/4 cup chocolate chips (for topping)
- 1/4 cup peanuts (for topping)
- 1/4 cup banana chips (for topping)
-
Preheat the oven to 375 degrees F. Spray a 8 x8 inch cake pan and line with parchment. In a bowl, melt the butter and peanut butter in the microwave for 30 second bursts until melted and fully combined. Add in the brown sugar and vanilla extract and mix until fully combined. Slowly add in the eggs, mixing after each egg is added to prevent them from cooking. Whisk in the flour, baking powder and salt until there are no lumps. Pour the batter into the cake pan and sprinkle the chocolate chips, peanuts, and banana chips on top and bake for 30-35 minutes, or until a toothpick comes out clean. Let cool.

Cookie Butter Cake
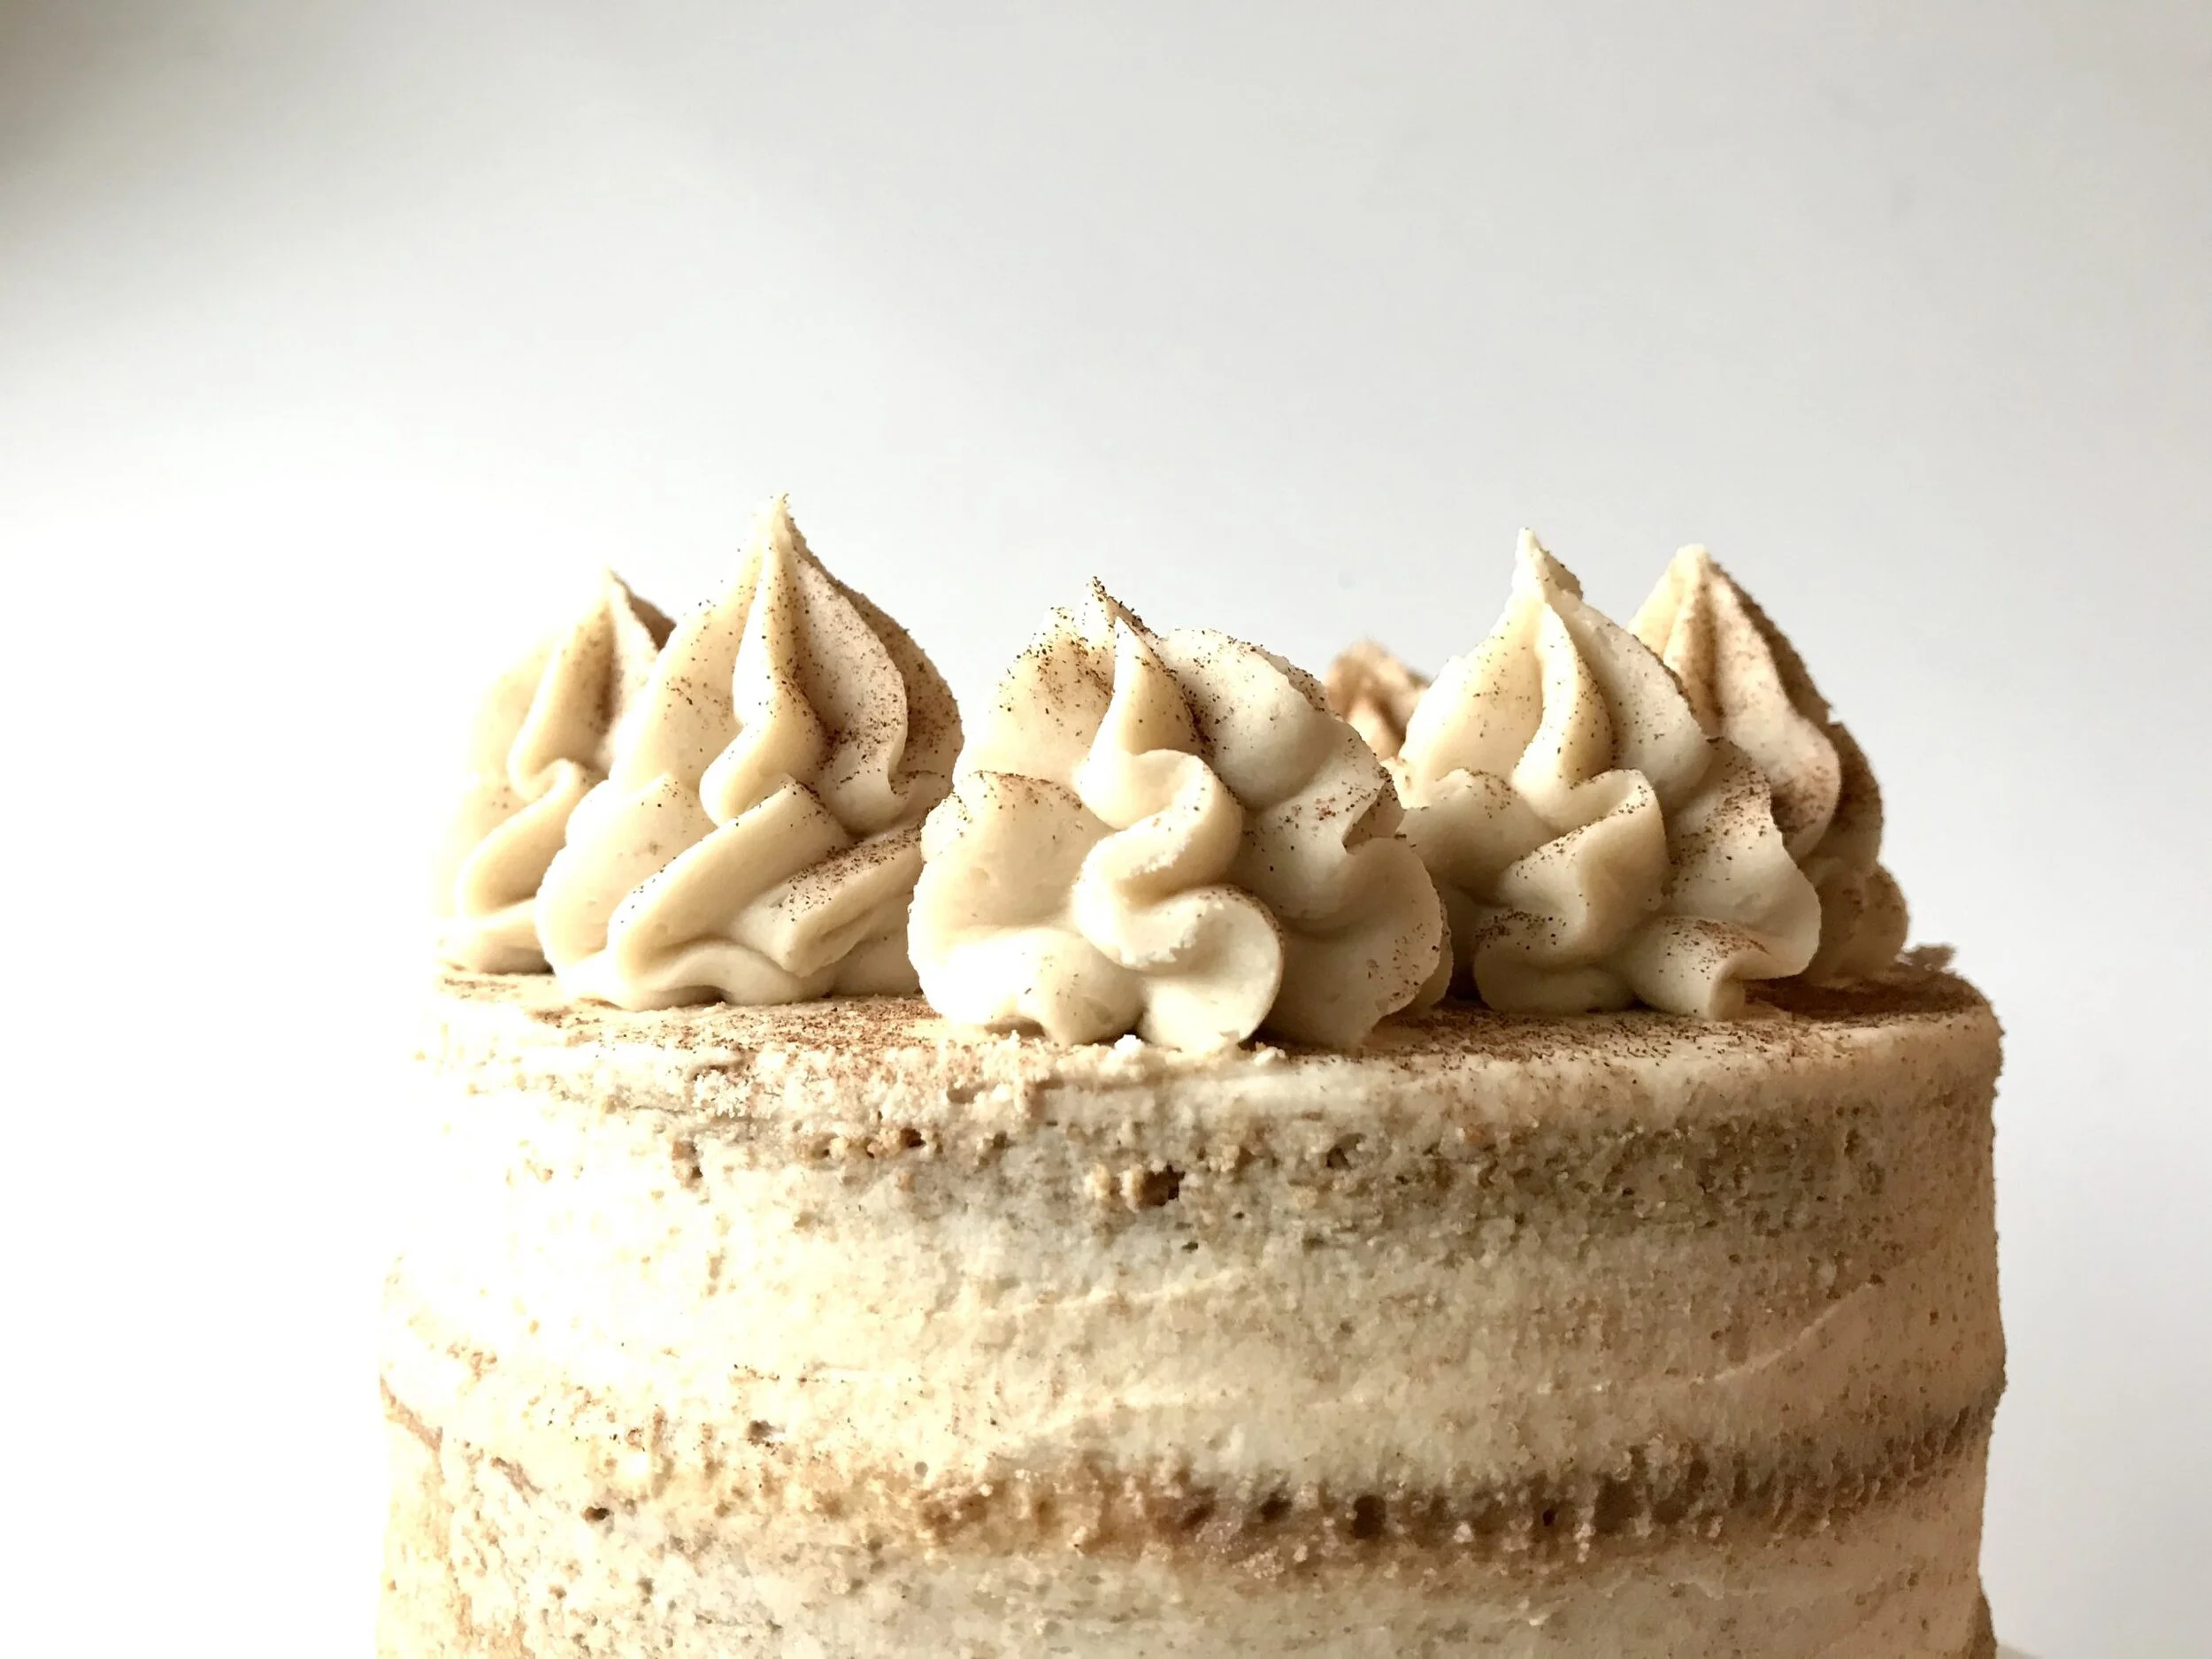
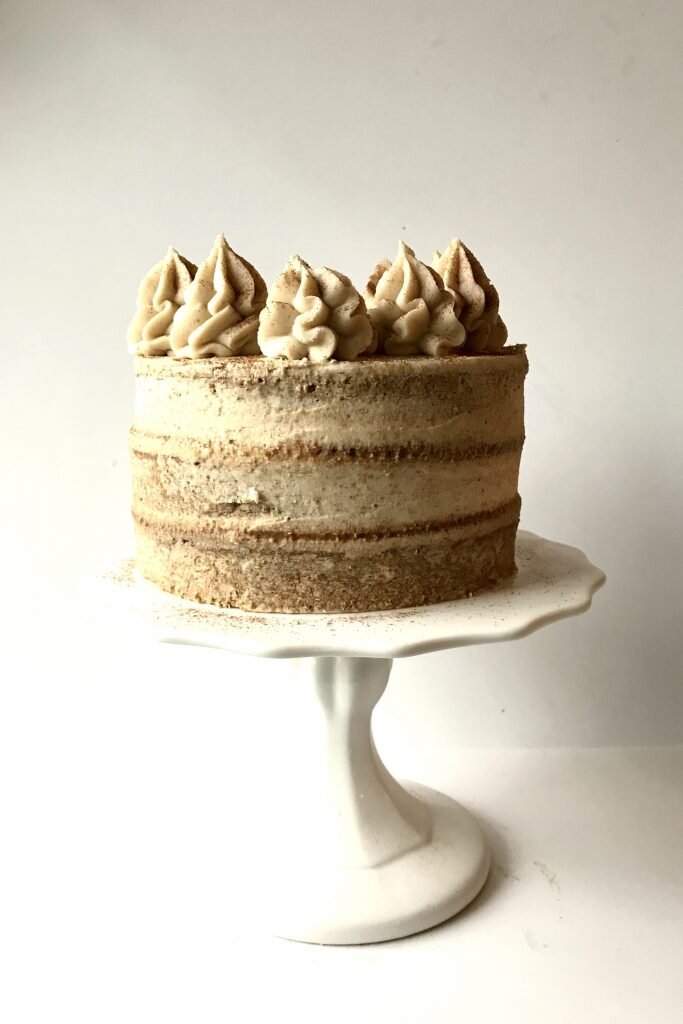
[wprm-recipe-jump]
*Disclaimer: This post contains affiliate links. To learn more, please go here.This cookie butter cake is lovely in flavor and everyone will absolutely love it! It's made with biscoff cookies and a homemade cookie butter filling. The cake layers are soft with lovely bits of cookie pieces spread throughout and the spiced filling makes it all come together with a thin layer of simple buttercream.If you don't want to make homemade cookie butter than that is completely ok. You can always go to your local grocery store and buy a small tub of cookie butter that is available and ready to go for you. But I do suggest getting a package of the biscoff cookies too so you can add it into the batter. You can also use the cookies to decorate the cake as well or just enjoy it as a little snack while you make this cookie butter cake too!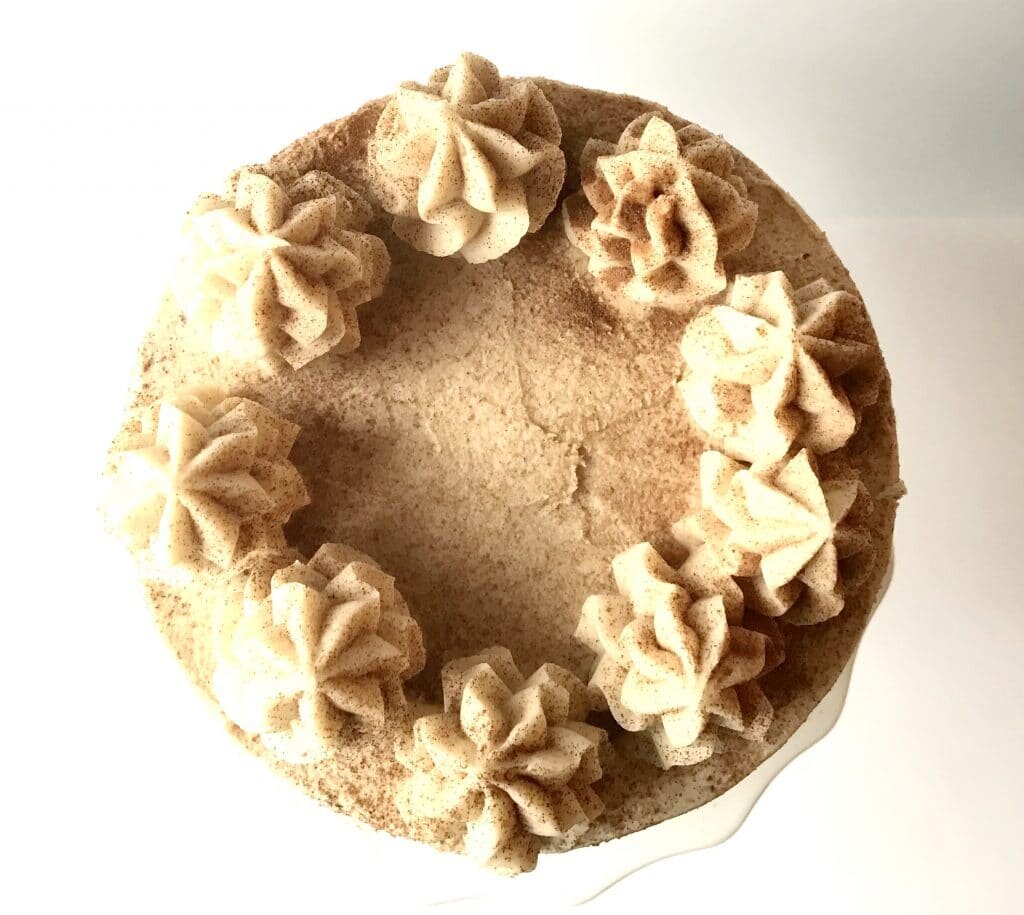
[mailerlite_form form_id=1]

Above are some products that I personally use and recommend for this recipe and to have for everyday use. Whenever I make a cake I will always use 6-inch cake pans. Growing up my mom didn't like having huge cakes in the fridge because no one would really eat it besides myself. That's when I came into the habit of making a smaller size layer cake instead which serves 8-10 people.
____________________________________________________________________________
cookie butter cake

this cookie butter cake is filled with a homemade biscoff cookie butter that gives it a nice spicey kick to it and lots of flavor!
makes one 3-layer, 6-inch cake
cake
- 2 cup all-purpose flour
- 3/4 cup granulated sugar
- 1 1/2 tsp baking soda
- 3/4 tsp salt
- 1/2 cup vegetable oil
- 2 eggs
- 1 tbsp vanilla extract
- 3/4 cup buttermilk
- 3/4 cup water
- 10 biscoff cookies (crushed)
cookie butter
- 20 biscoff cookies
- 1/2 tsp cinnamon
- pinch salt
- 1/2 cup powdered sugar
- 3 tbsp vegetable oil
- 4 tbsp unsalted butter (room temp)
buttercream
- 1 1/2 cup unsalted butter (room temp)
- 5 cup powdered sugar
- 1 tsp vanilla
- pinch salt
- 1/4 cup cookie butter (optional)
cake
- preheat the oven to 350 degrees F and line three 6-inch pans with parchment paper. in a large bowl, combine the flour, sugar, baking soda and salt and whisk together. in another bowl, combine the oil, eggs, vanilla, water, and buttermilk and whisk together. pour the wet ingredients into the dry and mix until fully combined. fold in the crushed biscoff cookie pieces. place the batter in the pan and bake for 30-35 minutes or until a toothpick comes out clean. let the cake cool for 10 minutes then carefully remove them from the pans to continue cooling. wrap in cling wrap until ready to use.
cookie butter
-
combine all of the ingredients into a food processor and pulse until the cookies are fine and everything comes together. let sit for an hour so it comes together and thickens.
buttercream
-
place the butter into a bowl of an electric mixer fitted with a paddle attachment. mix until smooth. scrape down the sides of the bowl and add in the rest of the ingredients. mix on slow speed and gradually increase the speed. let mix until fluffy and lighter in color, about 3 minutes. you can add in some cookie butter into the buttercream as well, but this is completely optional!
Funfetti Cookie Sandwiches

[wprm-recipe-jump]
*Disclaimer: This post contains affiliate links. To learn more, please go here.What's more fun than a cookie? A funfetti cookie sandwiches yummy cookie dough decorated with sprinkles and flavored with princess extract. Couldn't be any better than that! But then there is also the buttercream that is in between those cookies so that makes it so much better! Oh, and kids will absolutely love them too!These funfetti cookie sandwiches are made with princess extract, which is a delicious emulsion that I have in my kitchen at all times. (More about this down below.) If you don't want to buy the princess extract than that is completely up to you. You can use almond extract instead or just stick to plain vanilla. The flavor isn't what really matters with these cookies, it's the fun of the sprinkles that are mixed in them!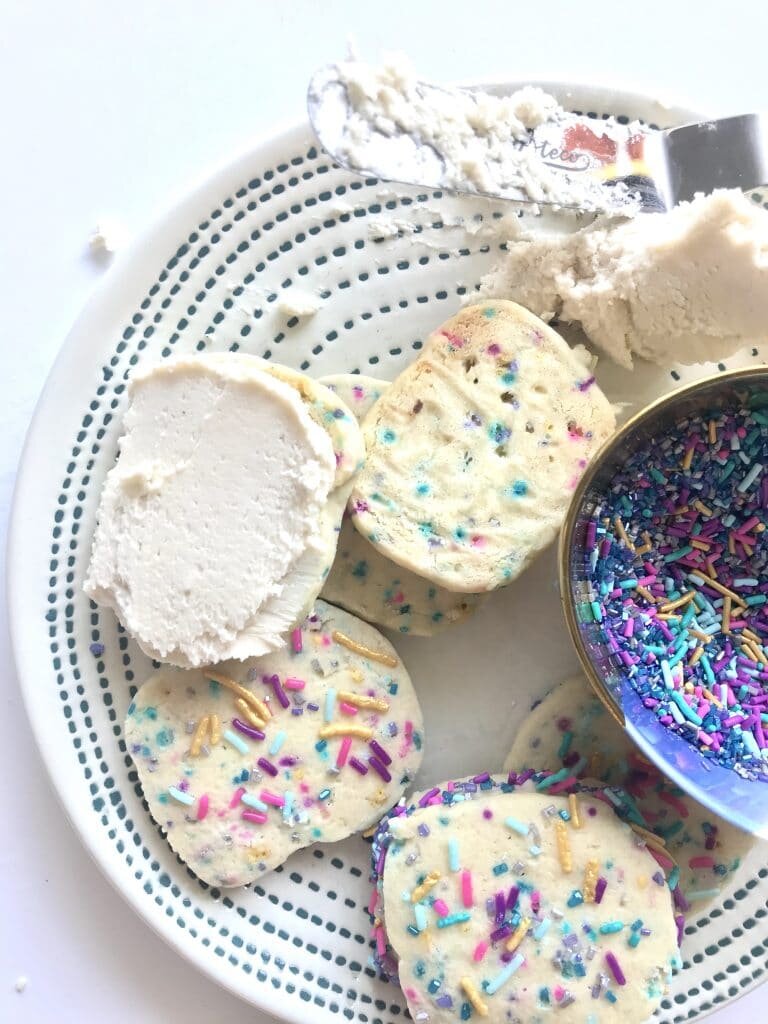
[mailerlite_form form_id=1]
Above are some products that I personally use and recommend for this recipe and to have for everyday use. One thing these cookies have in them is princess extract. Now this extract is delicious and is one of my favorite things to have in my kitchen at all times. It's a mix of vanilla, lemon and almond extracts and when they are all combined they make an addicting concoction.
_______________________________________________________________________________________
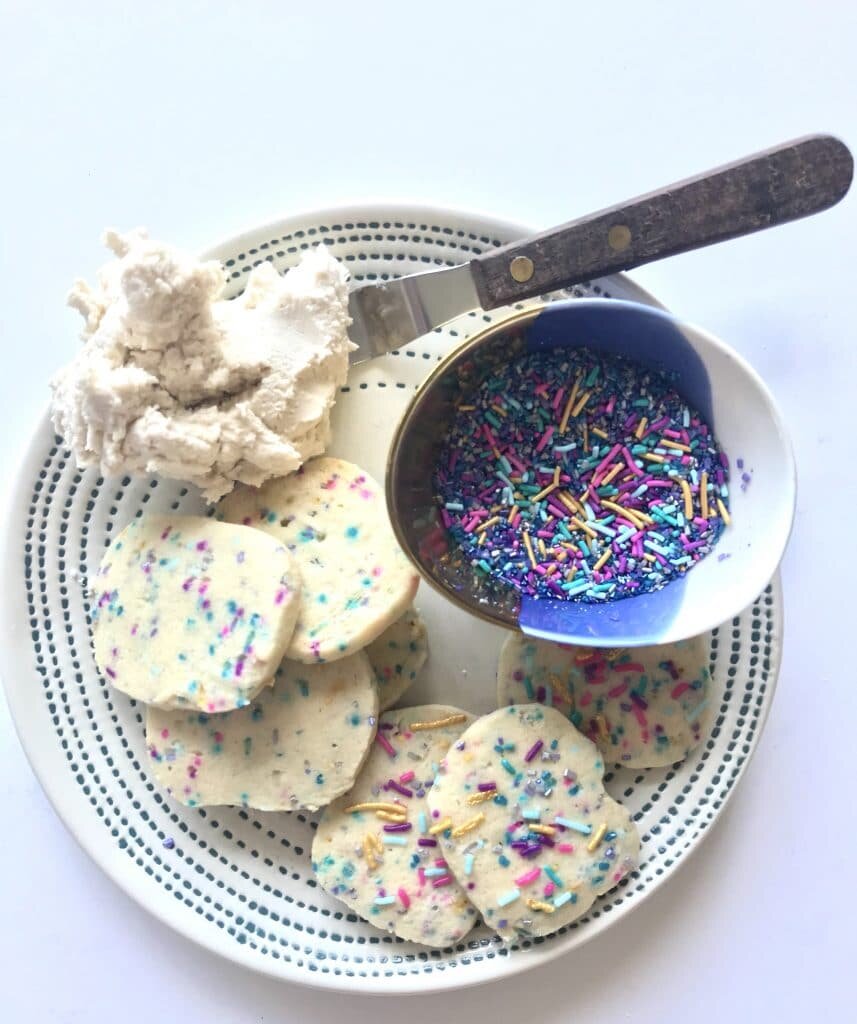
funfetti cookie sandwiches

shortbread cookies with a buttercream filling. flavored with princess extract and loaded with sprinkles!
cookies
- 1 1/2 sticks unsalted butter (room temp)
- 2/3 cup granulated sugar
- 1 egg
- 1 1/2 tsp princess extract
- 1/4 tsp salt
- 1 tsp baking powder
- 1/4 cup cornstarch
- 1 1/2 cup all-purpose flour
- 1/4 cup sprinkles (don't add in any sixlets chocolates if using a sprinkle blend)
buttercream
- 2 stick unsalted butter (room temp)
- 1 tsp princess extract
- 3 cup powdered sugar
- 1 tbsp water
cookies
- preheat the oven to 350 degrees F. in a bowl, combine the salt, baking powder, cornstarch, and flour; set aside. in another bowl, combine the butter and sugar and cream together with a paddle attachment until fluffy, about 1 minute. scrape down the sides of the bowl then add in the egg and princess extract. mix until incorporated, about 1 minute. scrape down the sides of the bowl again and then gradually add in the dry ingredients. fold in the sprinkles. roll the dough out into a log and wrap in cling wrap. place into the fridge for about 30 minutes. carefully cut the cookies with a sharp knife into 1/4 inch thick pieces and sprinkle a little more sprinkles on top of each cookie. place on a lined sheet pan and bake for 10-12 minutes. let cool. (you can roll them out and use cookie cutters too)
buttercream
- put all of the ingredients into the bowl of an electric mixer fitted with a whisk attachment. start slow and then gradually increase the speed. whip on high until light and fluffy, about 3 minutes. frost the cookies.

Bubble Gum Ice Cream

[wprm-recipe-jump]
*This post contains affiliate links. Please read disclosure to learn moreIt's super hot down here in Nashville compared to back home in North Dakota where they just had snow recently. I find it funny how there is such a huge difference in weather between both places, but being in the Nashville heat I want something cold, just not the snow. So why not have some bubble gum ice cream? It will bring out your inner child!If you don't want bubble gum as the flavor than I suggest using this cotton candy flavor instead. You don't need to add in any of the candy into the ice cream if you don't want to and cotton candy will make a great substitute for this childhood treat. Want to make it even better? If you opt for the cotton candy, than add some cotton candy clouds and make it into a sundae! Talk about a sugar overload!
[mailerlite_form form_id=1]
Above are some products that I personally use and recommend for this recipe and to have for everyday use. Besides the obvious ice cream machine, you will definitely need the bubble gum flavoring for this recipe. It's not necessary to have the bubble gum pieces per say, that is really just for texture and extra fun.
_____________________________________________________________________________________
bubble gum ice cream

creamy ice cream flavored with bubble gum flavoring and chunks of bubble gum pieces throughout makes this a childhood classic treat.
- 1 1/2 cup milk
- 1 cup heavy cream
- 3/4 cup granulated sugar
- pinch salt
- 2 tsp vanilla extract
- 1 tsp bubble gum flavor
- gum pieces
- food color (optional)
- place the cream, milk, sugar, bubble gum flavor, and vanilla into a pot and bring to a boil, whisking to make sure the sugar dissolves. place the ice cream base into the fridge overnight to cool and to let the flavor increase. following the manufacturer's instructions of your ice cream machine, turn the base for 20-25 minutes. once the ice cream is ready from turning it, add a drop of food coloring and let it swirl for a minute and then turn off the machine. swirl the ice cream with the gum pieces. freeze until set and then top with some sprinkles and eat all of the yummy ice cream!

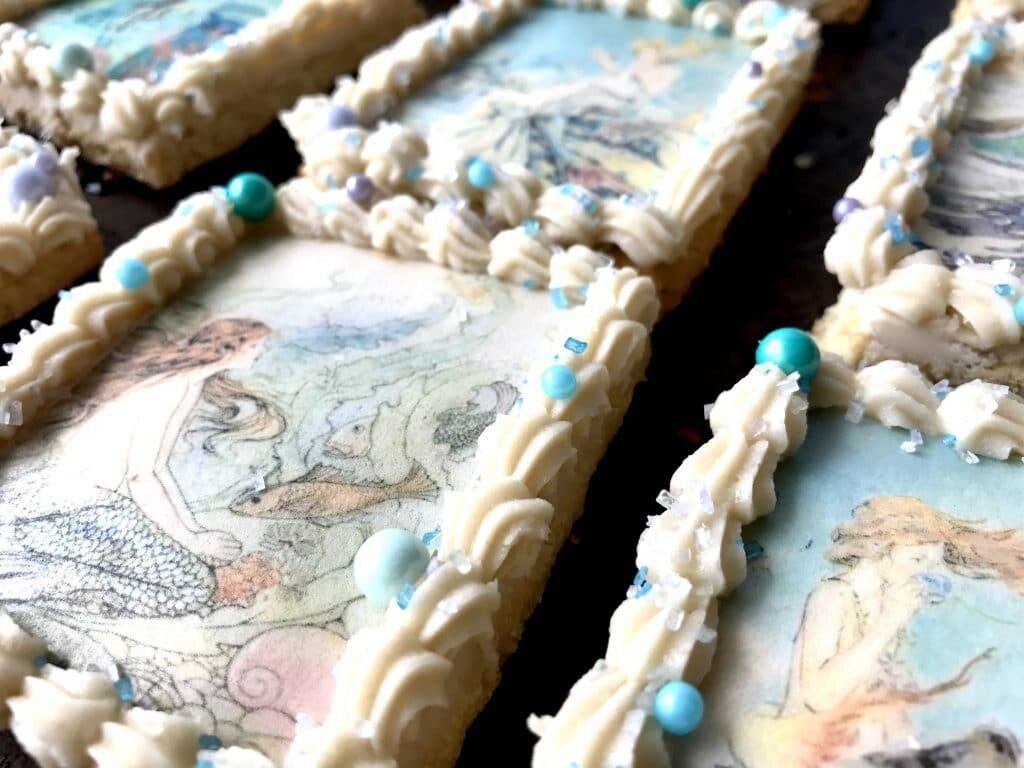
Coconut Sugar Cookies


[wprm-recipe-jump]
*Disclaimer: This post contains affiliate links. To learn more, please go here.These coconut sugar cookies are so simple and easy. Just like a regular cookie but with a little extra with coconut flour added into the mix. Coconut flour adds a nice flavor that way you don't need to add any of that fake coconut extract. You can firm the dough up in the fridge and cut out into desired shapes and even add on these super cute mermaid edible images or use whatever cookie cutter you like!Want to learn how to get images onto cookies and even cakes and chocolates? Then check out my new online edible printing course that will guide you through everything you need to know about edible printing, from start to finish! You won't regret it! Not too sure if you want to buy something so pricey if you aren't sure you'd like it? Ten you can certainly check out my array of edible paper images you buy and try out before making such a huge purchase. You can even buy these images here in my shop!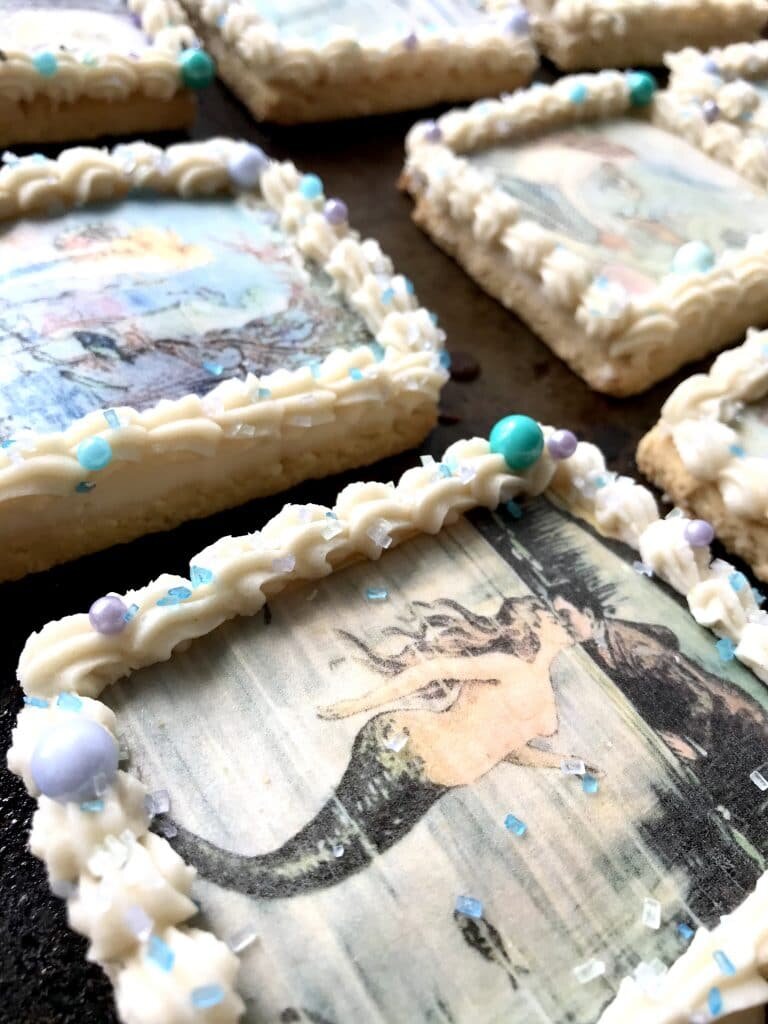
[mailerlite_form form_id=1]
[gallery columns="2" size="large" ids="4325,4329"]
Above are some products that I personally use and recommend for this recipe and to have for everyday use. When making these coconut sugar cookies you absolutely, no exception, have to use coconut flour! If you try to sub it out for regular flour or almond flour than they will not turn out the way they are supposed to. So please stick to the recipe or else it won't turn out for you. Coconut flour should be available at your local grocery store, otherwise I have provided a link for you to get it from amazon.
_________________________________________________________________________________
coconut sugar cookies

these cookies are made with coconut flour which gives it a natural coconut flavor. iced with a simple buttercream makes these sugar cookies complete and perfect for a summer treat.
- 2 sticks unsalted butter (room temp)
- 2/3 cup granulated sugar
- 1 1/2 tsp vanilla extract
- 1 egg
- 1/2 tsp salt
- 1 tsp baking soda
- 3/4 cup coconut flour
- 1 cup all-purpose flour
- 1/3 cup shredded coconut
-
preheat the oven to 350 degrees F. line a pan with parchment paper. in the bowl of an electric mixer fitted with a paddle attachment cream the sugar and the butter until light and fluffy, about 1 minute. scrape down the side of the bowl and then add in the egg and vanilla. in another bowl combine the coconut flour, flour, baking soda, and salt and whisk together. scrape down the sides of the bowl then on low speed, gradually add in the dry ingredients. add in the shredded coconut. wrap the dough into cling-wrap and refrigerate for 30 minutes. roll to 1/4 inch thickness and cut out with desired shapes and bake for 8-10 minutes. enjoy as is or ice with your favorite royal icing or simple buttercream.